
Vanden Plas L6-4.2L (1982)
Housing Assembly HVAC: Service and Repair
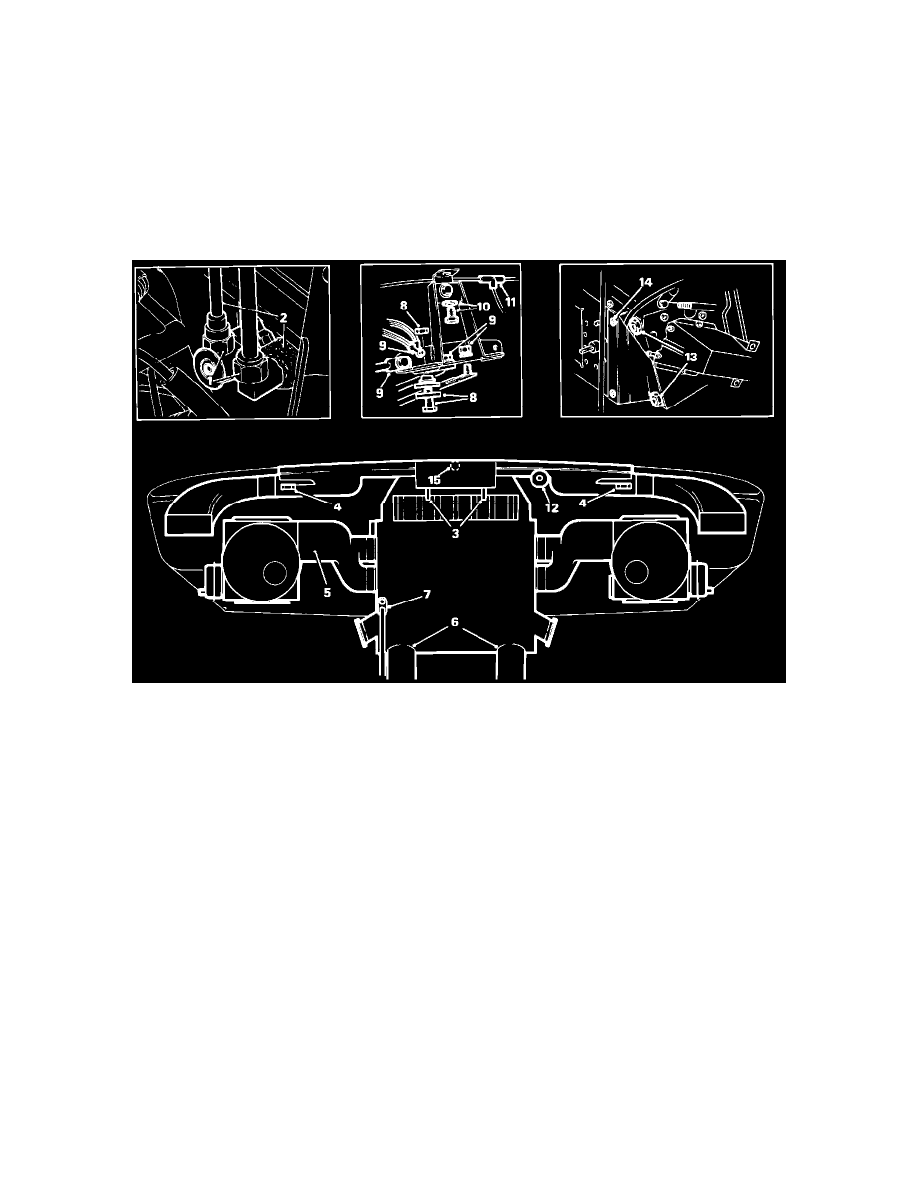
AIR CONDITIONING UNIT
- Disconnect the battery earth lead.
- Withdraw the steering wheel and the adjuster assembly from the upper steering column.
- Remove the left and right hand underscuttle casing.
- Remove the instrument panel module and carefully remove switch panel.
- Withdraw the air conditioning knobs from the air conditioning selector switches, remove the radio, remove the screws securing the facia and the
console to the air conditioning unit.
- Remove the glove box liner.
- Slacken the nuts securing the top rear portion of the facia to the bulkhead, remove the bolts securing the sides of the facia to the bulkhead, remove the
nut securing the main light switch, displace the switch and carefully remove the facia from the car.
A/C Unit
- Disconnect the air conditioning hoses at the bulkhead connectors to the expansion valve on the engine compartment (1).
- Disconnect the coolant hoses at the heater bulkhead connectors in the engine compartment.
- Remove the nuts securing the air conditioning unit to the bulkhead (2).
- Unclip the main harness from the securing clips on the screen rail (3).
- Remove the bolts securing the demist duct support rail to the body mounting points and remove the support rail (4).
- Disconnect the pliable ducting between the air conditioning unit and the blower motors from the stub pipes (5).
- Remove the rear compartment ducts (6).
- Remove the nuts and bolts securing the unit support stays (7); recover the stays.
- Remove the automatic gearbox selector quadrant cover.
- Remove the bolts securing the upper steering column to the mounting bracket, remove the spacers and the packing washers (8).
- Remove the bolts securing the earth leads and the support stays to the steering column mounting bracket. Retain the washers (9).
- Remove the bolt securing the mounting bracket to the screen rail (10) and retain the bracket.
NOTE:To facilitate refitting, it is advised that the position of all the electrical multipin connectors are noted and marked. The position and the routes of
all the vacuum pipes noted and marked.
- Disconnect the blower motor flap vacuum pipes at the tee piece (11), and the demister duct vacuum pipe at the servo (12).
- Disconnect the main panel harness electrical connectors and remove the harness from the securing clips.
- Remove the nuts securing the air conditioning switch panel to the air conditioning unit (13) and remove the screws securing the mode switch cover,
retain the switch cover (14).
- Disconnect the mode switch vacuum pipes and the mode switch electrical connectors.
- Disconnect the earth cable and the motor harness multi-pin at the air conditioning main harness.
- Disconnect the remaining block connectors including the multi-pin connector of the windscreen wiper motor harness at the bulkhead.
- Disconnect the ambient and in car sensors Ease the drain tubes clear of the grommets in the transmission tunnel, ease the main panel harness clear of