
Comanche 4WD L6-242 4.0L VIN S MFI (1992)
7.
Install front bearing race in housing using suitable driver.
8.
Lubricate pinion bearings, insert pinion assembly into housing, then install collapsible spacer, front pinion bearing, companion flange and pinion
nut. Use original spacer and pinion nut for adjustment purposes, as they must be renewed for final assembly and preload adjustment.
9.
Hold companion flange with suitable tool and tighten pinion nut just enough to eliminate endplay.
10.
Note pinion depth marking and calculate desired pinion depth as follows:
a.
If number is positive (+) add that many thousandths to specified nominal pinion depth.
b.
If number is negative ( - (+) subtract that many thousandths from specified nominal pinion depth.
c.
Record result of calculation for final shim selection.
11.
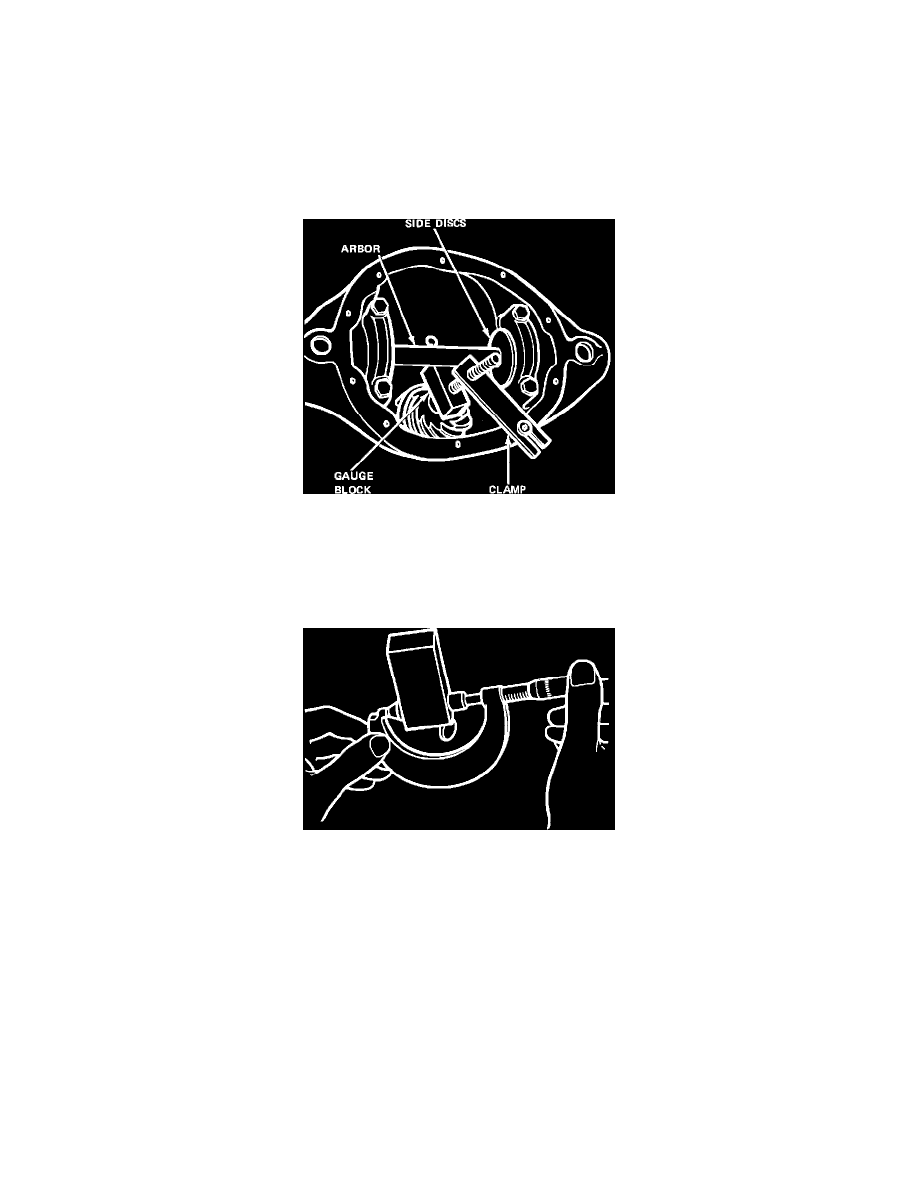
Assemble side bearing discs on arbor J-5223-4 or equivalent. Use two J-5223-23 discs for 8-7/8 inch ring gear or 3 J-6381-2 discs for 7-9/16 inch
ring gear.
Fig. 4 Pinion Depth Gauge Installation
12.
Mount arbor and disc assembly in housing, ensuring discs are seated in side bearing webs. Install caps and tighten bolts snugly.
13.
Mount gauge block J-5223-20 with anvil seated on pinion face, install clamp assembly and extend clamp bolt to secure position of gauge block.
14.
Loosen gauge block thumb screw to release plunger. When plunger contacts arbor, tighten thumb screw without disturbing plunger.
15.
Remove clamp assembly, then the gauge block and plunger.
Fig. 5 Measuring Gauge Block To Determine Pinion Installation Depth
16.
Measure distance from end of gauge block anvil to end of plunger to obtain measured pinion depth, and record measurement.
17.
Remove bearing caps, arbor and disc assembly, drive pinion and bearings, rear pinion bearing race and depth adjusting shims.
18.
Measure thickness of pinion depth adjusting shim, add this dimension to measured pinion depth obtained in step 16, and record sum.
19.
To obtain proper pinion depth shim thickness, subtract desired pinion depth obtained in step 10 from sum of measured pinion depth and shim
thickness obtained in step 18. Remainder is proper pinion depth shim thickness.
PINION INSTALLATION & PRELOAD ADJUSTMENT
1.
Install selected pinion shim, ensuring shim is centered in rear bearing bore and that chamfer faces housing.
2.
Install rear pinion bearing race using suitable driver to seat race.
3.
Lubricate pinion bearings, insert pinion and rear bearing assembly into housing, then install new collapsible spacer and front bearing.
4.
Lubricate seal lips of new pinion seal with axle lubricant, then install seal using tool J-22661 or equivalent.
5.
Install companion flange and new pinion nut.
6.
Hold companion flange with suitable tool and tighten pinion nut just enough to eliminate endplay, rotating pinion as nut is tightened to seat
bearings.
7.
Measure pinion rotating torque (bearing preload) using suitable torque wrench.