Commander 2WD V8-5.7L (2008)

17. Evacuate the refrigerant system See: Service and Repair/Refrigerant System Evacuate.
18. Charge the refrigerant system See: Service and Repair/Refrigerant System Charge.
19. Initiate the Actuator Calibration function using a scan tool. Refer to HVAC System Test. See: Testing and Inspection/Component Tests and
General Diagnostics/HVAC System Test
Rear HVAC Housing Removal
REMOVAL
WARNING: Refer to the applicable warnings and cautions for this system before performing the following operation See: Service
Precautions/Warning and See: Service Precautions/Caution. Failure to follow the warnings and cautions could result in possible personal
injury or death.
NOTE: The rear HVAC housing must be removed from the vehicle for service of the mode door actuator, blend door actuator, blower motor
and blower motor resistor and, it must be disassembled for service of the A/C evaporator, heater core, mode-air door and blend-air door.
NOTE: Illustration shown with rear body cradle removed for clarity.
1. Disconnect and isolate the negative battery cable.
2. Recover the refrigerant from the refrigerant system See: Service and Repair/Refrigerant System Recovery.
3. Drain the engine cooling system See: Engine, Cooling and Exhaust/Cooling System/Service and Repair.
4. Raise and support the vehicle.
5. Remove the right rear tire and wheel assembly and the right rear quarter liner See: Body and Frame/Fender/Front Fender/Front Fender
Liner/Service and Repair/Removal.
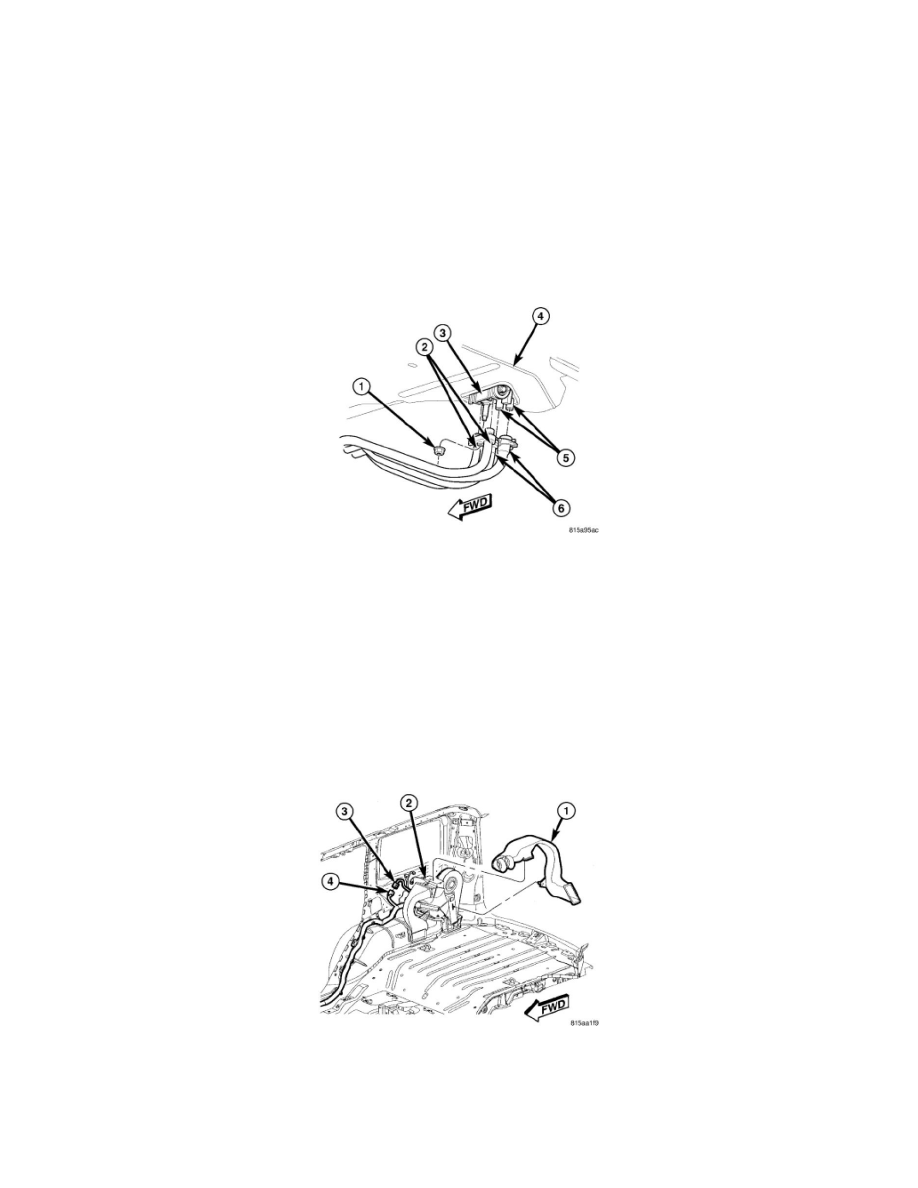
6. Remove the nut (1) that secures the underbody refrigerant lines (2) to the rear A/C expansion valve (3) which extends through the rear floor panel
(4) behind the right rear wheel housing.
7. Disconnect the rear underbody refrigerant lines from the rear A/C expansion valve and remove and discard the O-ring seals.
8. Install plugs in, or tape over the opened underbody refrigerant line fittings and rear expansion valve ports.
9. Disconnect the rear heater hoses (6) from the rear heater core tubes (5) which extends through the rear floor panel.
10. Lower the vehicle.
11. Remove the right interior quarter trim panel See: Body and Frame/Interior Moulding / Trim/Trim Panel/Service and Repair/Quarter Panel
Trim/Quarter Trim Panel - Removal.
12. Disengage the retainer that secures the distribution duct (1) to the rear of the HVAC housing (2) and remove the duct
13. Disconnect the rear HVAC wire harness connector (3) from the body wire harness connector (4).
