Grand Cherokee 2WD Limited V8-4.7L (2002)

3.
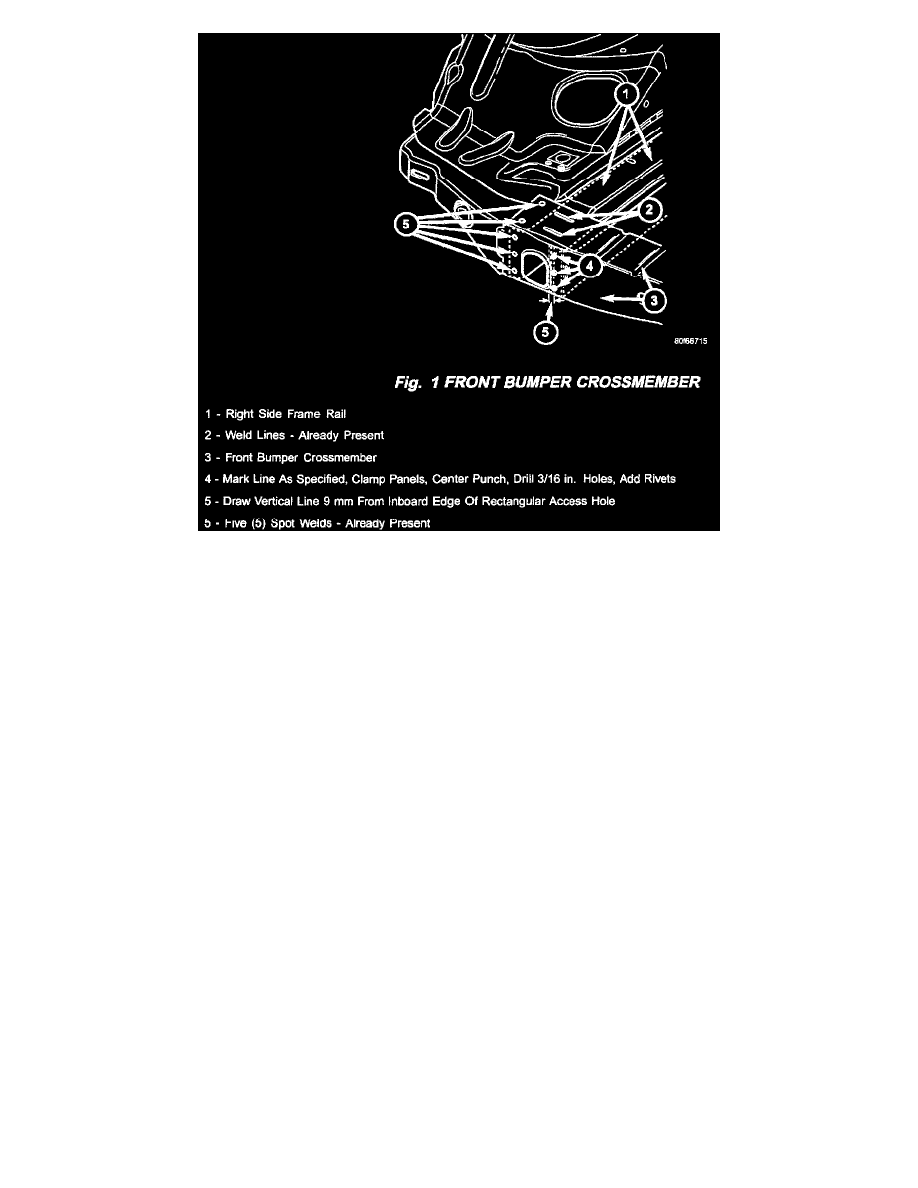
Draw a vertical line from top to bottom across the width of the front crossmember. The vertical line should be positioned so that it is 9 mm to the
right, and parallel to, the inboard vertical edge of the right access hole (in the crossmember). See illustration (Fig. 1).
4.
Mark the vertical line in three places as illustrated. Each top and bottom mark is to be 20 mm (.750 in.) from the top and bottom edge of the
crossmember respectively. The middle mark is to be centered at 50 mm (2.0 in.) from the top and bottom edge of the crossmember.
5.
Center punch all three marks to prevent drill bit drift and improperly positioned holes.
6.
Position locking pliers through the rectangular hole in the crossmember. Tightly clamp the crossmember panel to the frame rail edge flange.
Position the locking pliers so that it will not interfere with the drilling of the three holes or with the heads of the rivets when they are installed.
7.
Using a 3/16 size drill bit, drill a hole at each of the three marks made on the vertical line. Drill all the way through both metal panels (the
crossmember and frame rail edge flange).
8.
Make sure the area around the three drilled holes are free of metal burrs. Install a suitable corrosion resistant material (e.g. paint primer) to the
drilled holes.
9.
With the two panels securely held together by the locking pliers, install a rivet (p/n 34201208) in each drilled hole.
10.
Remove the locking pliers.
11.
Move to the rectangular access hole located at the left side (driver side) of the front bumper crossmember.
12.
Perform steps 2 through 10 in a similar manner so that the installed rivets are positioned along the inboard edge of the driver side rectangular
access hole. The left side repair should mirror the repairs made to the right side.
13.
Verify that the squeak-like sound condition has been corrected.
14.
Install both end caps and screws.
15.
Install the front fascia and grill.
POLICY:
Reimbursable within the provisions of the warranty.
