
Grand Cherokee 4WD L6-242 4.0L VIN S MFI (1993)
Cylinder Head Gasket: Service and Repair
Cylinder Head Installation
INSTALLATION
The engine cylinder head gasket is a composition gasket. The gasket is to be installed DRY. DO NOT use a gasket sealing compound on the gasket.
If the engine cylinder head is to be replaced and the original valves used, measure the valve stem diameter. Only standard size valves can be used with
a service replacement engine cylinder head unless the replacement head valve stem guide bores are reamed to accommodate oversize valve stems.
Remove all carbon buildup and reface the valves.
1. Remove the shop towels from the cylinder bores. Coat the bores with clean engine oil.
2. Position the engine cylinder head gasket (with the numbers facing up) onto the cylinder block.
CAUTION: Engine cylinder head bolts should be reused only once. Replace the head bolts if they were used before or if they have a paint dab on
the top of the bolt.
3. With bolt # 14 held in place (tape around bolt), install the engine cylinder head. Remove the tape from bolt # 14.
4. Coat the threads of stud bolt # 11 with Loctite 592 sealant, or equivalent.
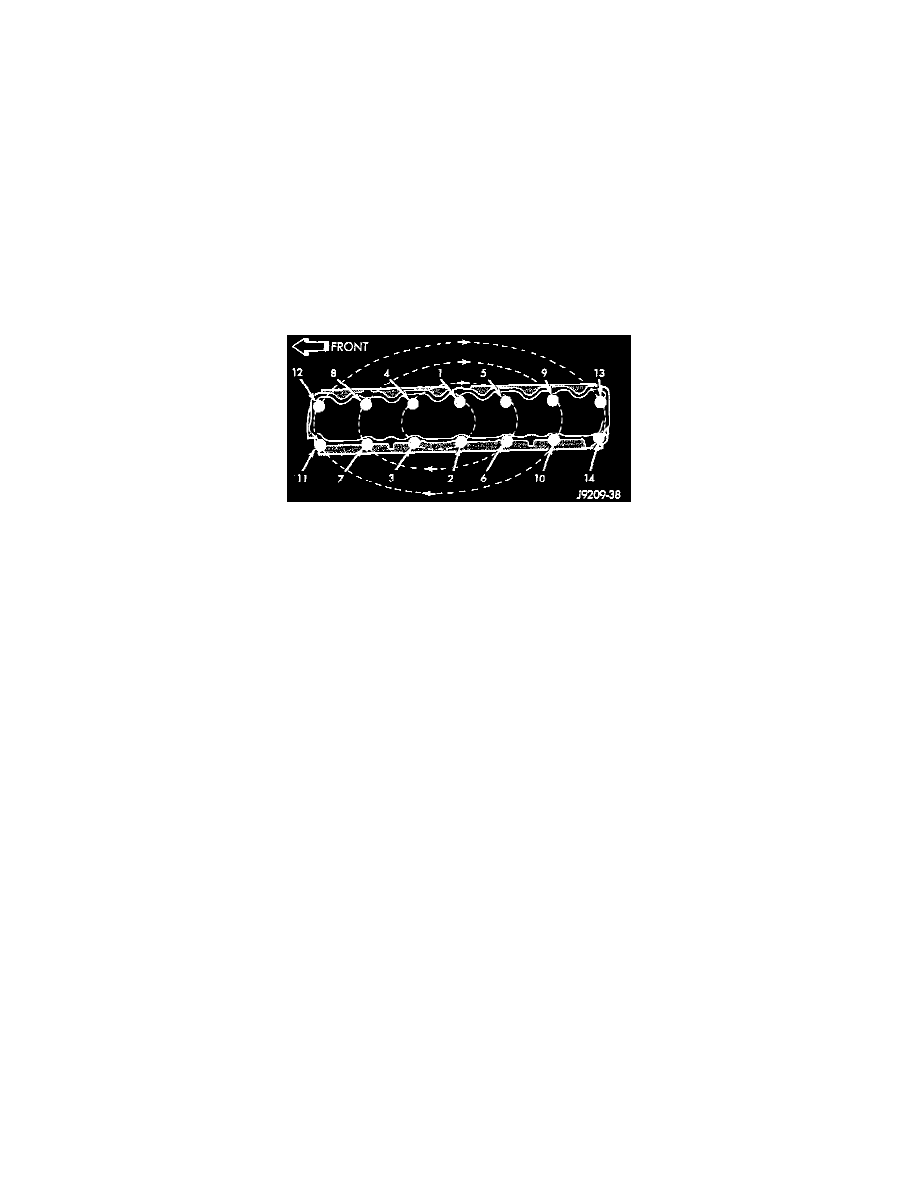
Fig. 7 Engine Cylinder Head Bolt Tightening Sequence
5. Tighten the engine cylinder head bolts in sequence according to the following procedure Fig. 7:
a. Tighten all bolts in sequence (1 through 14) to 30 Nm (22 ft. lbs.) torque.
b. Tighten all bolts in sequence (1 through 14) to 61 Nm (45 ft. lbs.) torque.
c. Check all bolts to verify they are set to 61 Nm (45 ft. lbs.) torque.
d. Tighten bolts (in sequence):
^
Bolts 1 through 10 to 149 Nm (110 ft. lbs.) torque.
^
Bolt 11 to 136 Nm (100 ft. lbs.) torque.
^
Bolts 12 through 14 to 149 Nm (110 ft. lbs.) torque.
CAUTION: During the final tightening sequence, bolt # 11 will be tightened to a lower torque than the rest of the bolts. DO NOT overtighten
bolt # 11.
e. Check all bolts in sequence to verify the correct torque.
f.
If not already done, clean and mark each bolt with a dab of paint after tightening. Should you encounter bolts which were painted in an earlier
service operation, replace them.
6. Install the ignition coil and bracket assembly
7. Connect the temperature sending unit wire connector.
8. Install the spark plugs and tighten to 37 Nm (27 ft. lbs.) torque. Connect the ignition wires.
9. Install the intake and engine exhaust manifolds. Refer to Engine/Intake Manifold/Service and Repair for the proper procedure.
See: Intake Manifold/Service and Repair
10. Install the fuel lines and the vacuum advance hose.
11. If equipped, attach the power steering pump and bracket.