Liberty 2WD V6-3.7L (2008)

1. Place the passenger airbag on a suitable work surface with the housing (1) facing up. Be certain to take the proper precautions to prevent the
airbag door from receiving cosmetic damage during the following procedures.
2. Carefully position the passenger airbag instrument panel bracket (3) over the two studs on the top of the airbag housing.
3. Install and tighten the two nuts (2) that secure the bracket to the studs on the housing. Tighten the nuts to 20 Nm (15 ft. lbs.).
4. Reinstall the passenger airbag onto the instrument panel. See: Assembly/Installation.
Assembly - Door
ASSEMBLY - DOOR
WARNING: To avoid serious or fatal injury on vehicles equipped with airbags, disable the Supplemental Restraint System (SRS) before
attempting any steering wheel, steering column, airbag, Occupant Classification System (OCS), seat belt tensioner, impact sensor, or
instrument panel component diagnosis or service. Disconnect and isolate the battery negative (ground) cable, then wait two minutes for the
system capacitor to discharge before performing further diagnosis or service. This is the only sure way to disable the SRS. Failure to take the
proper precautions could result in accidental airbag deployment.
WARNING: To avoid serious or fatal injury, service of this unit should be performed only by DaimlerChrysler-trained and authorized dealer
service technicians. Failure to take the proper precautions or to follow the proper procedures could result in accidental, incomplete, or
improper airbag deployment and possible occupant injuries.
WARNING: To avoid serious or fatal injury, use extreme care to prevent any foreign material from entering the passenger airbag, or becoming
entrapped between the passenger airbag cushion and the passenger airbag door. Failure to observe this warning could result in occupant
injuries upon airbag deployment.
WARNING: To avoid serious or fatal injury, the passenger airbag door must never be painted. Replacement airbag doors are serviced in the
original colors. Paint may change the way in which the material of the airbag door responds to an airbag deployment. Failure to observe this
warning could result in occupant injuries upon airbag deployment.
NOTE: The following procedures can be used to replace the passenger airbag door. If the passenger airbag is deployed, the passenger airbag
unit and the airbag door must both be replaced.
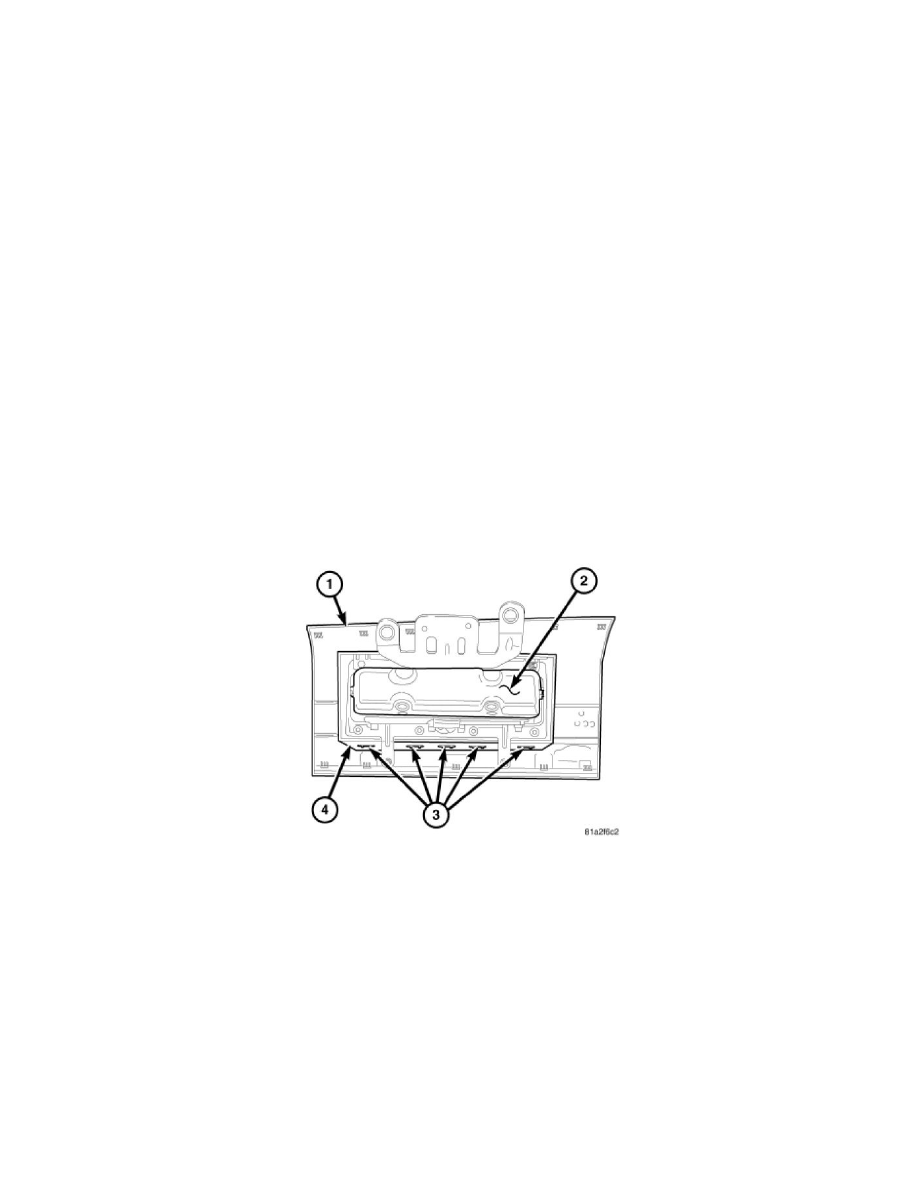
1. Place the passenger airbag door (1) on a suitable work surface with the airbag receptacle (4) facing up. Be certain to take the proper precautions to
prevent the airbag door from receiving cosmetic damage during the following procedures.
2. Carefully position the passenger airbag housing (2) into the airbag door receptacle.
3. Work around the perimeter of the unit engaging each of the nine hooks (3) on the housing through the windows in the upper and lower walls of the
airbag door receptacle.
4. After the passenger airbag has been assembled, try pulling the airbag door and the airbag housing away from each other. Visually verify that this
action has fully seated all of the windows of the airbag door into the cradles of the airbag housing hooks.
5. Reinstall the passenger airbag into the instrument panel. See: Assembly/Installation.
Installation
INSTALLATION
WARNING: To avoid serious or fatal injury on vehicles equipped with airbags, disable the Supplemental Restraint System (SRS) before
attempting any steering wheel, steering column, airbag, Occupant Classification System (OCS), seat belt tensioner, impact sensor, or
instrument panel component diagnosis or service. Disconnect and isolate the battery negative (ground) cable, then wait two minutes for the
system capacitor to discharge before performing further diagnosis or service. This is the only sure way to disable the SRS. Failure to take the
proper precautions could result in accidental airbag deployment.
