
Liberty Sport 2WD L4-2.4L VIN 1 (2002)
10.
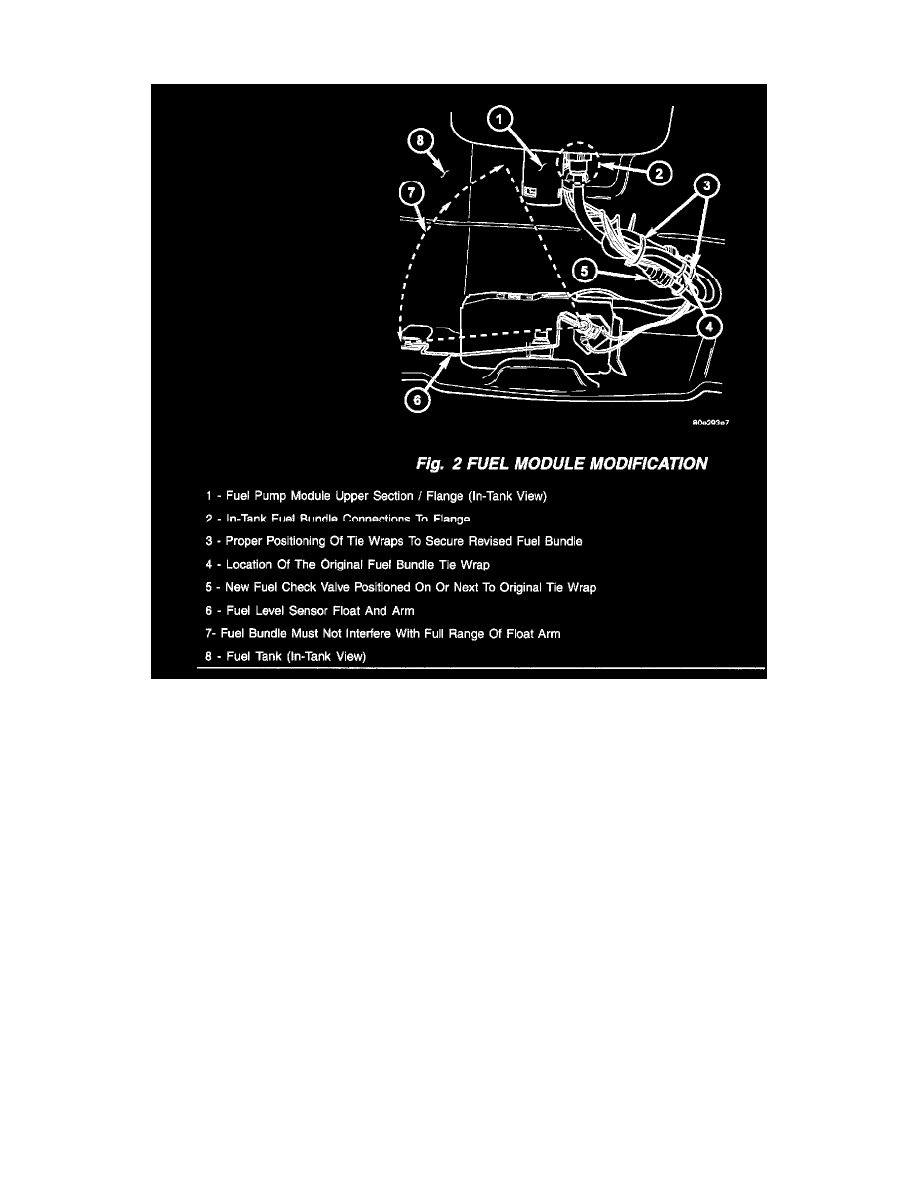
Connect the new check valve (from the kit) to the end of the existing in-tank fuel supply line.
11.
Tie wrap, in two places, the new check valve and excess hose to the existing in-tank bundle of fuel lines and electrical harness. Make sure that the
new check valve is positioned so that it rests on or next to the original tie wrap (Fig. 2).
NOTE:
THE REVISED IN-TANK HARNESS/FUEL LINE BUNDLE MUST BE CORRECTLY TIE WRAPPED TO PREVENT POSSIBLE
INTERFERENCE WITH THE FULL MOVEMENT OF THE FUEL LEVEL SENDING UNIT FLOAT AND ARM. DO NOT REMOVE THE
LOWER SECTION OF IN-TANK FUEL PUMP MODULE TO PREVENT POSSIBLE DAMAGE TO THE FUEL LEVEL SENDING UNIT.
12.
Connect the revised bundle, the electrical connector and both fuel lines from the lower section of the fuel pump module, to the upper section /
flange of the fuel pump module.
13.
Verify that the new fuel pump module flange sealing ring is properly positioned.
14.
Install the fuel pump module flange to the fuel tank and install the fuel pump module flange locking ring.
15.
Connect the electrical harness, fuel lines, and ORVR line to the module flange.
16.
Add previously drained fuel to the fuel tank. Start the engine and check fuel line fittings for leaks. Using the fuel rail service port, verify that the
fuel pressure drop-off condition has been corrected.
17.
Apply silicone sealant, p/n 04883971, to the fuel pump module metal access plate.
18.
Install the access plate attaching nuts. Tighten the nuts to 3 Nm (26 in. lbs.).
NOTE:
MAKE SURE THAT THE FUEL PUMP MODULE ACCESS PLATE IS COMPLETELY SEALED TO THE CARGO COMPARTMENT FLOOR