
Wrangler L4-2.5L VIN P (1999)
Water Shield Lower Screws Remove/Install
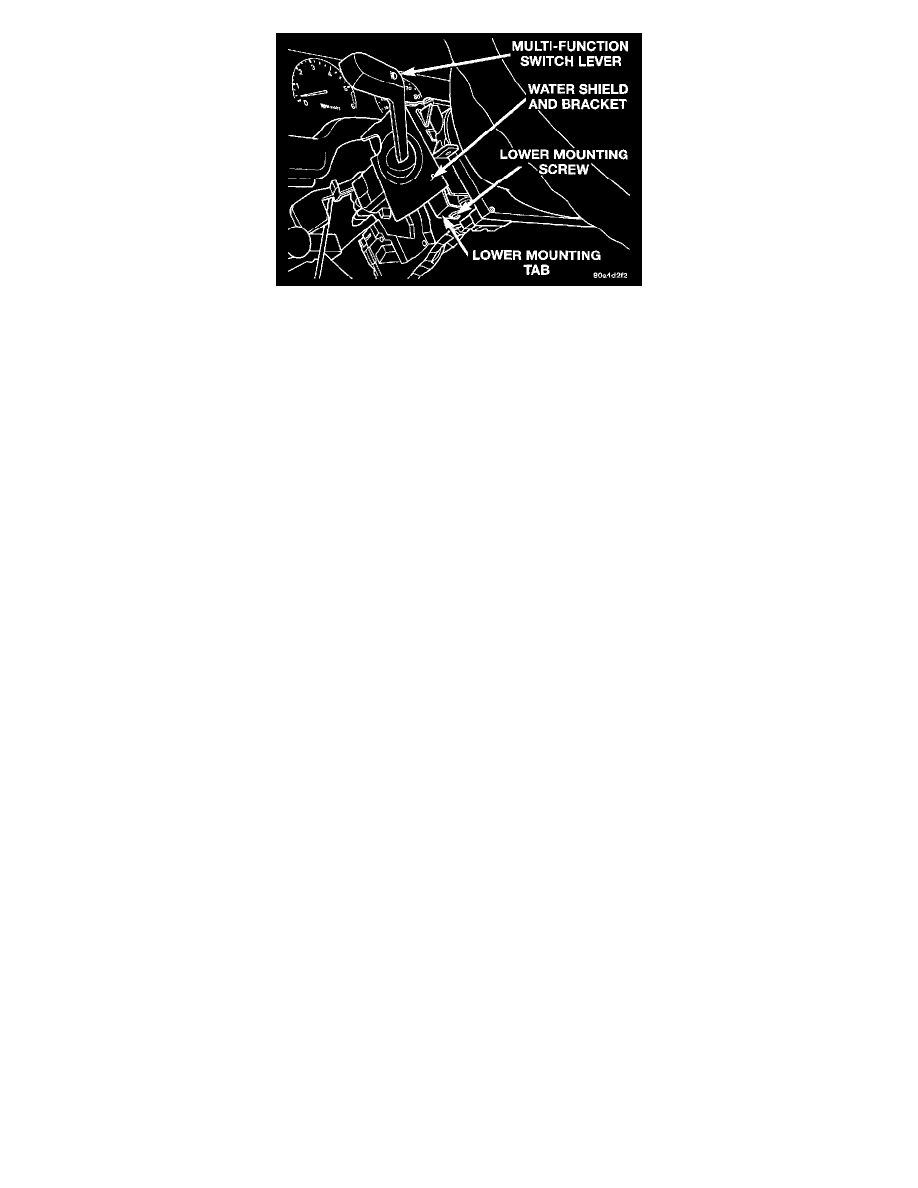
7. Remove the one screw located below the multi-function switch control stalk that secures the multi-function switch water shield and bracket to the
steering column.
8. Gently pull the lower mounting tab of the multi-function switch water shield bracket away from the steering column far enough to clear the screw
boss below the multi-function switch control stalk.
9. Lift the water shield and bracket with the multi-function switch off of the left side of the steering column far enough to access the two
multi-function switch wire harness connectors. If the vehicle is equipped with the optional tilt steering column, lifting gently upward on the tilt
release lever will provide additional clearance to ease multi-function switch removal.
10. Disconnect the two instrument panel wire harness connectors from the multi-function switch connector receptacles.
11. Remove the multi-function switch and water shield from the steering column as a unit.
12. Gently and carefully remove the water shield from the switch by pulling it over the hazard warning switch button and the multi-function switch
control stalk.
INSTALLATION
1. Gently and carefully install the water shield onto the switch by pulling it over the hazard warning switch button and the multi-function switch
control stalk.
2. Position the multi-function switch and water shield near its mounts on the steering column as a unit.
3. Reconnect the two instrument panel wire harness connectors to the multi-function switch connector receptacles.
4. Position the multi-function switch onto its mounts on the left side of the steering column. If the vehicle is equipped with the optional tilt steering
column, lifting gently upward on the tilt release lever will provide additional clearance to ease multi-function switch installation.
5. Position the lower mounting tab of the multi-function switch water shield bracket to the steering column screw boss below the multi-function
switch control stalk.
6. Install and tighten the one screw located below the multi-function switch control stalk that secures the multi-function switch water shield and
bracket to the steering column. Tighten the screw to 1.1 Nm (10 in. lbs.).
7. Install and tighten the two screws that secure the multi-function switch water shield and bracket to the top of the steering column. Tighten the
screws to 2.2 Nm (20 in. lbs.).
8. Position both the upper and lower shrouds onto the steering column.
9. Install and tighten the three screws that secure the lower steering column shroud to the upper shroud. Tighten the screws to 2 Nm (18 in. lbs.).
10. If the vehicle is so equipped, tighten the two nuts that secure the non-tilt steering column upper mounting bracket to the dash panel steering
column support bracket studs. Tighten the nuts to 22 Nm (200 in. lbs.).
11. Install the knee blocker onto the instrument panel. Refer to Knee Blocker in the Airbags and Seat Belts/Airbags/Knee Diverter/Service and Repair
for the procedures.
12. Reconnect the battery negative cable.