
Wrangler 4WD L4-150 2.5L VIN P MFI (1998)
Air Duct: Service and Repair
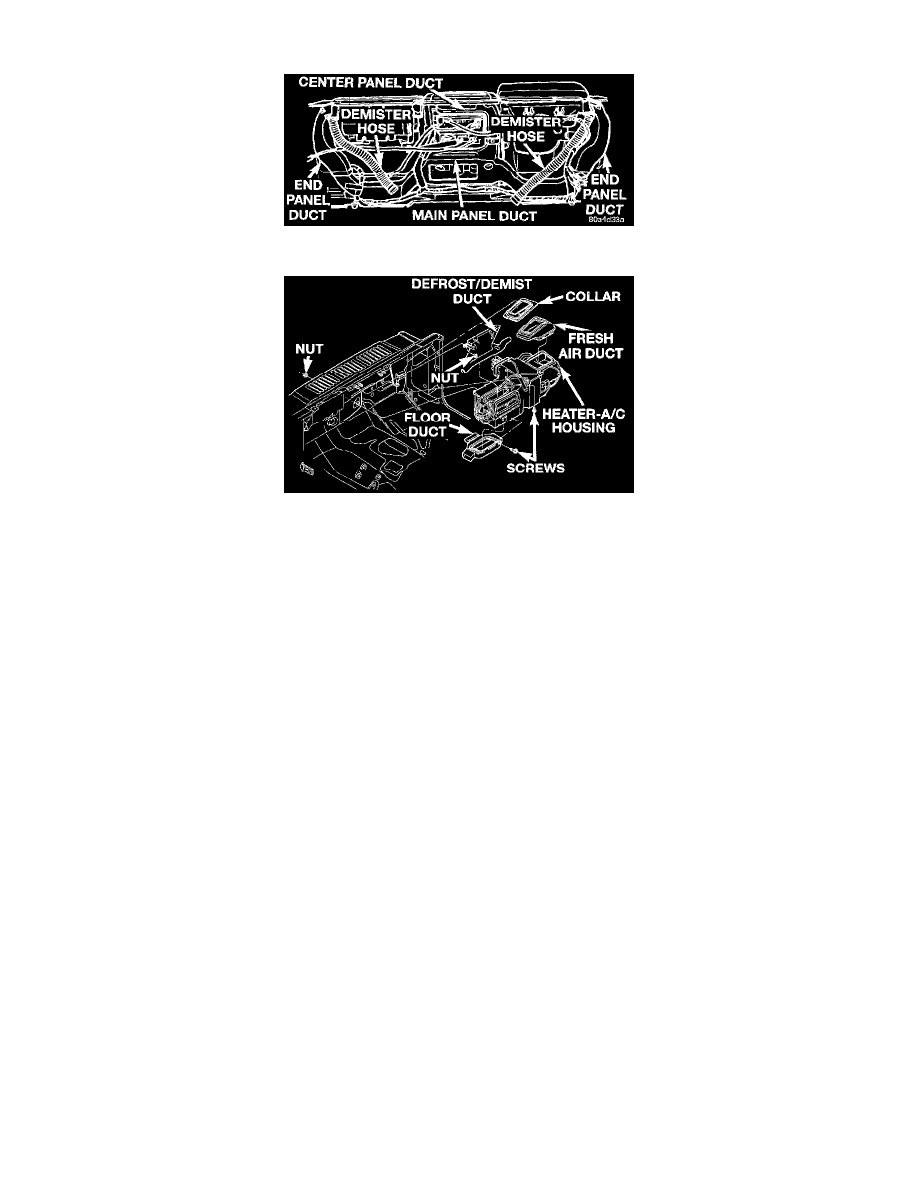
Instrument Panel Ducts And Outlets Remove/Install
Heater-A/C Housing Ducts Remove/Install
REMOVAL
Only the demister hoses and the panel outlet barrels can be removed without instrument panel assembly removal. Removal of the fresh air duct and collar
requires that the heater-A/C housing also be partially removed. The panel outlet housings and demister outlets are serviced only as a part of the
instrument panel or instrument panel center bezel.
WARNING: ON VEHICLES EQUIPPED WITH AIRBAGS, REFER TO AIRBAGS BEFORE ATTEMPTING ANY STEERING WHEEL,
STEERING COLUMN, OR INSTRUMENT PANEL COMPONENT DIAGNOSIS OR SERVICE. FAILURE TO TAKE THE PROPER
PRECAUTIONS COULD RESULT IN ACCIDENTAL AIRBAG DEPLOYMENT AND POSSIBLE PERSONAL INJURY.
Defrost/Demist Duct
1. Remove the instrument panel assembly from the vehicle. Refer to Instrument Panel, Gauges and Warning Indicators/Instrument Panel Systems for
the procedures. See: Instrument Panel, Gauges and Warning Indicators/Instrument Cluster / Carrier/Service and Repair
2. Remove the two push-nuts that secure the defrost/demist duct to the studs on the dash panel.
3. Remove the defrost/demist duct from the studs on the dash panel.
4. Reverse the removal procedures to install.
Demister Hoses
1. Disconnect and isolate the battery negative cable.
2. Remove the glove box from the instrument panel to service the passenger side demister hose. Refer to Glove Box in Instrument Panel Systems for
the procedures. Remove the knee blocker from the instrument panel to service the driver side demister hose. Refer to Knee Blocker in Instrument
Panel Systems for the procedures. See: Instrument Panel, Gauges and Warning Indicators/Instrument Cluster / Carrier/Service and Repair
3. Reach through the glove box opening or the steering column opening of the instrument panel to disconnect the ends of the demister hose from the
demister outlet and the defrost/demist duct.
4. Reverse the removal procedures to install.
Floor Duct
1. Remove the instrument panel from the vehicle. Refer to Instrument Panel Assembly in Instrument Panel, Gauges and Warning
Indicators/Instrument Panel Systems for the procedures. See: Instrument Panel, Gauges and Warning Indicators/Instrument Cluster /
Carrier/Service and Repair
2. Remove the two screws that secure the floor duct to the bottom of the heater-A/C housing.
3. Release the snap clip that secures the floor duct to the dash panel side of the heater-A/C housing by pushing the snap clip towards the dash panel.
4. Slide the floor duct out from under the heater-A/C housing.
5. Reverse the removal procedures to install. Tighten the screws to 2.2 N.m (20 in. lbs.).