
Wrangler 4WD L4-150 2.5L VIN P MFI (1998)
Condenser HVAC: Service and Repair
WARNING: REVIEW THE WARNINGS AND CAUTIONS BEFORE PERFORMING THE FOLLOWING OPERATION.
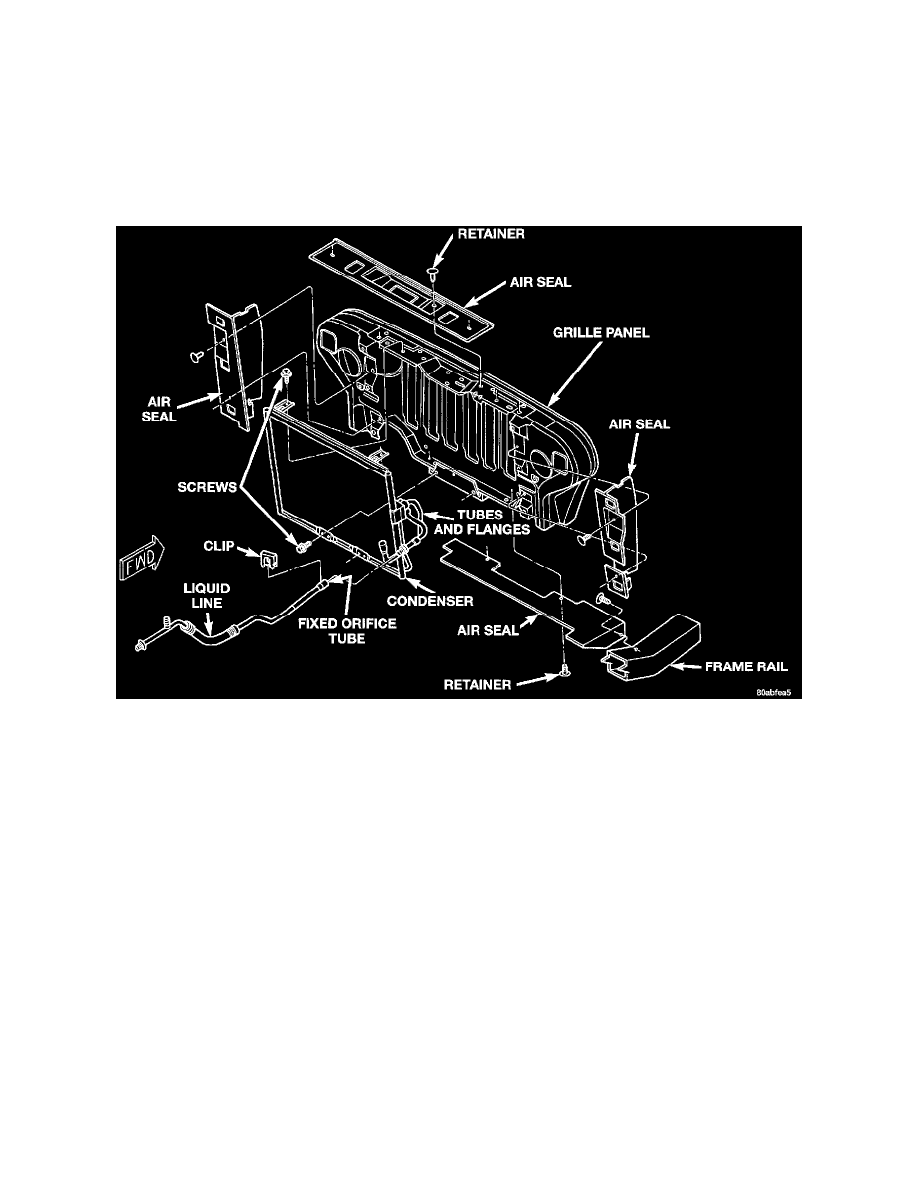
CAUTION: Before removing the condenser, note the location of each of the radiator and condenser air seals. These seals are used to direct air through
the condenser and radiator. The air seals must be reinstalled in their proper locations in order for the air conditioning and engine cooling systems to
perform as designed.
REMOVAL
1. Disconnect and isolate the battery negative cable.
2. Recover the refrigerant from the refrigerant system. See Refrigerant Recovery for the procedures.
Condenser Remove/Install
3. Remove the three retainers that secure the upper condenser air seal to the grille panel and remove the upper air seal.
4. Remove the two screws that secure the upper condenser mounting brackets to the top of the grille panel.
5. Reach through the right side of the grille panel opening from the front of the vehicle to remove the screws that secure the condenser inlet jumper
tube and outlet jumper tube block fittings to the condenser. Install plugs in, or tape over all of the opened refrigerant line fittings.
6. Remove the three retainers that secure the lower condenser air seal to the passenger side frame rail and the bottom of the grille panel and remove
the lower air seal.
7. Remove the two screws that secure the lower condenser mounting bracket to the bottom of the grille panel.
8. Remove the three screws on each side of the radiator that secure the radiator mounting brackets to the sides of the grille panel.
9. Tilt the radiator and shroud unit back towards the engine. Use care to prevent the cooling fan blades from damaging the radiator fins.
10. Carefully lift the condenser out of the vehicle.
INSTALLATION
1. Carefully position the condenser in the vehicle.
2. Install and tighten the two screws that secure the upper condenser mounting brackets to the top of the grille panel. Tighten the screws to 2.2 N.m
(20 in. lbs.).
3. Align the radiator mounting brackets to the sides of the grille panel. Install the six screws that secure the radiator and shroud unit to the grille
panel. Tighten the screws to 8 N.m (72 in. lbs.).
4. Install the upper condenser air seal to the top of the grille panel with three retainers.
5. Remove the tape or plugs from the condenser and the inlet and outlet jumper tube refrigerant line block fittings. Reach through the grille opening
from the front of the vehicle to install the inlet and outlet jumper tube block fittings to the condenser with two screws. Tighten the mounting screws
to 12 N.m (105 in. lbs.).
6. Install the two screws that secure the lower condenser bracket to the bottom of the grille panel. Tighten the screws to 2.2 N.m (20 in. lbs.).
7. Install the lower condenser air seal to the bottom of the grille panel and the passenger side frame rail with three retainers.