
Wrangler 4WD L4-150 2.5L VIN P MFI (1998)
Housing Assembly HVAC: Service and Repair
Heater - A/C Housing Removal and Installation
The heater-A/C housing assembly must be removed from the vehicle and the two halves of the housing separated for service access of the heater core,
evaporator coil, blend-air door, and each of the various mode control doors.
WARNING: ON VEHICLES EQUIPPED WITH AIRBAGS, REFER TO AIRBAGS BEFORE ATTEMPTING ANY STEERING WHEEL,
STEERING COLUMN, OR INSTRUMENT PANEL COMPONENT DIAGNOSIS OR SERVICE. FAILURE TO TAKE THE PROPER
PRECAUTIONS COULD RESULT IN ACCIDENTAL AIRBAG DEPLOYMENT AND POSSIBLE PERSONAL INJURY.
REMOVAL
1. Disconnect and isolate the battery negative cable.
2. Remove the instrument panel from the vehicle. See: Instrument Panel, Gauges and Warning Indicators/Instrument Cluster / Carrier/Service and
Repair
3. If the vehicle is not equipped with air conditioning, go to Step 6. If the vehicle is equipped with air conditioning, recover the refrigerant from the
refrigerant system.
4. Disconnect the liquid line refrigerant line coupler from the evaporator inlet tube. Install plugs in, or tape over all of the opened refrigerant line
fittings. See: Coupler HVAC/Service and Repair
5. Disconnect the accumulator inlet tube refrigerant line coupler from the evaporator outlet tube. Install plugs in, or tape over all of the opened
refrigerant line fittings. See: Coupler HVAC/Service and Repair
6. Drain the engine cooling system.
7. Disconnect the heater hoses from the heater core tubes. Install plugs in, or tape over the opened heater core tubes.
8. Unplug the heater-A/C system vacuum supply line connector from the tee fitting near the heater core tubes.
Heater-A/C Housing Remove/Install
9. Remove the five nuts from the heater-A/C housing mounting studs on the engine compartment side of the dash panel. If necessary, loosen the
battery hold-downs and reposition the battery for additional access. Refer to Starting and Charging/Battery for the procedures. See: Starting and
Charging/Battery/Service and Repair
10. Remove the cowl plenum drain tube from the heater-A/C housing mounting stud on the dash panel directly behind the engine cylinder head.
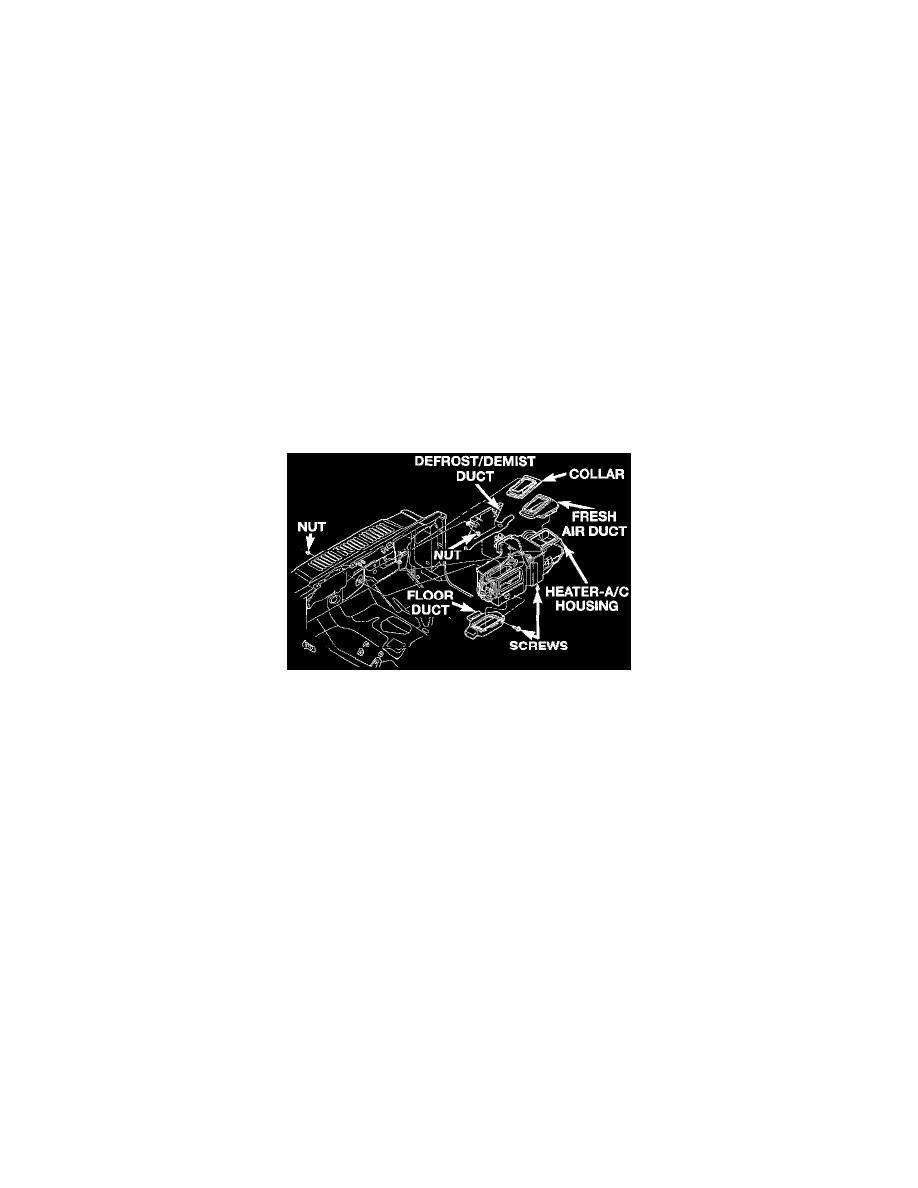
11. Remove the floor duct from the bottom of the heater-A/C housing. See Floor Duct for the procedures. See: Air Duct/Service and Repair
12. Remove the one screw that secures the heater-A/C housing to the plenum bracket on the passenger compartment side of the dash panel.
13. Pull the heater-A/C housing down far enough to clear the defrost/demist and fresh air ducts, and rearward far enough for the mounting studs and
the evaporator condensate drain tube to clear the dash panel holes.
14. Remove the heater-A/C housing from the vehicle.
Disassembly
1. Remove the heater-A/C housing from the vehicle and place it on a work bench.
2. Unplug the vacuum harness connectors from the floor door actuator and, if the unit is so equipped, the recirculation air door actuator.
3. Disengage the vacuum harness from any routing clips located on the lower half of the heater-A/C housing.
4. Disengage the heater-A/C wire harness connector and the blower motor relay wire harness connector push-in retainers from their mounting holes
on the heater-A/C housing.
5. Remove the blower motor and blower wheel unit from the heater-A/C housing. See: Blower Motor/Service and Repair
6. Carefully remove the foam seal from the flange around the blower motor opening in the heater-A/C housing. If the seal is deformed or damaged, it
must be replaced.