
Wrangler 4WD L4-150 2.5L VIN P MFI (1998)
Pressure Plate: Service and Repair
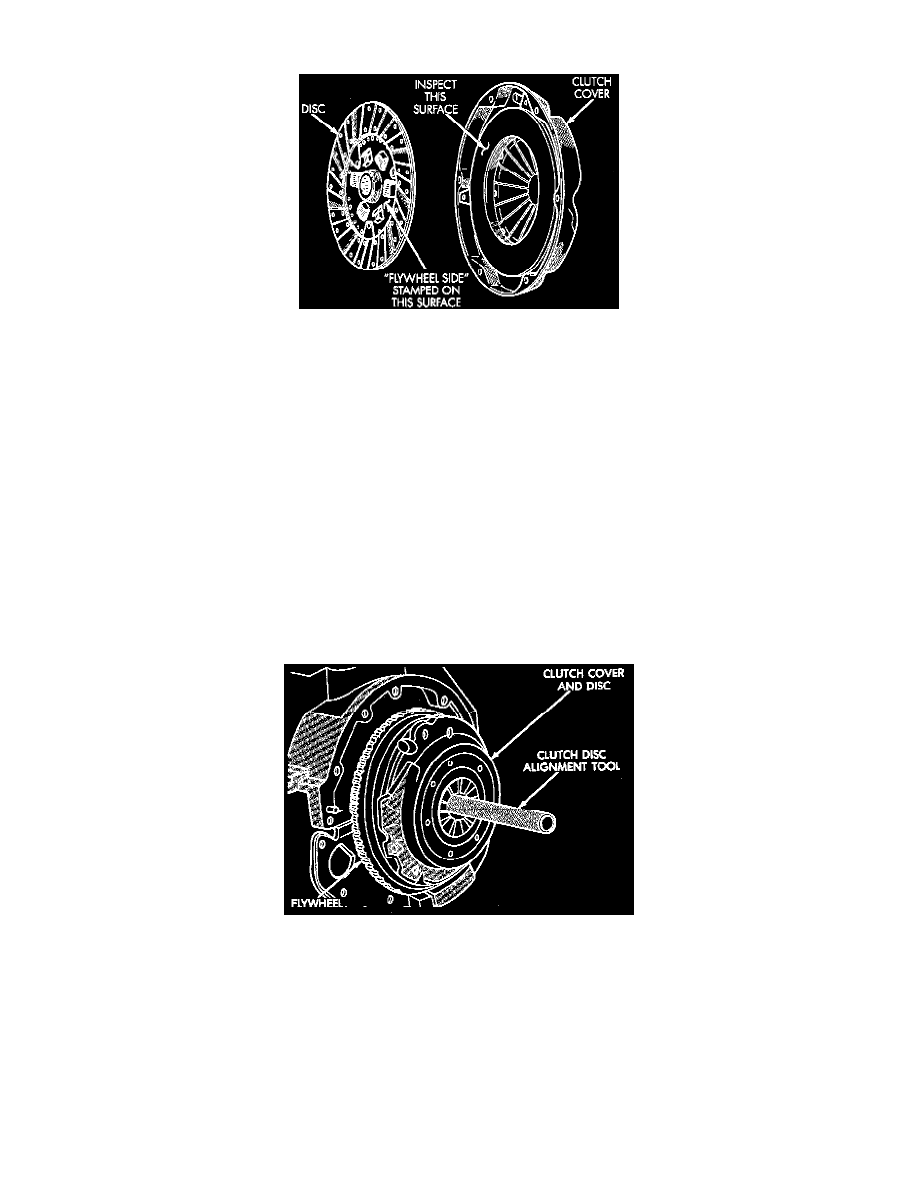
Clutch Disc And Pressure Plate Inspection
REMOVAL
1. Remove transmission.
2. If original clutch cover will be reinstalled, mark position of cover on flywheel for assembly reference. Use paint or a scriber for this purpose.
3. If clutch cover is to be replaced, cover bolts can be removed in any sequence. However, if original cover will be reinstalled, loosen cover bolts
evenly and in rotation to relieve spring tension equally. This is necessary to avoid warping cover.
4. Remove cover bolts and remove cover and disc.
INSTALLATION
1. Lightly scuff sand flywheel face with 180 grit emery cloth. Then clean surface with a wax and grease remover.
2. Lubricate pilot bearing with MOPAR high temperature bearing grease.
3. Check runout and free operation of new clutch disc as follows:
a. Slide disc onto transmission input shaft splines. Disc should slide freely on splines.
b. Leave disc on shaft and check face runout with dial indicator. Check runout at disc hub and about 6 mm (1/4 inch) from outer edge of facing.
c. Face runout should not exceed 0.5 mm (0.020 inch). Obtain another clutch disc if runout exceeds this limit.
4. Position clutch disc on flywheel. Be sure side of disc marked flywheel side is positioned against flywheel. If disc is not marked, be sure flat side of
disc hub is toward flywheel.
5. Inspect condition of pressure plate surface of clutch cover. Replace cover if this surface is worn, heat checked, cracked, or scored.
Typical Method Of Aligning Clutch Disc
6. Insert clutch alignment tool in clutch disc.
7. Insert alignment tool in pilot bearing and position disc on flywheel. Be sure disc hub is positioned correctly. Side of hub marked Flywheel Side
should face flywheel. If disc is not marked, place flat side of disc against flywheel.
8. Position clutch cover over disc and on flywheel.
9. Install clutch cover bolts finger tight.
10. Tighten cover bolts evenly and in rotation a few threads at a time. Cover bolts must be tightened evenly and to specified torque to avoid distorting
cover. Tightening torque 31 Nm (23 ft. lbs.).
a. Start all 6 bolts by hand.
b. Tighten 3 pilot hole bolts 3/4s of the way (any sequence).
c. Starting 180 degrees from the last pilot bolt, tighten 3 large hole bolts 3/4s of the way (any sequence).