
Forte L4-2.0L (2010)
REQUIRED.
If label does not exist, continue to step (1) of the ECM Upgrade Procedure until completion.
NOTICE
^ A fully charged battery is necessary before ECU upgrade can take place. DO NOT connect a battery charger to the vehicle during ECU upgrade. Make
sure the blower motor is "OFF" during ECU upgrade.
^ All ECU upgrades must be done with the ignition key in the "ON" position.
^ Be careful not to disconnect any cables connected to the vehicle or GDS during the ECU upgrade procedure.
^ DO NOT start the engine during ECU upgrade.
^ DO NOT turn the ignition key "OFF" or interrupt the power supply during ECU upgrade.
^ When the ECU upgrade is completed, turn the ignition key "OFF" and wait 20 seconds before starting the engine.
^ ONLY use approved ECU upgrade software designated for the correct model, year and engine size. Failure to do so may create other driveability
issues due to the use of the incorrect ECM/PCM calibration.
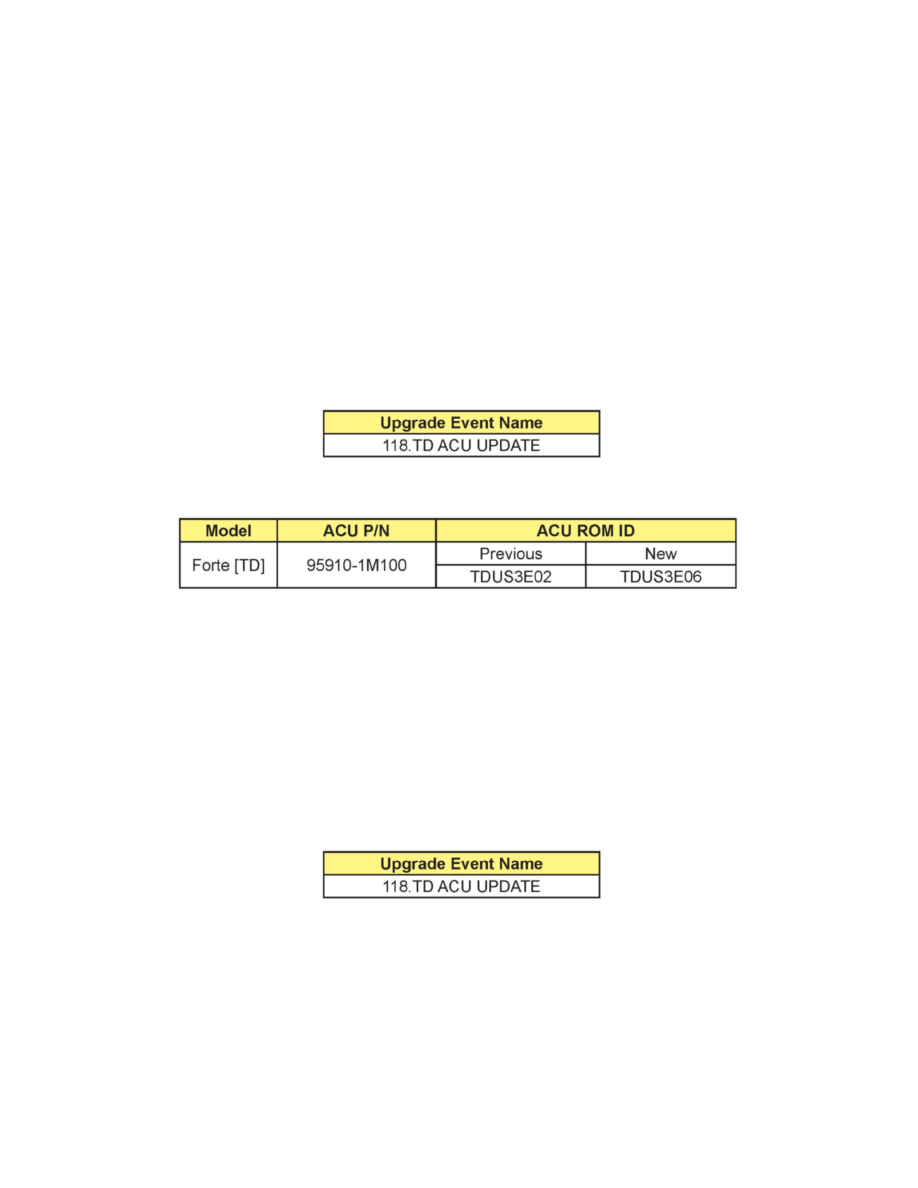
ROM ID INFORMATION TABLE:
AUTOMATIC ECM UPGRADE PROCEDURE USING THE GDS:
1. Connect the power supply cable to the GDS tool.
2. Connect the USB cable between the VCI and the GDS tool.
3. Connect the main 16-pin DLC cable from the VCI into the vehicle's 16-pin connector under the driver's side instrument panel.
4. Turn on VCI and GDS tool with the ignition key in the ON position.
Do NOT start the engine.
5. Select VIN or ECU Upgrade on the initial screen.
6. Enter the vehicle information by pressing the VIN Auto Detect button, entering the vehicle's VIN or selecting the vehicle model, model year,
engine/fuel type, and AIRBAG as the system and then click OK.
7. Select ECU Upgrade on the initial screen after entering the vehicle information.
8. Select Auto Mode then AIRBAG in the left ECU Upgrade column.
9. Read Preparation and click OK.
10. The GDS will read the vehicle's ROM ID.
11. After the Current ROM ID is displayed, select appropriate Upgrade Event, "118.TD ACU UPDATE."