6 V6-3.7L (2009)

Headlamp Alignment Switch: Testing and Inspection
HEADLIGHT LEVELING SWITCH INSPECTION
1. Remove the following parts:
a. Front scuff plate (driver-side) See: Body and Frame/Interior Moulding / Trim/Scuff Plate/Service and Repair/Front Scuff Plate
Removal/Installation
b. Front side trim (driver-side) See: Body and Frame/Interior Moulding / Trim/Trim Panel/Service and Repair/Front Side Trim
Removal/Installation
c. Upper panel See: Body and Frame/Interior Moulding / Trim/Console/Service and Repair/Removal and Replacement/Upper Panel
Removal/Installation
d. Decoration panel (driver-side) See: Body and Frame/Interior Moulding / Trim/Dashboard / Instrument Panel/Service and Repair/Removal and
Replacement/Decoration Panel Removal/Installation
e. Hood release lever See: Body and Frame/Doors, Hood and Trunk/Hood/Hood Latch Release/Service and Repair
f.
Meter hood See: Body and Frame/Interior Moulding / Trim/Dashboard / Instrument Panel/Service and Repair/Removal and
Replacement/Meter Hood Removal/Installation
g. Lower panel (driver-side) See: Body and Frame/Interior Moulding / Trim/Dashboard / Instrument Panel/Service and Repair/Removal and
Replacement/Lower Panel Removal/Installation
h. Headlight leveling switch See: Service and Repair
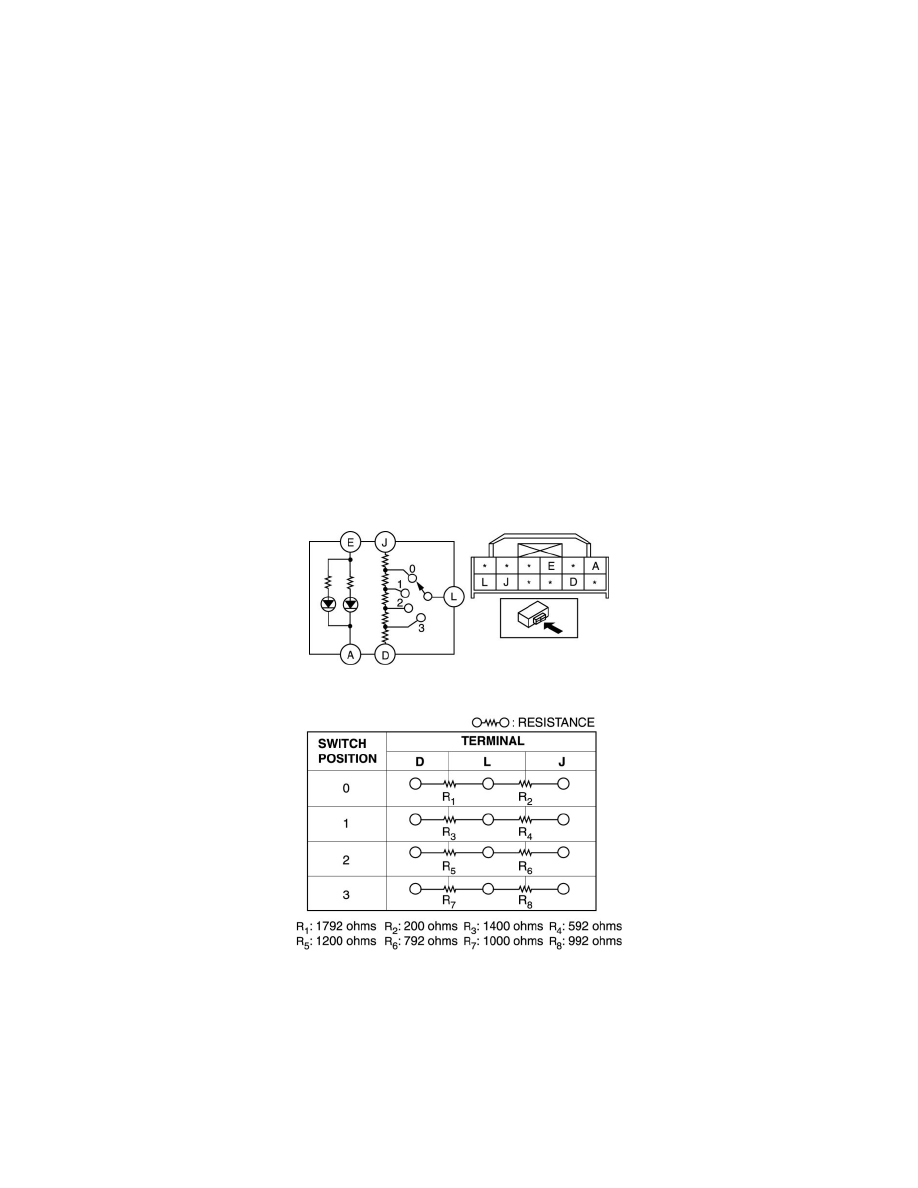
2. Verify that the resistance and continuity between the headlight leveling switch terminals is as indicated in the table using a tester.
-
If not as indicated in the table, or if the resistance is not within the specification, replace the headlight leveling switch.
3. Apply battery voltage to headlight leveling switch terminal E, and connect terminal A to ground.
4. Verify that the LED illuminates.
-
If there is any malfunction, replace the headlight leveling switch.
