
626 L4-2184cc 2.2L SOHC F2 (1989)
7.
Remove boot support, rear cover locknut, rear cover, oil seal and the upper bearing.
8.
Gently grasp serrated part of pinion and pull it out of gear housing. If pinion is difficult to remove, gently tap gear housing with plastic
hammer while pulling.
9.
To remove lower bearing, heat housing in water to approximately 176°F, then tap end of housing with wooden hammer.
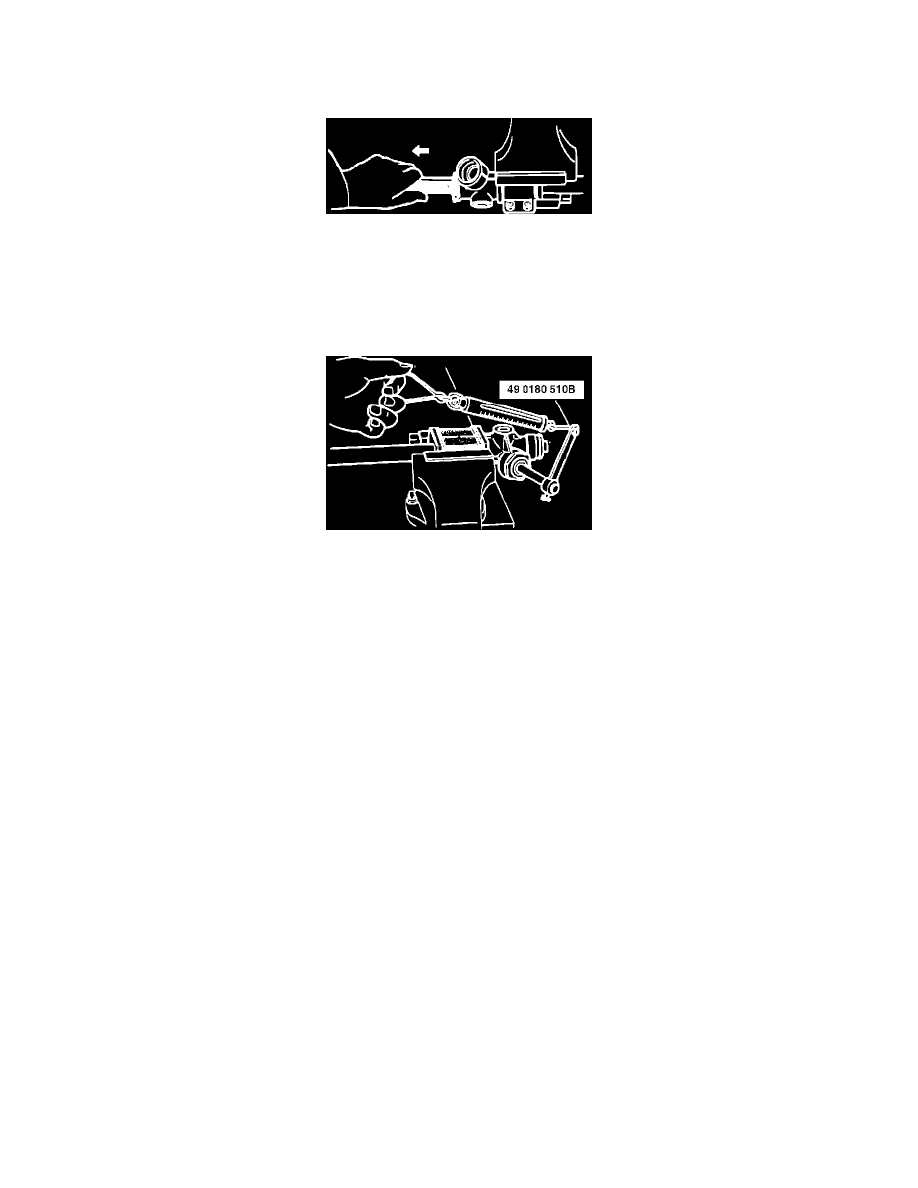
Fig. 5 Removing Rack
10.
Remove rack by taking it out in direction indicated, Fig. 5. Do not damage rack bushing with edge of rack gear.
11.
Break bushing to remove. Be careful not to damage gear housing.
Assembly
Fig. 9 Measuring Pinion Preload W/manual Steering Gear
1.
Install mounting rubber and bracket.
2.
Align rounded tab on bushing with rounded slot of housing and press bushing into gear housing until it is fully seated.
3.
Apply lithium base grease in bearing and bearing bore, press in lower bearing in proper direction, using pinion to press in.
4.
Fill or coat following components with lithium base grease.
a. Pinion bearing and teeth.
b. Inside of gear housing.
c. Oil seal lip.
d. Roller surface.
e. Holder.
f.
Friction block surface.
g. Inner surface of housing rack bushing.
h. Rack gear and outer circumference of rack shaft, 7.09 inches (180mm) in in from either end. Be careful not to fill ventilation holes with
grease.
i.
Tie rod ball joint.
j.
Inside of left and right boot.
5.
Carefully install rack in direction opposite of removal.
6.
Set notch of teeth of rack at pinion position, then insert pinion. This notch is used for adjustment of pinion bearing preload without pinion
engaged with rack.
7.
Install upper bearing and screw on rear cover. Apply sealant to threads of rear cover. Do not install oil seal. Use tool 490259700A or
equivalent to screw on rear cover.
8.
Tighten rear cover so that pinion torque is approximately 14.1 ounces. Check with tool 490180510B, or equivalent, and pull scale. Before
measuring torque, rotate pinion to left and right a few times to seat bearing.
9.
Loosen rear cover and readjust pinion torque to 10.6 ounces, then torque locknut to 36-51 ft. lbs. Recheck pinion torque after tightening
locknut. If it is not 7-12.3 ounces, loosen locknut and readjust.
10.
Carefully move rack so that pinion is set to center of rack gear.
11.
Install roller assembly, needle roller, holder, dish springs, friction block and spring. Install roller bearing so that it correctly contacts rack.
12.
Torque adjust cover to 7.2 ft. lbs., then loosen it 25-45°. Using tool 49H032321A or equivalent, torque locknut to 29-43 ft. lbs. Apply sealant to
threads of adjust cover before installing.
13.
Measure pinion torque, Fig. 9. At center position ±90°, scale reading should be 35-50 ounces. In any other position, scale reading should be 60
ounces.
14.
Mark positions of rack grooves of left and right tie rod for staking.
15.
Install new washer on left tie rod and install tie rod, torquing to 58-72 ft. lbs, then stake washer in two places.
16.
Use a pipe to press in oil seal until it is flush with end of rear cover.