
B2300 Regular Cab 2WD L4-2.3L VIN A (1997)
6. Align crankshaft so number one piston is at TDC as indicated by timing mark.
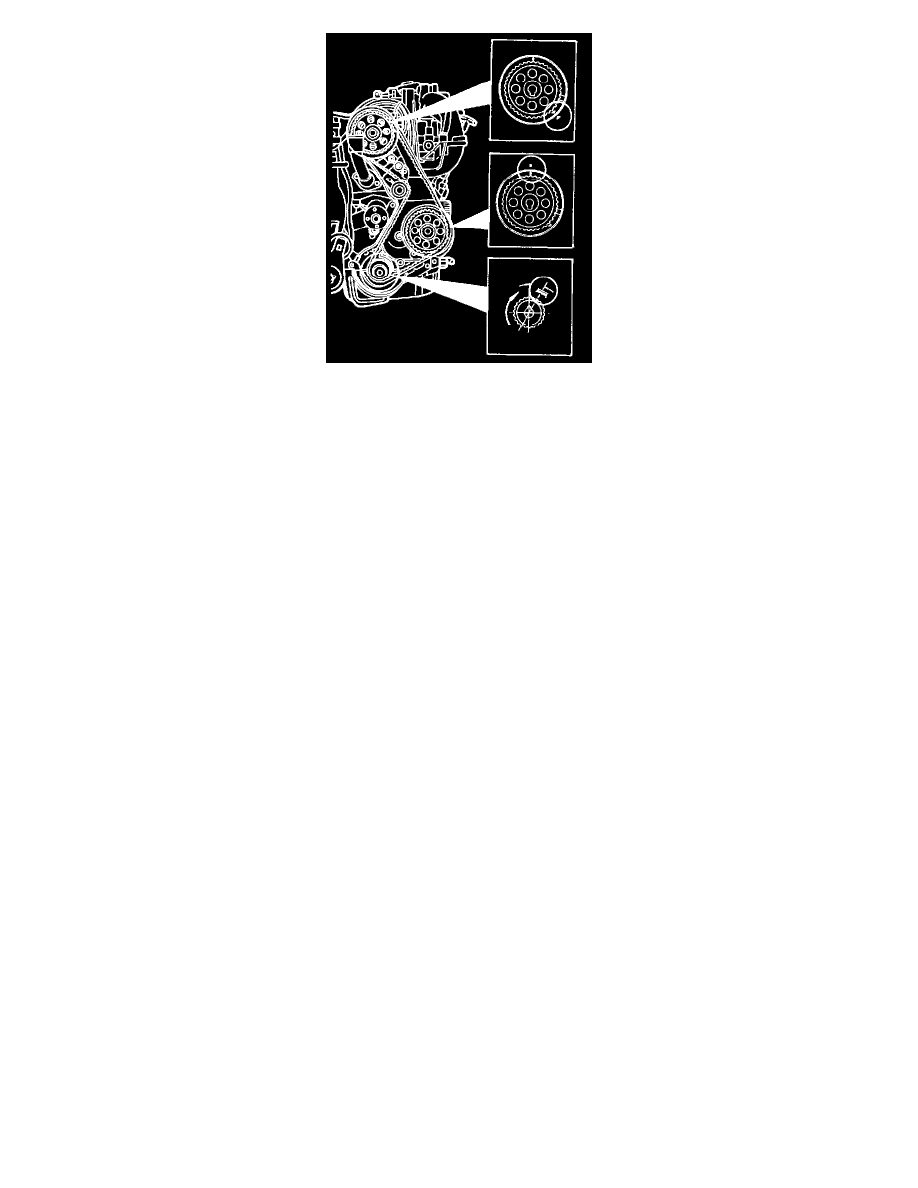
7. Align mark on crankshaft pulley with line on timing belt cover.
8. Align the triangle on the camshaft pulley with the triangle on the timing belt inner cover.
9. Align the diamond on the oil pump pulley with the diamond on the timing belt inner cover.
10. Install the timing belt over the timing belt pulley and then counterclockwise over the oil pump and camshaft pulleys. Align the belt fore and aft on
the pulleys.
11. Loosen the belt tensioner adjustment bolt to allow the tensioner to move against the belt. If the spring does not have enough tension to move the
roller against the belt (the belt hangs loose), it may be necessary to manually push the roller against the belt and tighten the bolt.
Note: The spring cannot be used to set belt tension. A wrench must be used on the tension assembly.
12. Rotate the crankshaft two complete turns in direction of normal rotation (clockwise) to remove the slack from the belt. Check the alignment of the
timing marks. Repeat steps if timing marks are not properly aligned.
13. Tighten the belt tensioner adjustment bolt to the specified torque.
Tightening torque: 35-45 Nm (3.5-4.5 kgf.m, 25-33 ft-lb)
14. Tighten the belt tensioner spring bolt to the specified torque.
Tightening torque: 40-55 Nm (4.2-5.5 kgf.m, 30-40 ft-lb)
15. Install the timing belt outer cover.
16. Install the spark plugs and tighten to the specified torque.
Tightening torque: 7-14 Nm (0.7-1.4 kgf.m, 60-120 in-lb)