
B4000 2WD V6-4.0L OHV (1994)
7.
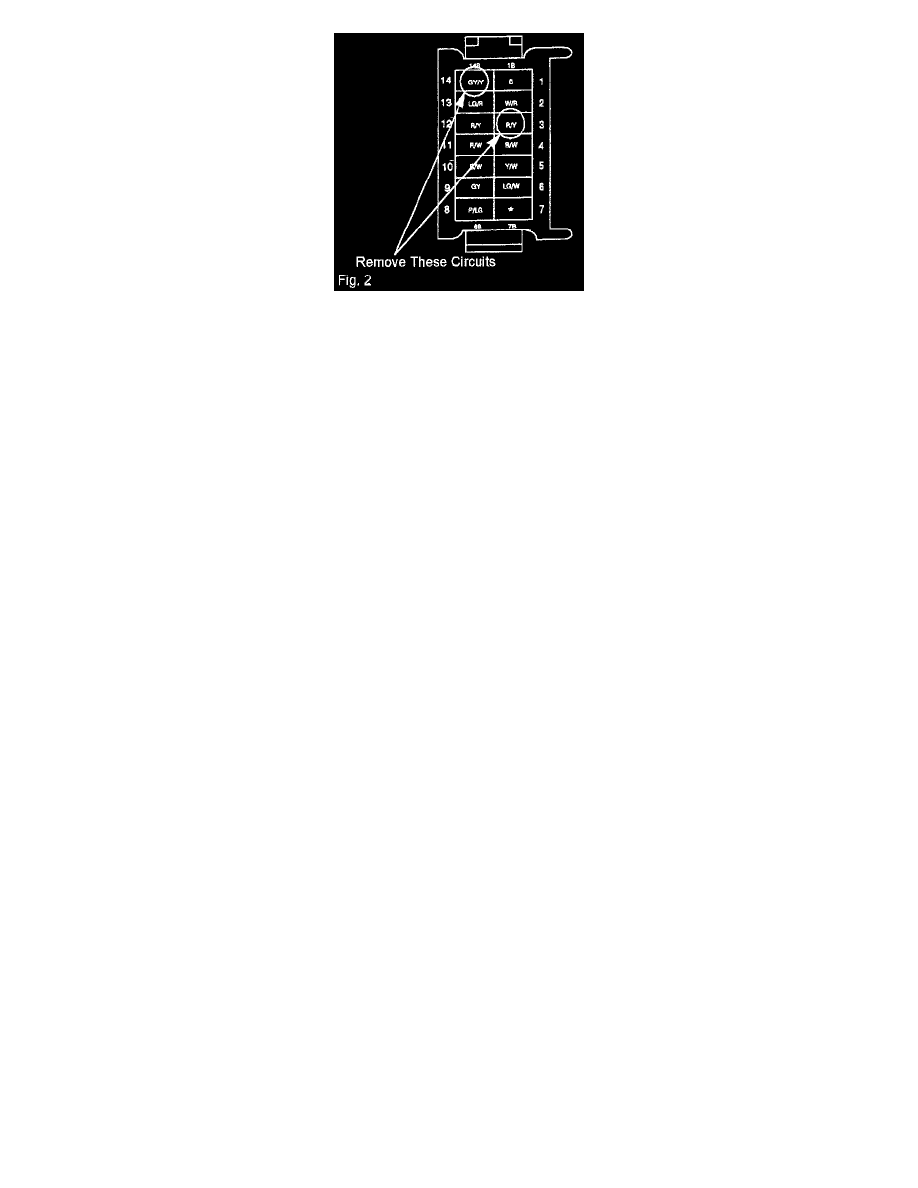
Remove # 14 circuit (gray with yellow tracer, 14 gauge wire) from the connector by prying the locking finger away from the wire terminal. Refer
to Fig. 2.
WARNING:
Do not break the locking finger.
8. Remove # 3 circuit (red with yellow tracer, 18 gauge wire) from the connector. Refer to Fig. 2.
9.
Cut and discard the terminals from the removed circuits.
10.
Heat shrink tubing over the # 14 circuit (gray with yellow tracer) wire end to prevent shorting.
11.
Strip .75 inch (20 mm) off of the end of the # 3 circuit (red with yellow tracer) wire.
12.
Install the two (2) new # 3 circuits into the connector where the # 3 and # 14 circuits were removed.
NOTE:
The new # 3 circuits are supplied with the jumper harness kit (8 inch (203 mm) long wire with partially stripped ends).
13.
Install the red lock wedge in the connector.
14.
Pull on the circuits to confirm they are seated firmly in the connector.
15.
Splice and solder all # 3 circuits together [two (2) new # 3 circuits and the original circuit (red with yellow tracer)].
16.
Solder and apply heat shrink tubing over spliced connection to prevent shorting.
17.
Attach wires to instrument cluster harness with electrical tape.
18.
Install instrument cluster. Refer to the workshop manual, section 5 for installation instructions.
19.
Clean terminals, connect and charge battery.
20.
Verify that the charge indicator light is working properly.
21.
Reset radio stations.
PARTS INFORMATION *
Part Number
Description
Quantity
ZZM0 13 S50
Harness kit
1
WARRANTY INFORMATION
(Applies To Verified Customer Complaints On Vehicles Covered Under Normal Warranty. Refer To The SRT Microfiche For Warranty Term
Information.)
Warranty Type:
A