MPV LX V6-2.5L DOHC (2000)

Alternator: Testing and Inspection
Generator Warning Light
1. Verify that the battery is fully charged.
-
Charge if necessary.
2. Verify that the drive belt deflection/tension is correct.
-
Adjust if necessary.
3. Turn the ignition switch on and verify that the generator warning light comes on.
-
If not, inspect generator warning light, wiring harnesses between the battery, generator warning light, and PCM terminal 98. When the
generator warning light and the wiring harnesses are okay, replace the PCM.
4. Verify that the generator warning light goes out after the engine is started.
-
If rot, inspect if any of the following DTCs are displayed: P0112, P0113, P1631, P1633, P1634.
Generator
Voltage
1. Verify that the battery is fully charged.
-
Charge if necessary.
2. Verify that the drive belt deflection/tension is correct.
-
Adjust if necessary.
3. Turn off all electrical loads.
4. Turn the ignition switch to start the engine and verify that the generator rotates smoothly without any noise while the engine is running.
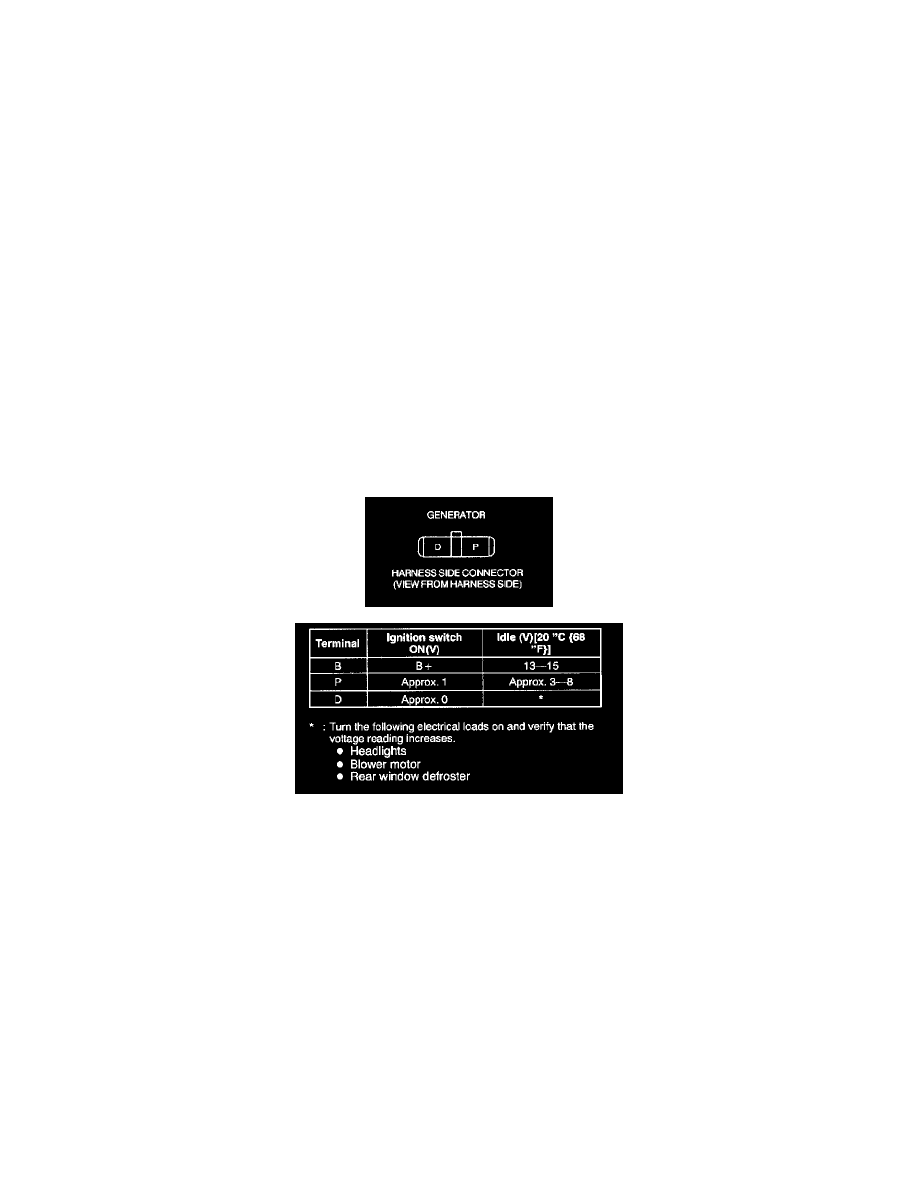
Standard Voltage
5. Measure the voltage at the terminals shown in the table.
-
If not as specified, repair or replace the generator as necessary.
Current
1. Verify that the battery is fully charged.
-
Charge if necessary.
2. Verify that the drive belt deflection/tension is correct.
-
Adjust if necessary.
3. Disconnect the negative battery cable.
4. Connect an ammeter, capable of reading 120 A or above, between generator terminal B and the wiring harness.
5. Connect the negative battery cable.
6. Turn off all electrical loads.
7. Start the engine and increase the engine speed to 2,000 - 2,500 rpm.
8. Turn the following electrical loads on and verify that the current reading increases.
1. Headlights
2. Blower motor
