
Tribute 2WD V6-3.0L (2008)
Some PCMs contain a memory area called a vehicle identification (VID) block. The PCM VID block commonly stores powertrain configuration items
such as VIN, tire size, axle ratio, and whether or not the vehicle is equipped with speed control.
As-Built Data
As-Built data is a VIN specific module configuration record. During vehicle build, the configuration from all modules is downloaded and stored in the
As-Built database. As-Built data will not reflect customer preference items that have been changed from the default state. These items will need to be
changed using programmable parameters after the module is configured.
NOTE: It is not necessary to obtain As-Built data unless directed to do so by the scan tool. This data may be accessed from the technician service
publication website.
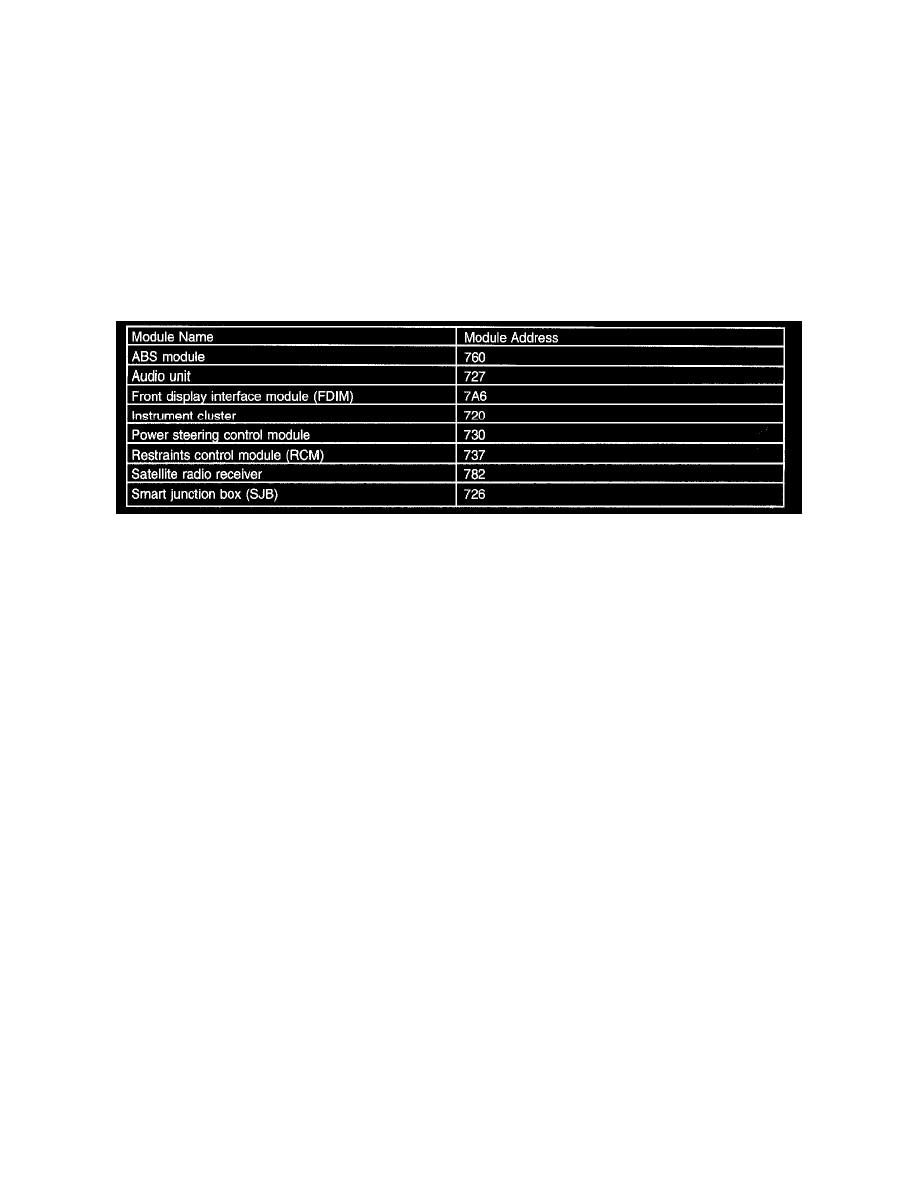
Module Addresses for As-Built Entry
The following chart lists module As-Built data addresses:
Programmable Module Installation
PROGRAMMABLE MODULE INSTALLATION
Programmable Module Installation (PMI) Using the Integrated Diagnostic System (IDS) When the Original Module is Available
NOTE: Following module installation, some modules require a separate learning procedure be carried out. For adaptive learning and calibration
instructions, refer to the specific module removal and installation procedures.
1. Connect the IDS and identify the vehicle as normal.
2. From the Toolbox icon, select Module Programming and press the check mark.
3. Select Programmable Module Installation.
4. Select the module that is being replaced.
5. Follow the on-screen instructions, turn the ignition key to the OFF position, and press the check mark.
6. Install the new module and press the check mark.
7. Follow the on-screen instructions, turn the ignition key to the ON position, and press the check mark.
8. The IDS downloads the data into the new module and displays Module Configuration Complete.
9. Test module for correct operation.
Programmable Module Installation (PMI) Using the Integrated Diagnostic System (IDS) When the Original Module is NOT Available
NOTE: Following module installation, some modules require a separate learning procedure be carried out. For adaptive learning and calibration
instructions, refer to the specific module removal and installation procedures.
1. Install the new module.
2. Connect the IDS and identify the vehicle as normal.
3. From the Toolbox icon, select Module Programming and press the check mark.
4. Select Programmable Module Installation.
5. Select the module that was replaced.
6. Follow the on-screen instructions, turn the ignition key to the OFF position, and press the check mark.
7. Follow the on-screen instructions, turn the ignition key to the ON position, and press the check mark.
8. If the data is not available, the IDS displays a screen stating to contact the As-Built Data Center.Retrieve the data from the technician service
publication website at this time and press the check mark.
9. Enter the module data and press the check mark.
10. The IDS downloads the data into the new module and displays Module Configuration Complete.
11. Test module for correct operation.