
Grand Marquis V8-255 4.2L (1982)
Air/Fuel Mixture: Adjustments
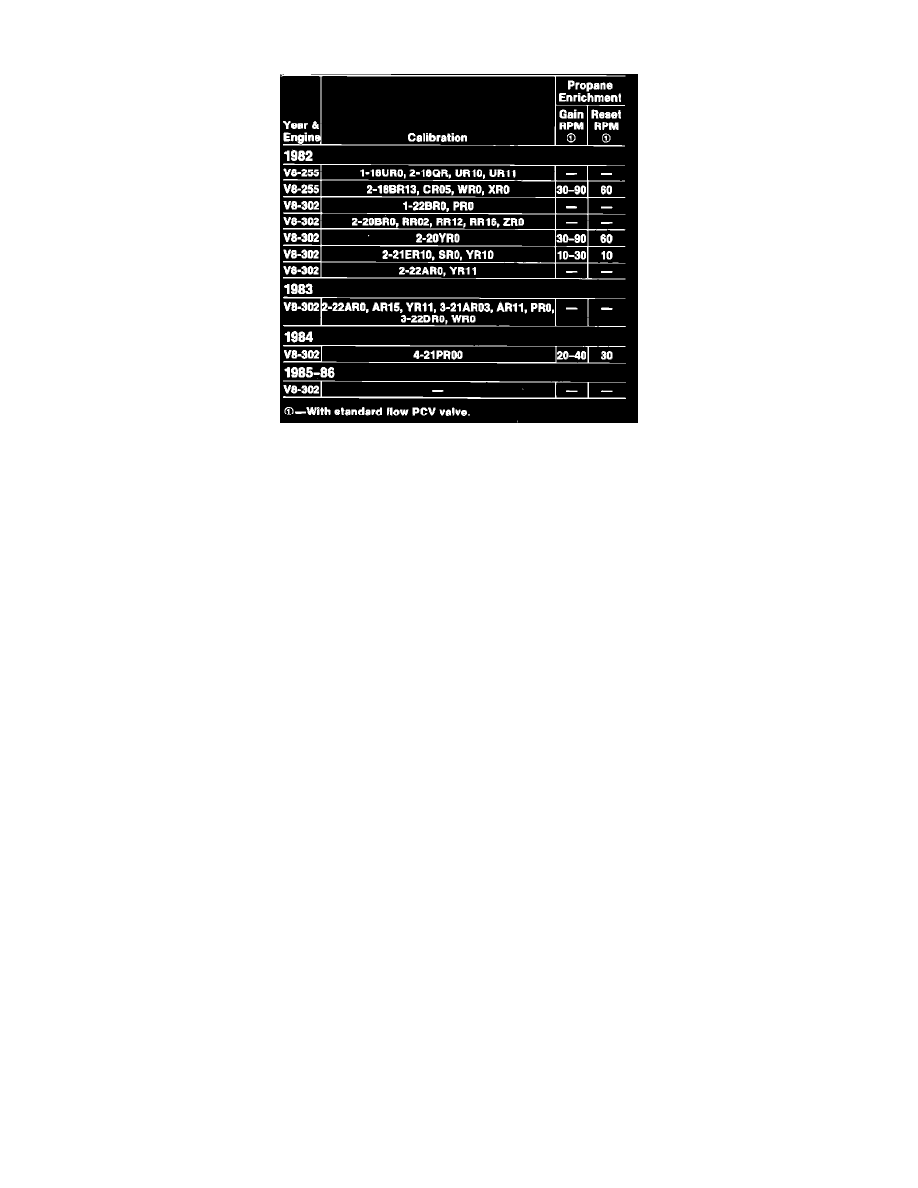
Fig. 4 Propane enrichment chart. 1982 - 86 models
EXC. 7200 & 2700 MODEL CARBURETORS & EFI
1. Set parking brake and block wheels. On vehicles equipped with a vacuum parking brake release, disconnect and plug vacuum hose at parking
brake actuator.
2. Connect a suitable timing light and tachometer to the engine.
NOTE: On vehicles equipped with high energy ignition systems, use Rotunda model 20362 tach. or equivalent.
If so equipped, insure that the hot idle compensator is in a closed position and remains so throughout the test for vehicles with hot idle
compensators internal to the carburetor. Idle vehicle on kickdown step of fast idle cam for three to five minutes to insure that HIC valve is closed.
3. Disconnect and plug vacuum lines from distributor. On vehicles equipped with dual model timing ignition module Part No. 12A244, disconnect
three pin switch assembly electrical connector from ignition module.
4. Start engine and operate until normal operating temperature is obtained. Turn OFF all accessories. Do not allow engine to idle for extended
periods of time. Exhaust system overheating may cause excessive underbody temperature.
5. Set timing to specification. The engine idle speed during timing adjustments must be at or below speed specified on vehicle emission control
information decal.
6. Connect vacuum lines to distributor and dual mode timing three pin switch assembly electrical connector to module.
7. Check and identify the correct PCV valve (high or low flow type). Check vehicle emission control information decal to determine whether a high
flow PCV valve is required. The correct PCV valve is required to enable a proper adjustment of idle mixture. In cases of severe oil dilution
by gasoline vapor, as in short trip driving in cold weather, the engine oil and filter should be changed prior to performing the idle mixture
adjustment procedure with propane enrichment.
8. Disconnect evaporative emission purge hose from air cleaner, if equipped. On vehicles equipped with fuel evaporative purge valve signal vacuum
hose, disconnect hose as follows:
a. Trace purge valve vacuum hose from purge valve located on the canister, to the first point where the hose can be disconnected.
b. Disconnect hose at that point, cap open port and plug vacuum hose. Do not disconnect vacuum hose from purge valve to prevent damage
to the valve.
9. Position idle mixture limiter caps in the maximum rich position: Idle mixture screws without limiter caps must be turned in to seat lightly, and then
turn screws outward approximately 1-1/2 to 2 turns. On carburetors with more than one mixture screw, the screws must be balanced. When
changing the mixture, turn screws in equal amounts.
10. Set curb idle speed to specification. On vehicles equipped with automatic transmission, position transmission selector lever into Drive or Neutral
as specified on the engine emission information decal. If the tachometer fluctuates during propane or idle set procedures, average the fluctuations
to determine true RPM. Stabilize engine idle speed before each idle speed and propane check by positioning transmission selector lever in Neutral,
and operate engine at2500 RPM for 15 seconds. This is important, since the curb idle and idle fuel mixture adjustments may be adjusted in
different transmission positions.
11. Disconnect and plug crankcase ventilation hose from air cleaner assembly.
12. On vehicles equipped with Thermactor system, note the following:
a. On dump valves with two vacuum fittings, disconnect and plug hoses.
b. On dump valves with one fitting, remove and plug hose at dump valve. Connect a ``jumper'' hose from dump valve vacuum fitting to an intake
manifold fitting.
13. Plug propane tool No. T75L-9600-A hose into air cleaner evaporative purge nipple. If vehicle is not equipped with a purge nipple, disconnect