
Grand Marquis V8-4.6L Flex Fuel (2010)
1. WARNING: Before servicing a vehicle equipped with a fire suppression system, depower the system by following the procedure in
Vehicle Jacking and Lifting. Failure to follow the instructions may result in serious personal injury.
With the vehicle in NEUTRAL, position it on a hoist. For additional information, refer to Vehicle Jacking and Lifting.
2. Disconnect the fuel tube spring lock coupling. For additional information, refer to Fuel Delivery and Air Induction.
3. Disconnect the battery ground cable. For additional information, refer to Battery.
4. Remove the LH engine mount. For additional information, refer to Engine Mount - LH See: Drive Belts, Mounts, Brackets and
Accessories/Engine Mount/Service and Repair/Removal and Replacement/Engine Mount - LH.
5. Remove the Evaporative Emission (EVAP) canister purge valve. For additional information, refer to Evaporative Emissions System.
6. Disconnect the Crankshaft Position (CKP) sensor electrical connector.
7. Disconnect the A/C compressor electrical connector.
8. Disconnect the A/C pressure sensor electrical connector.
9. Disconnect the electronic engine control electrical connector.
10. Disconnect the A/C accumulator switch electrical connector.
11. Disconnect the PCV tube quick connect coupling from the PCV valve. For additional information, refer to Fuel Delivery and Air Induction.
12. Disconnect the 4 RH ignition coil electrical connectors.
13. Disconnect the 3 wire harness retainers from the valve cover and position wire harness aside.
14. Lower the engine.
15. NOTICE: Do not use metal scrapers, wire brushes, power abrasive discs or other abrasive means to clean the sealing surface. These tools
cause scratches and gouges that make leak paths. Use a plastic scraping tool to remove all traces of the gasket material.
Loosen the 8 studs, the 3 bolts and remove the valve cover and discard the gasket.
-
Clean the valve cover mating surface of the cylinder head with silicone gasket remover and metal surface prep. Follow the directions on the
packaging.
-
Discard the valve cover gasket. Clean the valve cover gasket groove with soap and water or a suitable solvent.
Installation
1. NOTICE: If the valve cover is not installed and the fasteners tightened within 4 minutes, the sealant must be removed and the sealing
area cleaned. To clean the sealing area, use silicone gasket remover and metal surface prep. Failure to follow this procedure can cause
future oil leakage.
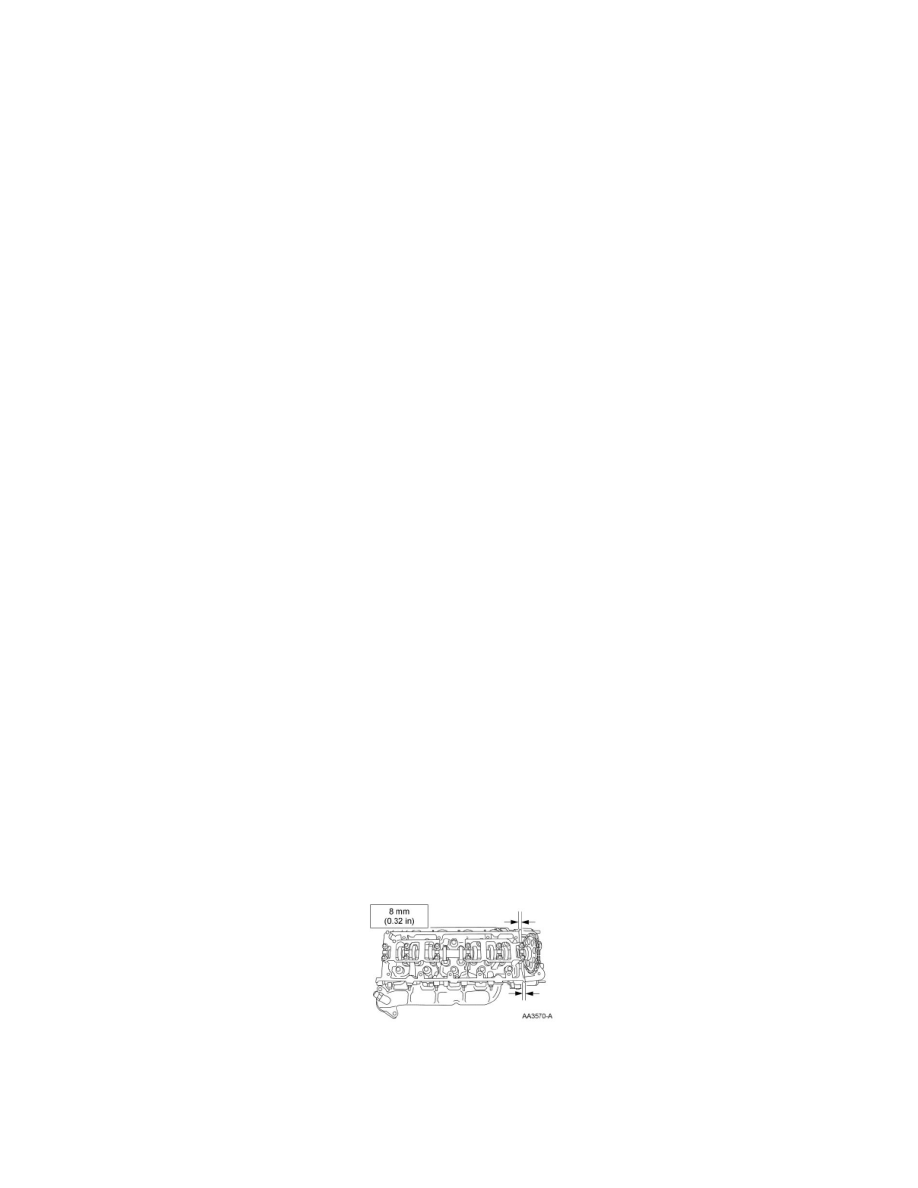
Apply a bead of silicone gasket and sealant in 2 locations shown where the engine front cover meets the cylinder head.
2. Install a new valve cover gasket and the valve cover.
-
Tighten the fasteners in the sequence shown to 10 Nm (89 lb-in).