
Mountaineer AWD V6-4.0L VIN K Flex Fuel (2003)
5.
Pull and peel the applique from one side to the other.
INSTALLATION PROCEDURE
1.
Scrape or pull all of the old urethane so that it is slightly below the surface of the black rubber mask (razor blade, gasket scraper). Scuff remaining
old urethane adhesive with 80-Grit sand paper around the perimeter.
2.
Clean window and back side of new applique with wax and grease remover.
3.
Allow to flash for two (2) minutes.
NOTE
DO NOT USE WINDSHIELD URETHANE.
4.
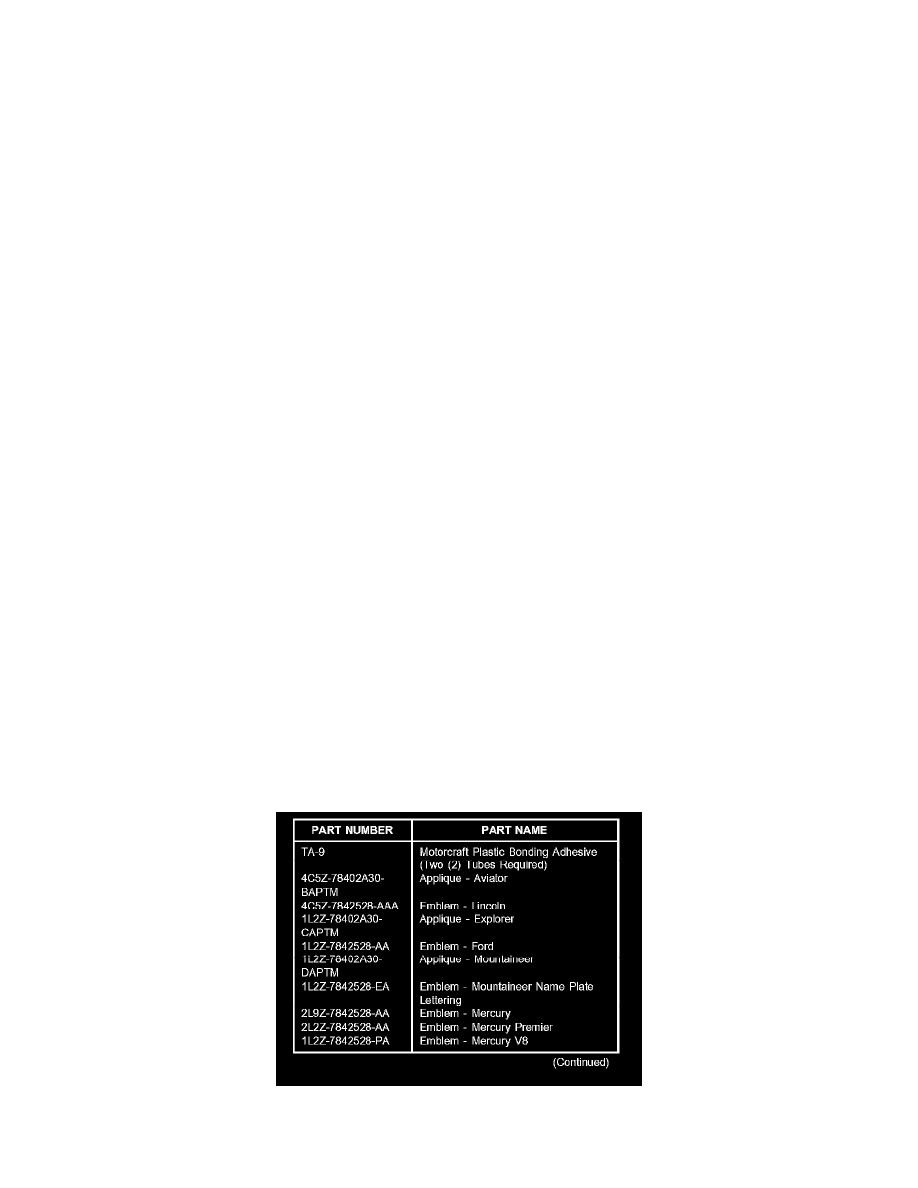
Install one (1) of the two (2) Motorcraft TA-9 Plastic Bonding Adhesive cartridges in the application gun Rotunda # 501-040. Squeeze the out
some material to level the plungers and install the nozzle.
NOTE
BEAD SIZE IS DEPENDENT UPON AMOUNT OF OLD URETHANE THAT IS REMOVED. TOP OF BEAD SHOULD EXTEND
APPROXIMATELY 6.5 MM (0.25 INCH) BEYOND EDGE OF TROUGH. THIS REPAIR WILL REQUIRE ONE TO TWO (1-2) TUBES OF
ADHESIVE. THE WORKABLE TIME OF THE ADHESIVE IS APPROXIMATELY TEN (10) MINUTES.
5.
Apply 6.5 mm (0.25 inch) bead of Motorcraft TA-9 adhesive to inner side of the trough the old urethane was injected in. This will keep squeeze
out to a minimum when the applique is installed.
6.
Apply new painted applique and firmly press by hand over the entire adhesive area. Clean off squeeze out adhesive immediately with wax and
grease remover.
7.
Verify applique to top rubber mask alignment quickly as you have eight to ten (8-10) minutes working time (Figure 2). Open lift glass. Using
extremely light pressure apply two (2) small clamps on the top corner ends to hold it in place.
NOTE
EXCESSIVE CLAMP PRESSURE CAN CAUSE DEPRESSION IN THE APPLIQUE. BE SURE THAT THE APPLIQUE IS CENTERED, WITH
AN EVEN GAP ON EACH SIDE.
8.
Apply tape, 2" wide X 6" in length every 4 inches vertically, starting on the bottom and then the top edge.
9.
Remove clamps on edge and replace with masking tape immediately after Step 8.
10.
Apply the 2" wide tape the full length horizontally of top and bottom, wrapping around backside.
11. Allow a minimum of forty five (45) minutes at 21°C (70° F) dry time and remove tape.
12.
Install new emblems.