
Achieva L4-144 2.4L DOHC VIN T SFI (1996)
17. Install fluid reservoir cover.
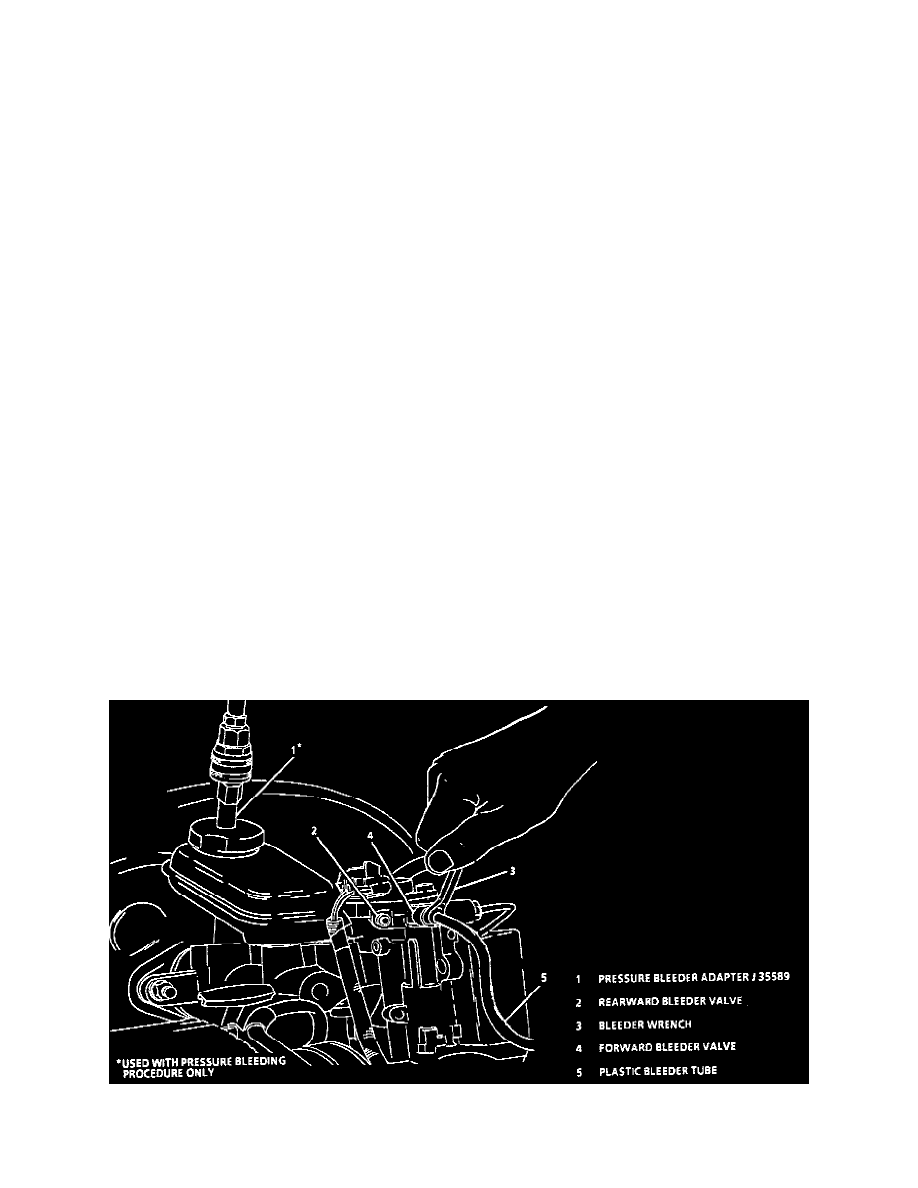
18. Bleed the hydraulic modulator.
A. Attach a clear plastic bleeder hose to the rearward bleeder valve on the hydraulic modulator. Submerge opposite hose end in a clean container
partially filled with clean brake fluid.
B. Depress brake pedal with moderate force.
C. Slowly open rearward bleeder valve 1/2 to 3/4 turns and allow fluid to flow.
D. Close valve and slowly release brake pedal.
E. Wait 5 seconds.
F. Repeat Steps 18B through 18E until no air bubbles are observed in the bleeder hose.
G. Relocate the bleeder hose on the forward hydraulic modulator bleeder valve and repeat Steps 18A through 18F.
H. Tighten hydraulic modulator bleeder valves to 9 Nm (80 lb.in.).
19. Remove fluid reservoir cover.
20. Inspect fluid level in reservoir and fill to the correct level if necessary.
21. Install fluid reservoir cover.
22. With ignition "ON" apply brake pedal with moderate force and hold. Note pedal travel and feel. If pedal feels firm and constant and pedal travel is
not excessive, start the engine. With the engine running, recheck the pedal travel. If it's still firm and constant and pedal travel is not excessive, go
to Step 23. If pedal feels soft or has excessive travel either initially or after engine start, perform the following: With a Tech 1, "Release" then
"Apply" each motor 2 to 3 times and cycle each solenoid 5 to 10 times. When finished, be sure to "Apply" the front and rear motors to ensure the
pistons are in the upmost position. DO NOT DRIVE THE VEHICLE. If a Tech 1 is not available, remove foot from brake pedal, start the engine
and allow it to run for at least 10 seconds to initialize the ABS. DO NOT DRIVE THE VEHICLE. After 10 seconds, turn the ignition "OFF." This
initialization procedure MUST be repeated 5 times to ensure any trapped air has been dislodged. Now repeat bleeding procedure starting at Step 1.
23. Road test the vehicle. Make several normal (non ABS) stops from a moderate speed to ensure proper brake system function. Allow adequate
cooling time between stops.
Pressure Bleeding
Note: Use only Supreme II (GM 1052542) or equivalent DOT 3 brake fluid from a clean, sealed container. Do not use fluid from an open container that
may be contaminated with water. The use of DOT 5 (silicone) brake fluid is not recommended. Reduced braking performance or durability may result.
Note: Avoid spilling brake fluid on any of the vehicle's painted surfaces, wiring, cables or electrical connectors. Brake fluid will damage paint and
electrical connections. If any fluid is spilled on the vehicle, flush the area with water to lessen the damage.
Note: Pressure bleeding equipment must be of the diaphragm type. It must have a rubber diaphragm between the air supply and the brake fluid to
prevent air, moisture and other contaminants from entering the hydraulic system.
1. Clean Fluid reservoir cover and surrounding area.
2. Remove fluid reservoir cover.
3. Inspect fluid to be at proper level. Add clean brake fluid as required.
4. Connect bleeder adaptor J 35589 to brake fluid reservoir.
5. Connect bleeder adaptor to pressure bleeding equipment.