
Aurora V6-214 3.5L VIN H SFI (2001)
1. Hold the cylinder (7) so that the side with four tumbler spring wells is facing up.
2. Insert tumbler springs (4) into the spring wells.
3. The first tumbler to be loaded will be the 1st key cut position (the first number in the key code). Install the first tumbler (8) in the slot nearest the
front of the lock cylinder, this is the side into which the key would be inserted.
4. Install the three remaining tumblers on this side of the lock cylinder, key cut positions 3, 5, and 7.
5. Inspect for correct loading of the tumblers (8) by inserting the key into cylinder (7). The tumblers (8) should be flush with the outside diameter of
the cylinder (7).
6. Turn the cylinder (7) so that the side with the three tumbler spring wells is facing up. Remove the key.
7. Insert the tumbler springs (4) into the three spring wells.
8. Install the tumbler (8) for the key cut position 2 into the slot nearest to the front of the lock cylinder.
9. Install the two remaining tumblers, key cut positions 4 and 6 on this side of the lock cylinder.
10. Inspect for correct loading of the tumblers (8) by inserting the key into cylinder (7). The tumblers (8) should be flush with the outside diameter of
the cylinder (7).
11. Lightly lubricate the tumbler (8) surfaces using the provided lubrication.
12. With the key inserted into the housing, rotate the cylinder (7) so that the side with the four tumblers is facing up.
Important: The retaining pin spring (3) and retaining pin (2) are not self retaining and must be held in place until the cylinder (7) is
assembled into the case assembly (1).
13. Insert one retaining pin spring (3) and one retaining pin (2) into the hole located behind the four tumblers (8).
14. Align the retaining lug on the cylinder (7) with the groove that extends the full length of the case assembly (1).
15. With the retaining pin (2) full depressed, install the cylinder (7) into the case (1) until the retaining pin (2) enters the case assembly (1).
16. Fully insert the cylinder (7), then rotate the cylinder (7) counter clockwise until the retaining pin snaps into place limiting the rotation.
17. Remove the key and install the illumination ring (6) onto the case assembly (1).
18. Install the theft deterrent module (5) over the illumination ring (6).
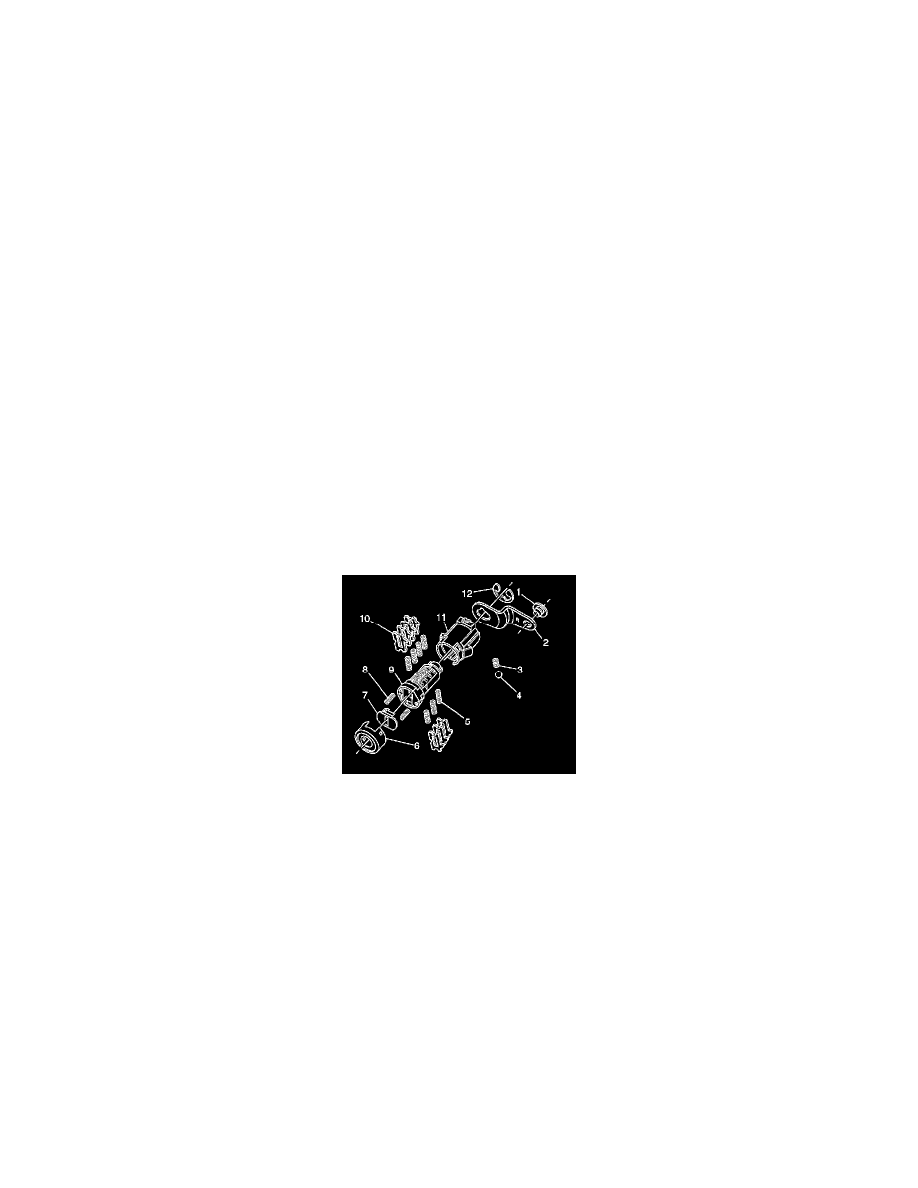
Assembling and Coding Door Lock Cylinder
The front side door lock cylinder only uses seven of the ten cut positions, 4 through 10. The tumbler positions are staggered from side to side 4 on one
side and 3 on the other. The left and right door lock cylinders are identical. The lock pawl determines which side of the vehicle the lock cylinder is on.
Important: The front side door lock cylinder tumblers (10) are not self retaining and must be held in place if the key is not fully inserted
into the lock cylinder, or until the cylinder (9) is assembled into the case assembly (11).
1. Hold the cylinder (9) so that the side with four tumbler spring wells faces up.
2. Insert tumbler springs (5) into the four spring wells.
3. Install the tumbler for key cut position 4 in the slot nearest to the front of the lock cylinder.
4. Install the three remaining tumblers, key cut positions 6, 8 and 10, on this side of the lock cylinder.
5. Inspect for correct loading of the tumblers (10) by inserting the key into cylinder (9). All of the tumblers should be flush with the outside diameter
of the lock cylinder.
6. Turn the cylinder (9) so that the side with three tumbler spring wells faces up.
7. Insert the tumbler springs (5) into the three spring wells.
8. Install the tumbler for key cut position 5 into the slot nearest the front of the lock cylinder.
9. Install the two remaining tumblers for key cut positions 7 and 9 on this side of the lock cylinder.
10. Inspect for correct loading of the tumblers (10) by inserting the key into cylinder (9). All of the tumblers should be flush with the outside diameter
of the lock cylinder.
11. Lightly lubricate the tumbler (10) surfaces using the provided lubrication.
12. Hold the case assembly (11) with the pre-staked detent spring retainer facing downward.
13. Insert one detent spring (3) and one detent ball (4) into the hole located to the rear and inside of the case assembly (11).
14. Insert the key into the lock cylinder.
15. Ensure the detent spring (3) and ball (4) are held in place until the cylinder is fully installed. Install the cylinder into the case assembly (11). The
detent ball (4) will line up with the V-shaped groove on the rear of the cylinder.