
Cutlass V6-191 3.1L VIN M SFI (1998)
Starter Motor: Service and Repair
Starter Motor Inspection
1. Clean all starting motor parts, but do not use grease dissolving solvents for cleaning. Solvent would dissolve the grease packed in the clutch and
would damage armature and field coil insulation. Wipe parts with a clean shop cloth.
2. Clean and test drive assembly action. The pinion should turn freely in the overrunning direction. Check the pinion teeth to see that they have not
been chipped, cracked, or excessively worn. Replace the assembly if necessary. Badly chipped pinion teeth may indicate chipped teeth on the ring
gear, which should be replaced if necessary.
3. Check the drive assembly for slipping by leaving the assembly attached to the armature, wrap the armature with a shop towel and clamp the
armature in a vise. Using a 12-point deep socket and torque wrench, put the socket on the pinion and turn counterclockwise. The drive should not
slip up to 68 N.m (50 lb ft) of torque. If it does, replace the drive assembly.
4. The roll type drive assembly should be wiped clean. Do not clean in any degreasing tank, or with grease-dissolving solvents; this will dissolve the
lubricant in the drive mechanism.
5. Inspect the armature commutator. If the commutator is dirty, clean with 400 grit polishing cloth, then wipe clean. If commutator is rough, the
armature should be replaced. Do not undercut or turn the commutators. Inspect the points where the armature conductors join the commutator bars
to make sure they have a good connection. A burned commutator bar is usually evidence of a poor connection.
6. Check the armature for short circuits by placing on the growler and holding the hack saw blade over the armature core while the armature is
rotated. If the saw blade vibrates, the armature is shorted. Recheck after cleaning between the commutator bars. If the saw blade still vibrates,
replace the armature.
7. Check the frame and field assembly by using a test lamp. Place one lead on the field lead terminal and the other lead on one insulated brush. If the
lamp fails to light, the series coil is open and will require repair or replacement. This test should be made from each insulated brush to check brush
and lead continuity.
8. Using a test lamp, place one lead on the grounded brush holder and the other lead on either insulated brush. If the lamp lights, a grounded series
coil is indicated and must be repaired or replaced.
9. Check the current draw of the solenoid winding as follows:
9.1. If the solenoid is not removed from the starter motor, the field lead must be removed from the terminal on the solenoid before making these
tests. Complete tests in a minimum of time to prevent overheating of the solenoid.
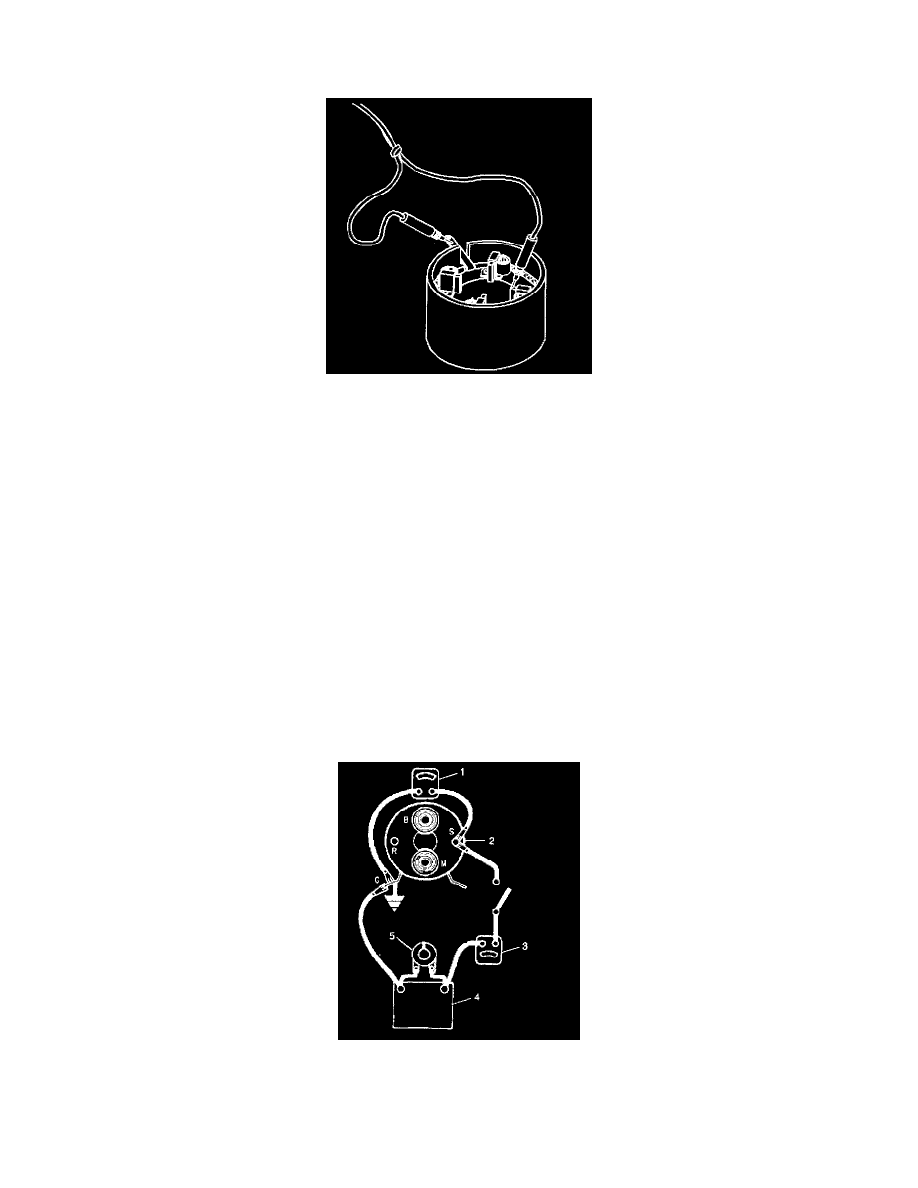
9.2. In order to check the hold-in winding, connect an ammeter (3) in series with 12-volt battery and the switch terminal on the solenoid. Connect
a voltmeter (1) to the switch (2) terminal and to the ground. Connect the carbon pile (5) across the battery (4). Adjust the voltage to 10 volts