
Toronado V8-307 50L (1982) Drum Brake System - Brake Shoe Service and Repair
Brake Shoe: Service and Repair
Types 1, 2 & 3
Removal
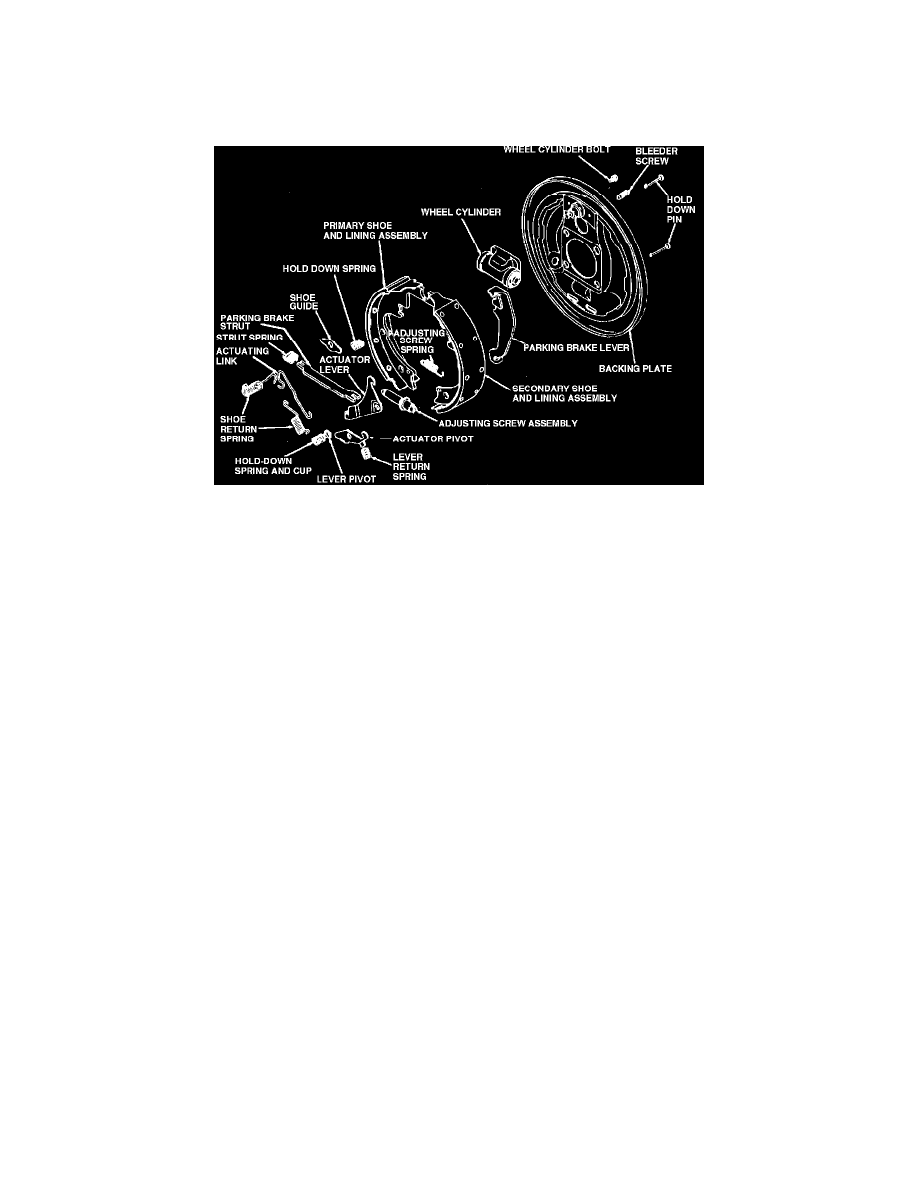
Fig. 2 Drum brake assembly. Type 2 typical
1.
Raise and support rear of vehicle, then remove tire and wheel assembly.
2.
Remove brake drum. If brake lining is dragging on brake drum, back off brake adjustment by rotating adjustment screw. Refer to individual car
chapter for procedure. If brake drum is rusted or corroded to axle flange and cannot be removed, lightly tap axle flange to drum mounting
surface with a suitable hammer.
3.
Using brake spring pliers or equivalent, unhook primary and secondary return springs. Observe location of brake parts being removed to aid
during installation.
4.
Remove brake hold-down springs with suitable tool.
5.
Lift actuating lever, then unhook actuating link from anchor pin and remove.
6.
Remove actuating lever(s) and return spring.
7.
Spread shoes apart and remove parking brake strut and spring.
8.
Disconnect parking brake cable from lever, then remove brake shoes from backing plate.
9.
Separate brake shoes by removing adjusting screw and spring, then unhook parking brake lever from shoe assembly.
10.
Clean dirt from brake drum, backing plate and all other components. Do not use compressed air or dry brush to clean brake parts. Many
brake parts contain asbestos fibers which, if inhaled, can cause serious injury. Clean brake parts with a water soaked rag or a suitable
vacuum cleaner to minimize airborne dust.
Inspection
1. Inspect components for damage and unusual wear. Replace as necessary.
2. Inspect wheel cylinders. Boots which are torn, cut or heat damaged indicate need for wheel cylinder replacement. On type 1 brakes, remove wheel
cylinder links. Fluid spill from boot center hole indicates cup leakage and need for wheel cylinder replacement. On type 2 and 3 brakes, use a
small screwdriver to pry center hole of boot away from piston. If fluid spills from center hole, cup leakage is indicated and wheel cylinder should
be replaced. On all types, light fluid coatings on piston within cylinder is considered normal.
3. Inspect backing plate for evidence of axle seal leakage. If leakage exists, refer to individual car chapters for axle seal replacement procedures.
4. Inspect backing plate attaching bolts, and ensure they are tight.
5. Using fine emery cloth or other suitable abrasive, clean rust and dirt from shoe contact surface on backing plate.
Installation
1.
Lubricate parking brake lever fulcrum with suitable brake lube, then attach lever to brake shoe. Ensure lever operates smoothly.
2.
Connect brake shoes with adjusting screw spring, then position adjusting screw. Ensure adjusting screw star wheel does not contact adjusting
screw spring after installation and also ensure righthand thread adjusting screw is installed on left side of vehicle and left-hand thread
adjusting screw is installed on right side of vehicle. When brake shoe installation is completed, ensure star-wheel lines up with adjusting
hole in backing plate.
3.
Lightly lubricate backing plate shoe contact surfaces with suitable brake lube, then the area where parking brake cable contacts backing plate.
4.
Install brake shoes on backing plate while engaging wheel cylinder links (if equipped) with shoe webbing. Connect parking brake cable to parking