
Grand Fury/Salon V8-318 5.2L VIN P 2-bbl (1984)
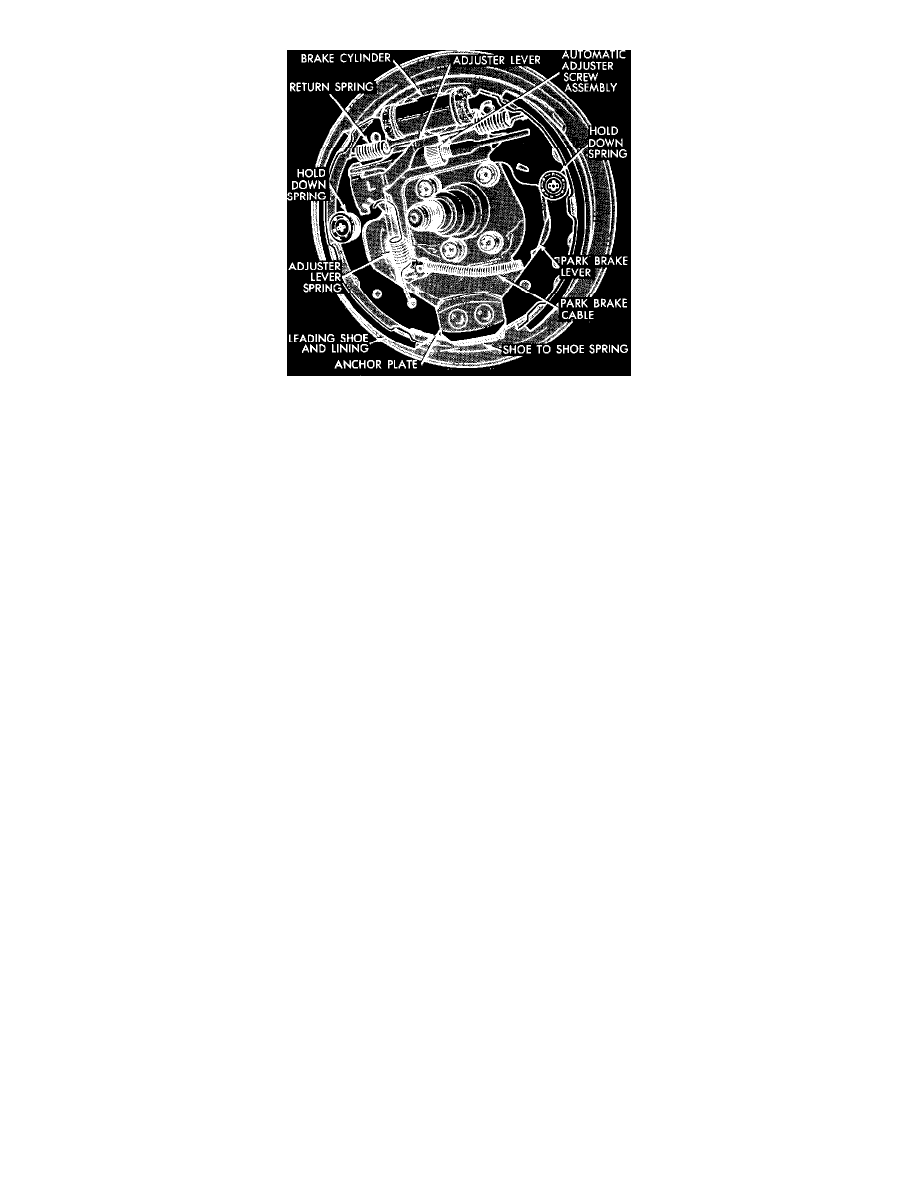
Fig. 1 Drum brake assembly. Type 3
1.
Raise and support rear of vehicle, then remove tire and wheel assembly.
2.
Remove brake drum. If brake lining is dragging on brake drum, back off brake adjustment by rotating adjustment screw.
3.
Using suitable pliers, remove adjuster lever spring.
4.
Remove adjuster lever.
5.
Turn automatic adjuster screw out to expand shoes past wheel cylinder boot.
6.
Using suitable tool, remove hold-down springs.
7.
Pull brake shoe assembly down and away from anchor plate.
8.
Remove C-clip retaining parking brake lever to trailing brake shoe webbing.
9.
Disassemble shoe assembly.
10.
Clean dirt from brake drum, anchor plate and all other components. Do not use compressed air or dry brush to clean brake parts. Many brake
parts contain asbestos fibers, which, if inhaled, can cause serious injury. To clean brake parts, use a water soaked rag or a suitable
vacuum cleaner to minimize airborne dust.
Installation
1.
Lightly lubricate anchor plate shoe contact surfaces with suitable brake lube.
2.
Remove brake drum hub grease seal and bearings, then clean and repack bearings and reinstall. Install new grease seal.
3.
Assemble automatic adjuster screw assembly, return spring and shoe-to-shoe spring to brake shoe assembly.
4.
Position lining assembly near anchor plate, then assemble parking brake lever to trailing shoe webbing. Secure with C-clip.
5.
Install lining assembly onto anchor plate. When positioned, back off adjuster nut to seat brake shoe ends in wheel cylinder.
6.
Install hold-down springs.
7.
Position adjuster lever, then using suitable pliers, install adjuster lever spring.
8.
Install brake drum and bearings. Refer to individual car chapter for wheel bearing adjustment procedure.
9.
Adjust brakes. Refer to individual car chapter for procedure.
10.
Install tire and wheel assembly.
11.
If any hydraulic connections have been opened, bleed brake system.
12.
Check master cylinder level, and replenish as necessary.
13.
Check brake pedal for proper feel and return.
14.
Lower vehicle and road test. Do not severely apply brakes immediately after installation of new brake linings or permanent damage may
occur to linings and/or brake drums may become scored. Brakes must be used moderately during first several hundred miles of operation
to ensure proper burnishing.