
Grand Voyager V6-201 3.3L VIN R SMFI (1997)
24.
Install the hood latch aligning it with the marks made in step 14.
25.
Connect the refrigerant lines. Torque the fasteners to 19-21 Nm (170-190 in. lbs.).
26.
Evacuate the A/C system. Continue evacuation for 45 minutes after the suction gauge reads -88 kPa (-26 in. Hg).
27.
Remove the air inlet resonator and air cleaner.
28.
For Trailer Tow (AHT) Equipped Vehicles, remove and discard both transmission fluid cooler hoses from the transmission to radiator. Install
formed hose, p/n 04682455, and clamps, p/n 06032839, to the outboard port of the transmission and the lower nipple of the radiator.
For NON-Trailer Tow Equipped Vehicles, remove the tape securing the transmission fluid cooler hoses together. Remove and discard the upper
transmission fluid cooler hose and clamps.
29.
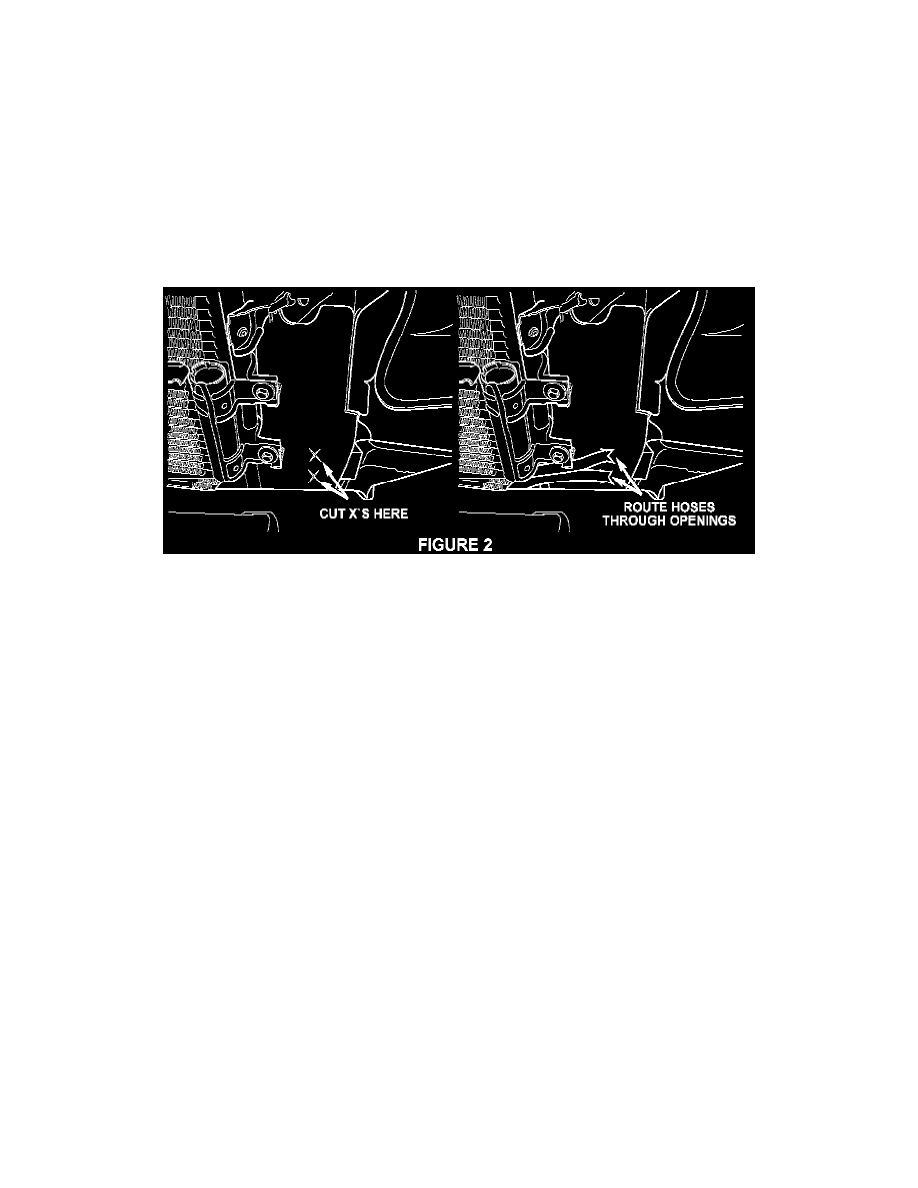
Pierce/Cut two "X"'s in the driver side radiator side air seal for the 5/16 in. fluid hoses to pass through, Figure 2.
30.
Cut the bulk 5/16 in. fluid hose into three pieces of the following lengths: 76 cm (30 in.), 102 cm (40 in.) and 66 cm (26 in.).
31.
Install the 76 cm (30 in.) hose and a clamp to the outboard fitting of the auxiliary cooler. Route the hose through one of the holes cut (step 29) in
the driver side radiator side air seal and install the hose and clamp to the top radiator transmission fluid hose fitting. Torque the clamps to 2 Nm
(16-20 in. lbs.).
32.
Install the 102 cm (40 in.) hose and a clamp to the inboard fitting of the auxiliary cooler. Route the hose through the other hole cut (step 29) in the
driver side radiator side air seal and install the hose and clamp to the inboard nipple on the transmission. Torque the clamps to 2 Nm (16-20 in.
lbs.).
33.
If the vehicle is equipped with the optional trailer tow package (sales code AHT), remove and discard the auxiliary transmission fluid cooler hose
and line assembly from the fan shroud. Install the 66 cm (26 in.) hose and clamps between the transmission fluid cooler fittings on the passenger
side of the radiator (this in-tank cooler is not used with the addition of the air to fluid auxiliary cooler). Torque the clamps to 2 Nm (16-20 in. lbs.).
34.
Install the air inlet resonator and the air cleaner housing.
35.
Charge the A/C system with R134a refrigerant using the procedure outlined and the quantity specified in the appropriate service manual.
36.
Start the engine and check for leaks at the transmission fluid lines, correct as necessary.
37.
With the transmission at normal operating temperature check the transmission fluid level. If fluid needs to be added use only Mopar ATF+2 Type
7176 (p/n 04798233).
38.
Install the front fascia.
39.
Install the front tire/wheel assemblies.