Montana SV6 V6-3.9L (2007)

Notice: Refer to Exterior Trim Emblem Removal Notice.
4. Use a plastic, flat-bladed tool to remove the emblem/nameplate from the panel surface.
5. When replacing, remove all adhesive as follows:
*
For body panels use a 3M(TM) Scotch Brite molding adhesive remover disk 3M(TM) P/N 07501 or equivalent.
*
For plastic panels use a lint free cloth and varnish makers and painters (VMP) naphtha or a 50/50 mixture by volume of isopropyl alcohol and
water to remove the adhesive.
Installation Procedure
Important: Apply the emblem/nameplate in an environment that is free from dust or other dirt that could come into contact with the
sticky backing. Foreign material may cause improper adhesion.
1. Clean the area where the emblem/nameplate will be installed.
Use a lint free cloth and VMP naphtha or a 50/50 mixture by volume of isopropyl alcohol and water to clean the area.
2. Dry the area thoroughly.
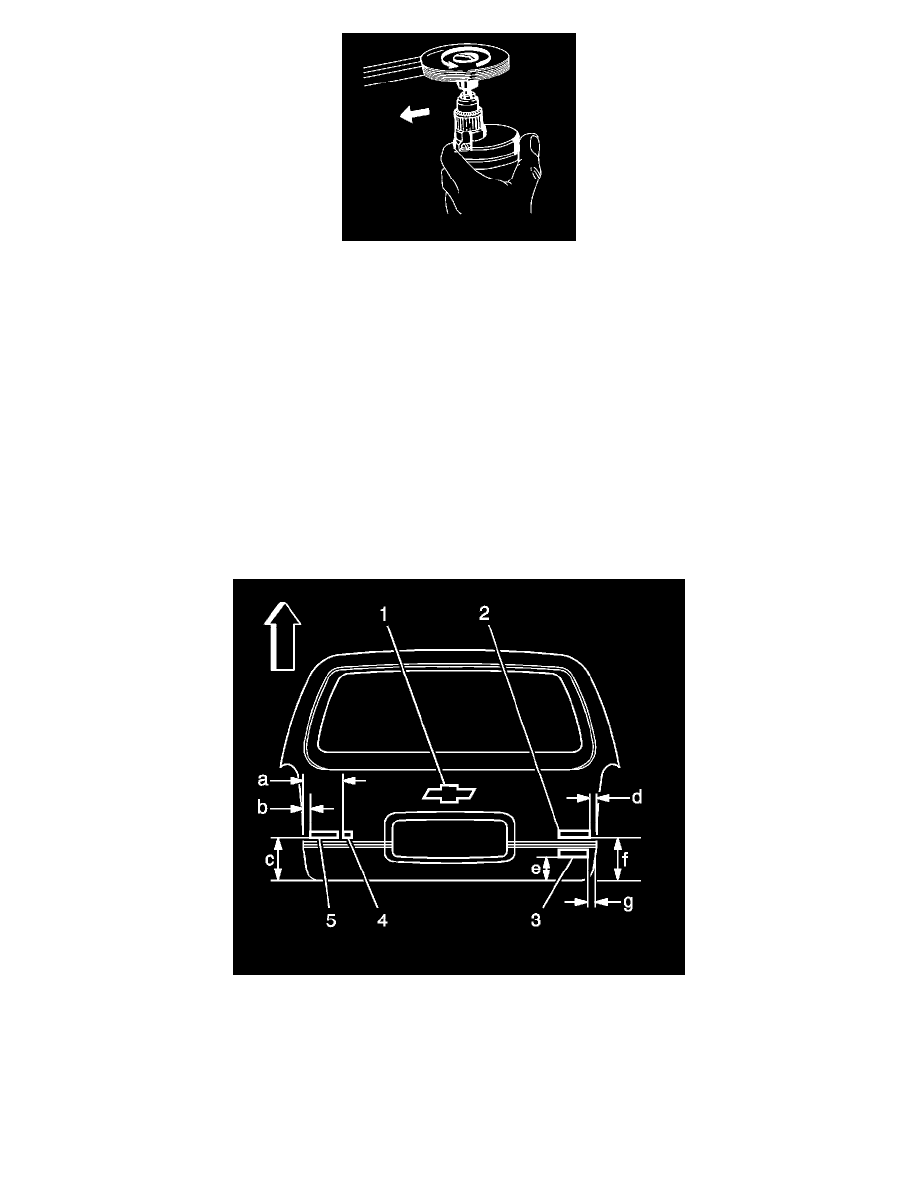
3. If the location of the emblem/nameplate has not been marked, apply tape and mark the location as shown below.
4. For the UPLANDER (5) emblem/nameplate, install as shown.
*
For the LS or LT emblem/nameplate, dimension (a) is 270 mm (10.63 in) from the left edge of the liftgate to the left edge of the LS or LT
emblem/nameplate.
*
Dimension (b) is 31 mm (1.30 in) from the outer edge of the liftgate to the left side of the UPLANDER emblem/nameplate edge.
*
Dimension (c) is 209 mm (8.23 in) from the bottom edge of the liftgate to the bottom of the UPLANDER emblem/nameplate.
*
For the Chevrolet (2) emblem/nameplate, dimension (d) is 31 mm (1.30 in) from the right edge of the liftgate to the right edge of the Chevrolet
emblem/nameplate.
*
For the VERSATRAK (3) emblem/nameplate, dimension (e) is 53 mm (2.09 in) from the bottom edge of the liftgate to the bottom edge of the
