
900 S Convertible L4-2290cc 2.3L DOHC EFI (1997)
NOTE: Step numbers below refer to numbers used in the illustrations.
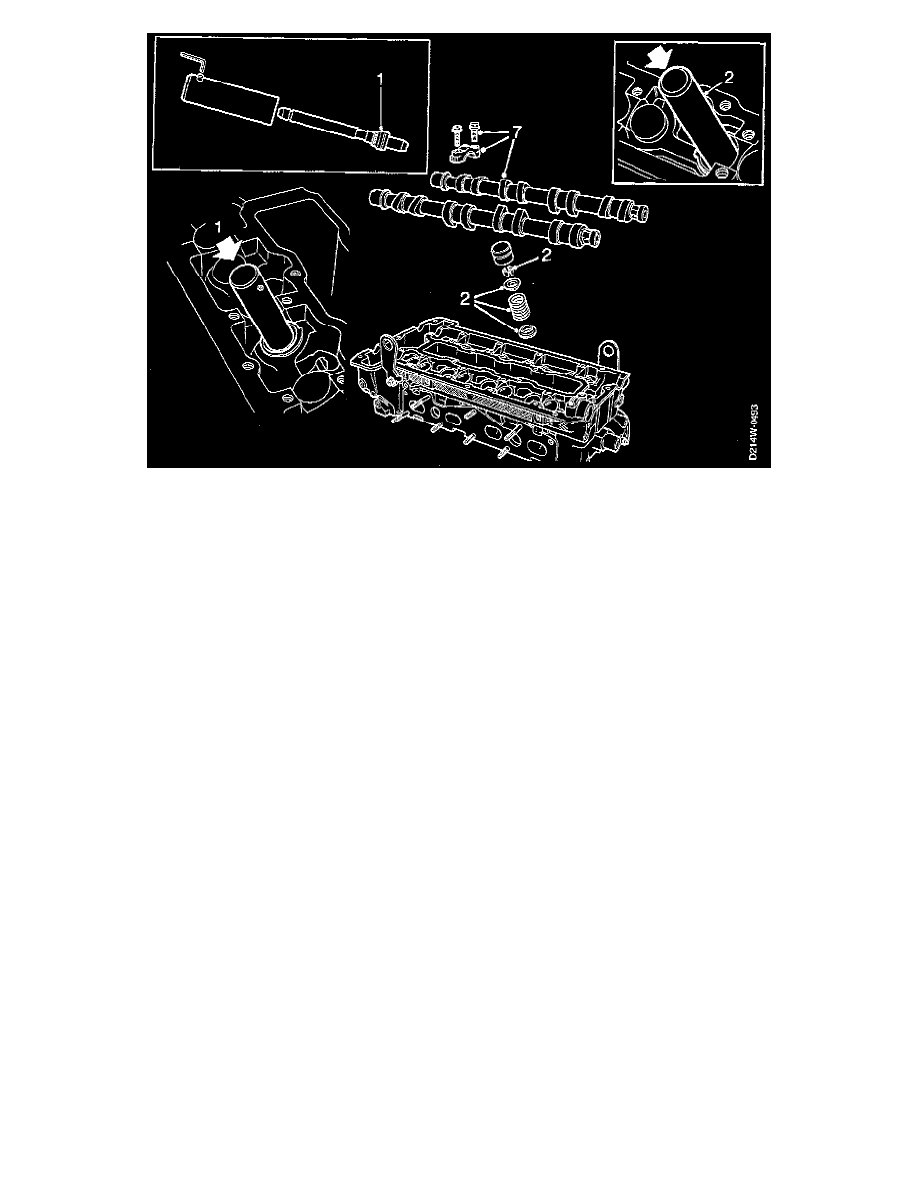
1. Remove the shank from valve seal installation tool No. 83 93 803, or equivalent, and install the valve guide seal in the tool with the rubber flange
inwards (upwards on the valve stem).
-
Install the seal on the valve.
-
Use a plastic mallet to tap the seal carefully into position.
2. Install the spring and spring cap and position the collets in the groove in the spring cap.
-
Using collet removal tool No. 83 94181 with installing tool No. 83 94 207, or equivalents, carefully tap the collets home.
3. Disconnect the compressed air supply, remove the air nipple and the flywheel locking segment.
4. Turn the crankshaft to the 0° mark and then to 45°.
5. Install the spark plugs and tighten to: 28 Nm (20.7 ft. lbs.).
6. Remove the protective sleeves and install the tappets.
7. Install the camshafts and bearing caps, beginning where the cams point downwards and press on the tappets.
-
Bearing caps marked 1-5 for the inlet side, 6-10 for the exhaust side.
-
Tighten camshaft bearing cap bolts to: 15 Nm (11 ft. lbs.).
NOTE: The black bolts have an oilway and should be fitted on the spark plug side.
8. Line up the marks on the camshafts with their timing marks and install the camshaft sprockets and chain.
-
Start with the camshaft on the inlet side.
-
Do not tighten the bolts yet.
9. Turn the crankshaft back to the 0° mark.
10. Prepare the chain tensioner for fitting by pressing down the catch and pushing in the chain tensioner.
11. Install the chain tensioner, using a 27 mm socket, then tighten to: 63 Nm (47 ft. lbs.).
12. Install the plug for the chain tensioner with push rod and spring and tighten to: 22 Nm (16 ft. lbs.).
13. Check that the chain is correctly seated in the guides.
-
Rotate the crankshaft two complete turns and check that the timing marks on the flywheel and camshafts are still in alignment.
-
Tighten the camshaft sprocket bolts to: 63 Nm (47 ft. lbs.).
14. Clean the flanges of the camshaft cover, using a suitable solvent.
15. Apply soap to the open end of the camshaft cover and install the cover, starting at the open end.
-
Then continue all the way round, on both the inside and outside.
-
Tighten cover bolt to: 15 Nm (11 ft. lbs.).
16. Install the nipple for crankcase ventilation and vacuum to the camshaft cover.
17. Install the ignition discharge module or ignition cables and the cover plate and tighten to: 11 Nm (8 ft. lbs.).
18. Reconnect the ignition discharge module leads.