
SL L4-1.9L SOHC VIN 9 (1991)
Firewall: All Technical Service Bulletins
Front Footwell - Water Leaks
NO.: 91-T-32B
DATE:
October, 1991
GROUP:
Body
CORP. NO.: 181511
SUBJECT:
Waterleak in Right or Left Front Footwell Area (Apply Sealant to Affected Seam) All 1991 Saturns Due to an error, this bulletin
supercedes Bulletins 91-T-32 and 91-T-32A, which should be discarded.
CONDITION:
Footwell area inside vehicle is wet due to water entering seam inside front wheelhouse.
CAUSE:
Condition may be caused by voids and skips in sealer in front wheelhouse seam.
CORRECTIVE
ACTION:
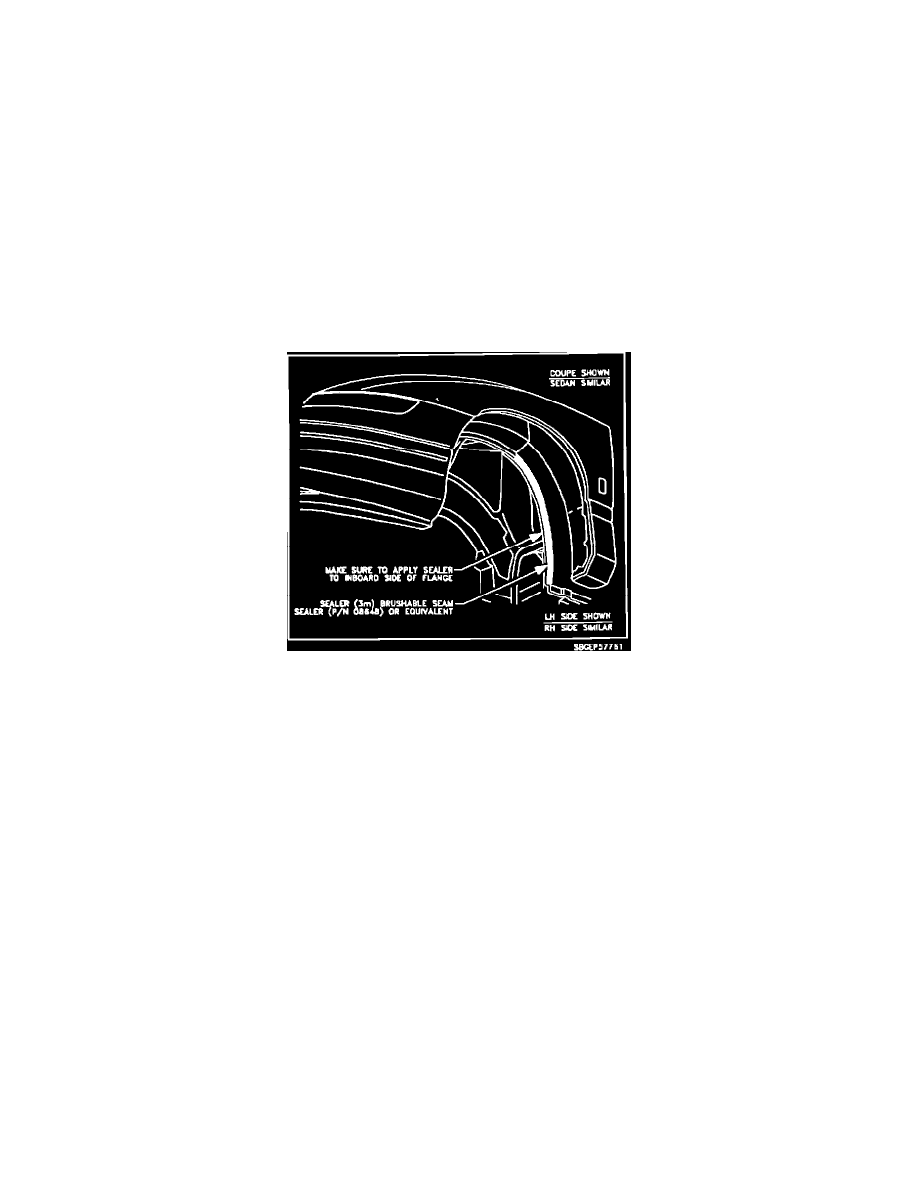
Apply a body and seam sealer such as 3M(R) Brushable Seam Sealer (P/N 08648 or equivalent) to inside of front wheelhouse seam.
PROCEDURE:
1.
Pull back carpeting in front footwell area on side where waterleak is evident.
2.
Remove wheel and wheelhouse panel from side where waterleak is evident. Refer to "Wheel Removal" procedure in the "Service Procedures"
section of the "Alignment, Wheels & Tires Service Manual" and "Wheelhouse Panel Removal" procedure in the "Front End" section of the
"Body/Collision Repair Service Manual."
3.
Apply water to the seam shown in the illustration on the next page for approximately five minutes, or until the waterleak is detected. If
waterleak is detected, go to Step 4 of this Bulletin. If no waterleak is detected, go to Step 5 of this Bulletin.
4.
If waterleak is detected:
a.
Apply a body and seam sealer such as 3M(R) Brushable Seam Sealer (P/N 08648 or equivalent) to the seam. Make sure the sealer is
applied to the inside of the seam as shown in the illustration on the next page.
b.
Allow the sealer to dry completely, then water test the area to make sure that the waterleak has been repaired.
c.
Install wheelhouse panel and wheel. Refer to "Wheelhouse Panel Installation" procedure in the "Front End" section of the
"Body/Collision Repair Service Manual" and "Wheel Installation" in the "Service Procedures" section of the "Alignment, Wheels &
Tires Service Manual."
d.
Place the carpeting back into the footwell area.
5.
If no waterleak is detected:
a.
Install wheelhouse panel and wheel. Refer to "Wheelhouse Panel Installation" procedure in the "Front End" section of the
"Body/Collision Repair Service Manual" and "Wheel Installation" in the "Service Procedures" section of the "Alignment, Wheels &
Tires Service Manual."
b.
Place the carpeting back into the footxvell area.