
SW L4-1.9L DOHC VIN 7 (1993)
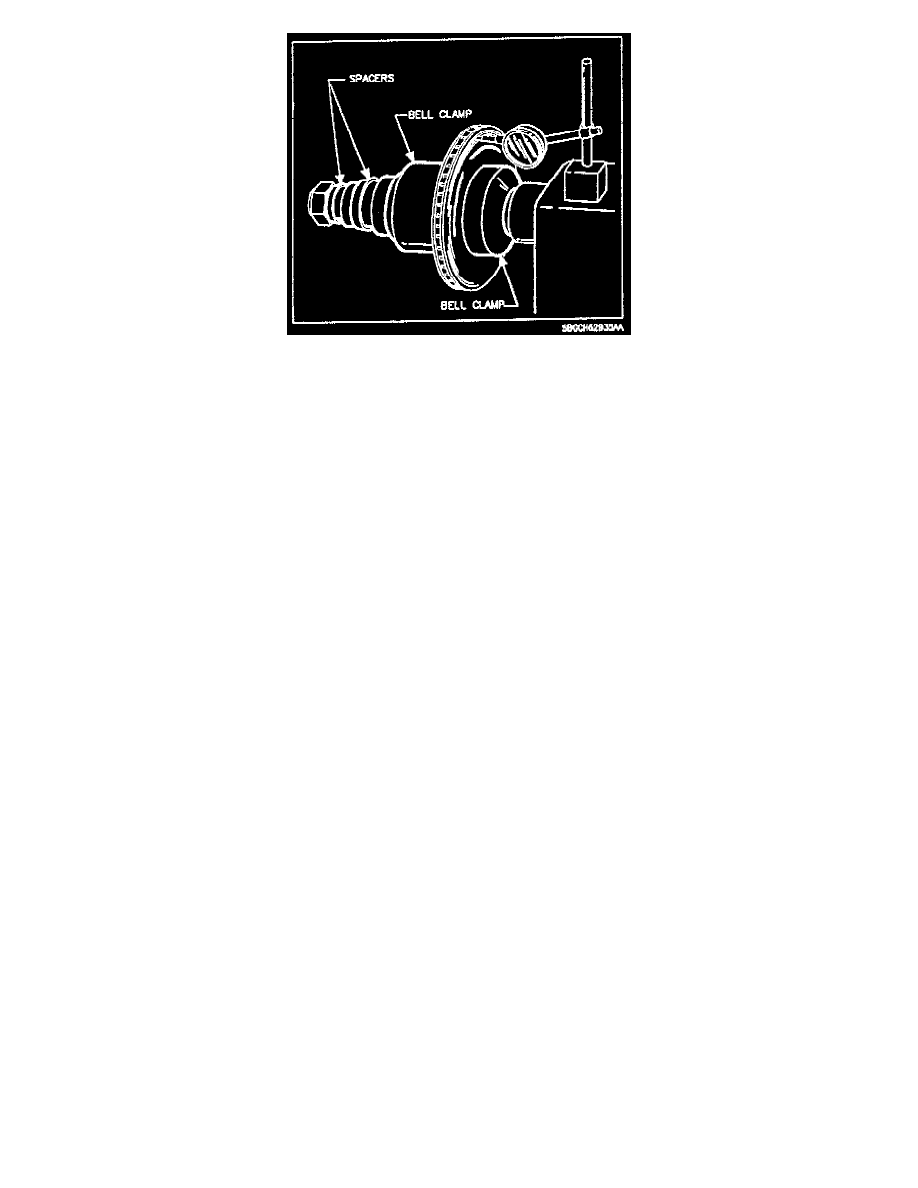
5. Before machining, use a magnetic dial indicator to make sure that the brake rotor turns squarely on the brake lathe. Attach dial indicator on lathe and
check brake rotor runout. Mark highest point of lateral runout on the brake rotor. Loosen attachment hardware and rotate brake rotor 180 degrees
(1/2 turn) while holding the inside bell clamp in its original position. Tighten attachment hardware and recheck brake rotor runout. Any runout must
follow the brake rotor. That is, the already marked high spot on the brake rotor must remain the high spot. If not, some problem exists in the
attachment of the brake rotor on the lathe, such as bent bell clamps, incorrect bell clamps, or untrue mounting surfaces.
6. After turning the brake rotor, visually check the machined brake rotor's surface finish. Any deterioration in the machined surface finish quality of the
brake rotor usually indicates worn cutting tips. Always use the cutting tips recommended by the brake lathe's manufacturer.
7. A secondary finishing operation improves brake rotor surface finish. Saturn recommends using silicon carbide 150 grit emery paper mounted on a
sanding block. Using moderate pressure, hold the paper against the brake rotor for 90 seconds per side as it turns in the lathe.
8. Thoroughly clean machined brake rotors with a spray solvent such as Saturn Choke Cleaner (P/N 21007127) or Saturn Brake and Choke Cleaner
(P/N 21007432) or equivalent.
INFORMATION ON PERFORMING BRAKE SERVICE
Several important factors are frequently overlooked when performing brake service. The following list must be considered and followed when
appropriate:
1. Proper machining of brake rotors is not a simple operation. Make sure the brake lathe is well maintained. Keep it clean at all times. Handle
attachment hardware with care. Damaged hardware will not machine brake drums or brake rotors accurately. Inspect the surface finish of machined
brake rotors and brake drums to make sure the cutting tips are in good condition. Make sure the cutting tips remain in good condition. Use a dial
indicator to make sure brake rotors turn squarely on the brake lathe. (Refer to step 5 under the "Recommended Procedure for Machining Brake
Rotors" in this bulletin.)
2. Keep all installed brake parts as clean as possible. Make sure to clean machined brake rotors and brake drums with a spray solvent (Saturn Choke
Cleaner P/N 21007127 or Saturn Brake and Choke Cleaner PIN 21007432 or equivalent). Always wipe off machined brake rotor surfaces with a lint
free shop towel after cleaning.
3. Thickness variation of brake rotors due to wear is a major cause of brake pulsation. Using a micrometer, check for excessive thickness variation
whenever a customer comments on brake pulsation.
4. Lateral brake rotor runout and restricted pads together are the leading cause of uneven brake rotor wear. Therefore, this combination leads directly to
brake pulsation.
IMPORTANT:
Make sure calipers slide freely on their pins; make sure brake pads move freely in their brackets.
5. Uniform wheel nut torque is very important. Uneven torque can distort brake rotors, causing excessive lateral brake rotor runout. A hand-held torque
wrench must be used to secure wheel nuts using a crisscross tightening pattern, even when a torque stick and an air-powered impact gun are used.
Torque: 140 Nm (103 ft.lbs.)
6. After brake rotors/brake drums and brake pads/shoes have been replaced, proper break-in promotes longer life and quieter, smoother brake
operation. To obtain proper break-in, follow this procedure: