seat Workshop Repair Guides

SEAT Workshop Service and Repair Manuals

Skirt mouldings - Assembly overview > < Remove the rear wing trim
Align and attach the trim on the rear wing
  Note
t  Remove adhesive residue with glue remover → Parts Catalogue.
t  The adhesive area must be free of contaminations.
t  Align the trim on the wing before final attachment.
t  The cover of the rear bumper must be assembled for aligning and attaching the trim.
   
Attach and align
–  Clean the fastening area on the wing with Isopropyl or Heptanol alcohol.
–  Allow to dry well.
–  Cut a few strips of body tape sized at 15x6 mm.
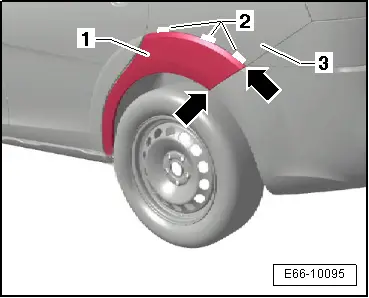
–  Place the rear wing trim -2- on the body -1-.
–  Align the trim -2- with the section -4- of the rear wing -1-.

  Note
   
The corners of the bumper trim must correspond with the corners of the trim -Arrows-.
–  Attach the strips of the body tape -2- along the upper section of the trim -1- on the rear wing -3-.
–  Remove the trim -1- again after the alignment.
Installing
–  Then treat the area where the new rear wing trim should be applied using silicone cleaner.
  Note
The trim must be applied precisely during the assembly, since a later position correction is no longer possible.
  E66-10095
–  Heat the adhesive tape -1- of the trim -2- by using the hot air gun -SAT 1416- to approx. 35 °C, check the temperature by using the digital thermometer -SAT 4002-.
–  Remove the backing of the adhesive tape -3-.
Attach the rear wing trim by observing the reference markings.
t  Body adhesive tape strips
t  wing section
t  Corners of the bumper
–  Apply pressure in the area of the trim adhesive tape by using the installation tool -T20098-.
–  Also press the adhesive area by pressing a cloth over the trim.
–  Remove the body tape strips and clean the area.
  E66-10097

Skirt mouldings - Assembly overview > < Remove the rear wing trim