seat Workshop Repair Guides

SEAT Workshop Service and Repair Manuals

Rear lid trim: Assembly overview > < Right side trim: Assembly overview
Removing and installing side trim (right-side)
Special tools and workshop equipment required
   
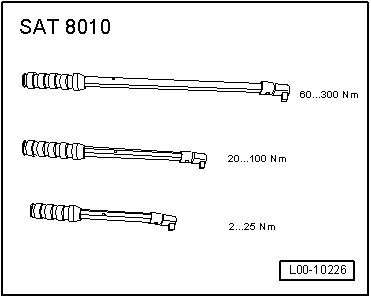
t  Torque wrench kit -SAT 8010-
  L00-10226
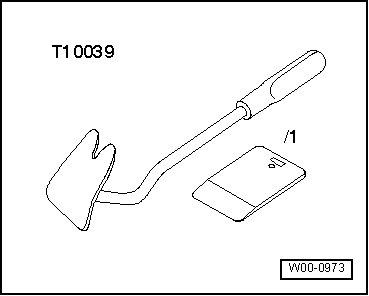
t  Release lever -T10039-
Removal:
–  Remove the rear end trim → Chapter.
–  Fold over the 2/3 section (right-side) of the rear seat backrest .
  W00-0973
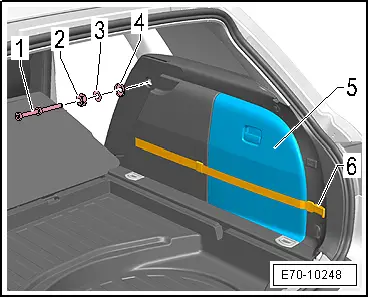
–  Loosen the securing strap -6-.
–  Remove cover -5-.
–  Unfasten nut -2-.
–  Unscrew and remove striker pin -1- together with washer -3- and dished washer -4-.
  E70-10248
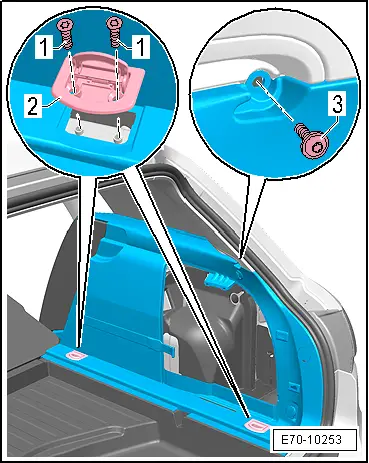
–  Unscrew the bolt -3-.
–  Move the fastening rings -2- upwards.
–  Unscrew the bolts -1- in each fastening ring -2-.
–  Remove the fastening rings -2- upwards.
  E70-10253
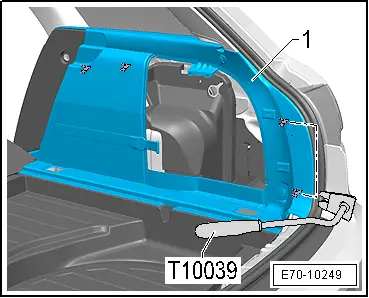
–  Release the side trim -1- using the release lever -T10039-.
  E70-10249
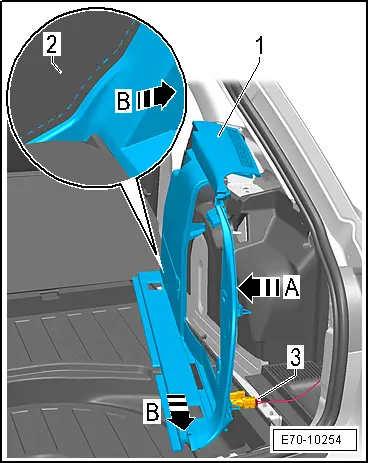
–  Separate the side trim -1- in the direction of arrow -A-.
–  Disconnect plug -3-.
–  Release the side trim -1- from the side padding -2- and remove in the direction of arrow -B-.
  E70-10254
Installation
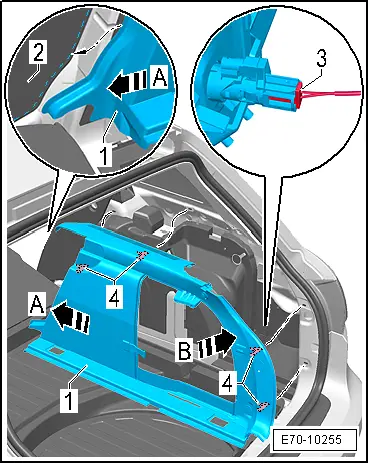
–  Install the side trim -1- at side padding -2- starting in the direction of arrow -A-.
–  Plug in connector -3-.
–  Fix the clips -4- of the side trim -1- to the body in the direction of arrow -B-.
  Note
Following installation, make sure seal is properly in position over trim.
  E70-10255
–  Install the fastening rings -2-.
–  Tighten bolt -1- to torque of 4 Nm.
–  Tighten bolt -3- to a torque of 1.8 Nm.
  E70-10253
–  Adjust the locking bolt -1- and tighten the nut -2- to 55 Nm.
–  Fit cover -5-.
–  Lock the securing strap -6-.
–  Install the rear end trim → Chapter.
–  Reattach the 2/3 section of rear seat backrest, right side .
  E70-10248

Rear lid trim: Assembly overview > < Right side trim: Assembly overview