skoda Workshop Repair Guides

Skoda Workshop Service and Repair Manuals

Summary of components of rear window > < Summary of components of windscreen
Removing and installing windscreen
  WARNING
After replacing the vehicle windows, they must be provided with the vehicle identification number → Chapter.
Removing undamaged windscreen
  WARNING
Wear protective goggles and gloves when cutting hardened PUR adhesive cement and when working with window and cutting cord.
  Note
A second mechanic is required for removing and installing.
–  Remove the plenum chamber cover → Chapter.
–  Remove door trim panels from the top of pillars A → Chapter.
–  Remove pillar A decorative trim outside → Chapter.
–  Removing interior rear-view mirror → Chapter.
–  Remove sun visors using hooks → Chapter.
–  Remove antenna plug (depending upon vehicle equipment).
–  Cover the painted surfaces along the window with textile adhesive tape.
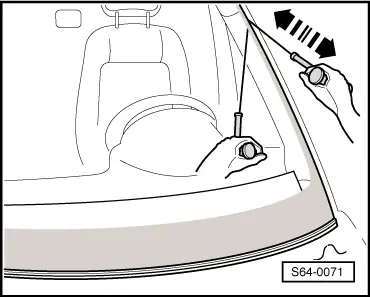
–  Pierce adhesive cement with the piercing needle in the bottom left corner.
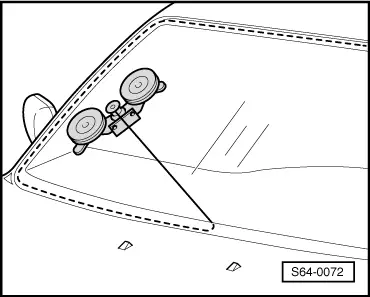
–  Pull cutting cord through the needle and attach the cord end to the windscreen wiper support.
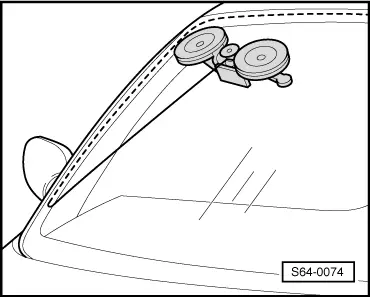
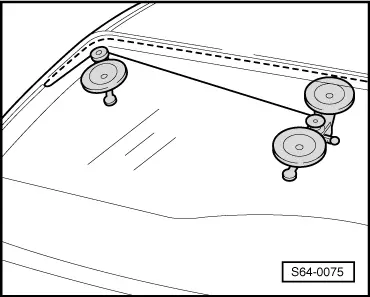
–  Insert cutting cord all around the windscreen below the sealing profile → Item.
   
–  Attach spooler -V.A.G 1654A- to the inner side of the window and insert the cord end into the spooler.
–  Cut through the adhesive cement with spooler -V.A.G 1654A-.
  S64-0076
–  Offset spooler -V.A.G 1654A- and continue cutting.
  S64-0072
–  Offset spooler -V.A.G 1654A- and attach steering roller -V.A.G 1474/1- to the inner side of the windscreen.
  Note
Cut through the adhesive cement as long as the cutting cord is guided in the steering roller -V.A.G 1474/1-.
  S64-0073
–  Remove steering roller -V.A.G 1474/1- and continue cutting through adhesive cement.
  S64-0074
–  Offset spooler -V.A.G 1654A- and attach steering roller -V.A.G 1474/1- in the top right corner of the windscreen.
  Note
Cut through the adhesive cement as long as the cutting cord is guided in the steering roller -V.A.G 1474/1-.
–  Remove steering roller -V.A.G 1474/1- and continue cutting through adhesive cement.
–  Repeat procedure in the top left and bottom corner.
–  Remove window with the aid of the suction cup gripper e.g. -V.A.G. 1344-.
Removing undamaged windscreen
  WARNING
Wear protective goggles and gloves when cutting hardened PUR adhesive cement and when working with window and cutting cord.
–  Remove the plenum chamber cover → Chapter.
–  Remove door trim panels from the top of pillars A → Chapter or → Chapter.
–  Remove pillar A decorative trim outside → Chapter.
–  Removing interior rear-view mirror → Chapter.
–  Remove sun visors using hooks → Chapter.
–  Remove antenna plug (depending upon vehicle equipment).
–  Cover the painted surfaces along the window with textile adhesive tape.
–  Pierce adhesive cement with the piercing needle.
–  Draw cutting cord through the needle and insert the cutting cord holders.
  S64-0075
–  Cut out windscreen with cutting cord along the circumference of the window.
–  Removing windscreen.
Installing windscreen
–  Prepare flange for fitting → Chapter.
–  Glueing on → Chapter.
–  Waiting time → Chapter.
  S64-0071

Summary of components of rear window > < Summary of components of windscreen