skoda Workshop Repair Guides

Skoda Workshop Service and Repair Manuals

Repairing the valve gear - Part 2 > < Repairing the valve gear - Part 1
Removing and installing camshaft
Special tools and workshop equipment required
t  Sealant -AMV 174 004 01-
t  Grease -G 052 735 A2-
t  Extractor -T10094A-
t  Pipe section -T10123-
t  Assembly device -T10118-
t  Sealant remover gasket stripper (bearing code GST, bearing article no. R 34402), manufacturer Retech s.r.o.
t  Cleaning and degreasing agent, e.g. -D 000 401 04-
Remove cylinder head cover
  Note
Sealing surfaces of cylinder head cover must not be reworked.
–  Removing timing gear cover → Chapter.
–  Removing the camshaft sprockets → Chapter.
–  Remove pipe section -T10123-.
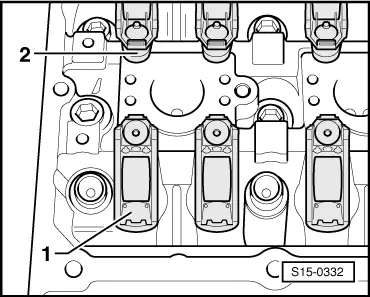
–  Remove the ignition coils with power output stage -N70 -, -N127-, -N291- using the extractor -T10094A- → Chapter.
   
–  Slacken the bolts of the cylinder head cover crosswise from outside to inside and remove.
–  Carefully remove the cylinder head cover and apply slight knocks with a rubber-headed hammer from above to loosen as necessary (the cylinder head cover sits on the dowel sleeves).
  WARNING
Use protective gloves and protective googles when working with sealant and grease remover!
Remove the remaining sealant on the cylinder head and on the cylinder head cover with sealant remover.
Degrease the sealing surfaces.
  Note
Sealant residues must not remain in the cylinder head.
Remove the camshafts
  S15-0329
–  Slacken the screws of the camshaft bearing in the given sequence and remove.
–  Carefully remove camshaft bearing cap.
–  Carefully lift out camshafts and place down on a clean surface.
Install camshafts
  Note
Lug of inlet camshaft must be positioned on the hole for the hall sender.
–  Coat the camshaft bearing on the cylinder head cover and on the camshaft covers with a constant layer of grease -G 052 735 A2-.
–  Carefully insert camshafts into the cylinder head cover.
–  Fit on camshaft bearing cap.
  S15-0330
–  Install screws of camshaft bearing in given sequence and tighten forcefully by hand.
Make sure that the camshaft bearing caps are not tilted.
   Tightening torque: 10 Nm + torque a further 90° (1/4 turn)
Pay attention to smooth operation of the camshafts.
Install cylinder head cover
l  Sealing surfaces must be free of oil and grease.
l  The pistons must not be positioned at top dead centre.
  Note
When turning the camshaft the valves may touch the piston in TDC.
–  Cut off nozzle of tube of the sealant -AMV 174 004 01- at the front marking (Ø of nozzle approx. 2 mm).
  S15-0331
–  Apply a thin even sealant bead on the clean sealing surface of the cylinder head.
t  Thickness of sealant bead: 2…3 mm.
t  The sealant must be run past on the inside in the area of the bolt holes.
  Note
t  The sealant bead must not be thicker than 3 mm otherwise excess sealant may get into the oil ducts and can cause engine damage.
t  The cylinder head cover must be installed within 15 minutes after applying the sealant.
  S15-0244
–  Make sure all roller rocker arms are correctly positioned on the end of valve stems -1- and on the relevant hydraulic supporting elements -2-.
  S15-0332
–  Carefully fit cylinder head cover onto the dowel sleeves -arrows- vertically from above into the cylinder head.
  S15-0333
–  Insert the new fixing screws and tighten diagonally and evenly from the inside to the outside.
Make sure that the cylinder head cover is not tilted.
   Tightening torque: 10 Nm + torque a further 90° (1/4 turn)
–  Wipe away exuded sealant particularly in the area steering wheel cover.
  Note
After installing the cylinder head cover, allow the sealant to dry for about 30 minutes.
Further installation occurs in reverse order.
  S15-0334

Repairing the valve gear - Part 2 > < Repairing the valve gear - Part 1