skoda Workshop Repair Guides

Skoda Workshop Service and Repair Manuals

Checking the coolant system for leaktightness > < Removing and installing fan shroud with radiator fanV7
Removing and installing radiator
(Fabia II, Roomster, Rapid)
Special tools and workshop equipment required
t  Catch pan, e.g. -VAS 6208-
t  Broad cross-head screwdriver
t  Pliers for spring strap clamps
Removing
–  Remove front bumper → Body Work; Rep. gr.63.
For vehicles Rapid
–  Remove headlights → Electrical System; Rep. gr.27
Continued for all vehicles
–  Drain coolant → Chapter.
–  Remove fan shroud with radiator fan -V7- → Chapter.
For vehicles Fabia II, Roomster
–  Disconnect plug from thermo-switch for radiator fan -F18-.
Continued for all vehicles
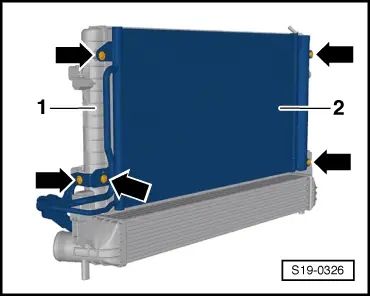
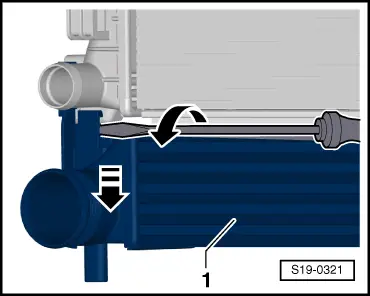
–  Detach top coolant hose from connection fitting of radiator.
For vehicles Fabia II, Roomster
   
–  Remove the holder for the windscreen washer fluid reservoir.
   To do so, press in the catch -direction of arrow 1- and at the same time push the bracket upwards -direction of arrow 2-.
Continued for all vehicles
  S19-0324
–  Unscrew right and left screw -2- for radiator bearing.
–  Push the radiator to the rear and remove the right and left radiator bearing ( → Chapter, Pos. 8).
Vehicles without air conditioning
–  Push the radiator together with the charge air cooler upwards out of the lower rubber bearings and remove it laterally down.
Vehicles with air conditioning
–  Remove V-ribbed belt → Chapter.
  WARNING
Risk of injury through refrigerant.
Do not open the refrigerant circuit of the air conditioning system.
  Caution
Risk of damaging the condenser as well as the refrigerant lines and hoses.
Do not over-tension or buckle refrigerant lines and hoses.
–  Remove the AC compressor from the bracket for auxiliary units and secure it with connected refrigerant hoses to the body.
  S19-0323
–  Mark the installation position of the screws -1- on the right and left and only slacken them.
–  Push the radiator together with the charge air cooler and the condensor upwards out of the lower rubber bearings.
   To do so, pull the plastic housing of the lock carrier downwards. There is little space on the right between the refrigerant line and the body.
–  Lay the radiator with the condensor to the rear.
  S19-0323
–  Release the screws -arrows- of the condensor -2- from the radiator -1-.
–  Draw the condensor forwards and attach to the lock carrier.
–  Remove radiator together with charge air cooler laterally down.
Separate the charge air cooler from the radiator.
  Caution
To prevent damage to the charge air cooler, the separation of the charge air cooler from the radiator must be carried out by 2 mechanics.
  S19-0326
–  Slide a broad cross-head screwdriver into the left catch from the front and the rear. Carefully open the catch of the charge air cooler -1- at the radiator by turning the screwdriver.
–  Pull the left charge air cooler slightly down in this position.
  S19-0321
–  Push the charge air cooler -1- to the right out of the catch of the radiator -2-.
Install
Installation is performed in the reverse order, pay attention to the following points:
  S19-0322
–  On vehicles with air conditioning system, push the plastic housing of the lock carrier upwards into the initial position and tighten the screws -1- on the right and left.
   Tightening torque: 8 Nm.
–  Top up coolant → Chapter.
  S19-0323

Checking the coolant system for leaktightness > < Removing and installing fan shroud with radiator fanV7