Skoda Workshop Service and Repair Manuals
HOME
FEATURES
MENU
INDEX
ABOUT US
Testing oil pressure and oil pressure switchF1 >
< Removing and installing oil pump
Fabia Mk2
Power unit
1,2/63; 77 kW TSI engine
Engine lubrication / Lubrication system
Removing and installing engine oil cooler
Removing and installing engine oil cooler
Removing and installing engine oil cooler
Special tools and workshop equipment required
t
Catch pan, e.g. -VAS 6208-
t
Hose binding claw
Removing
–
Drain the coolant from the cooling system
→ Chapter
.
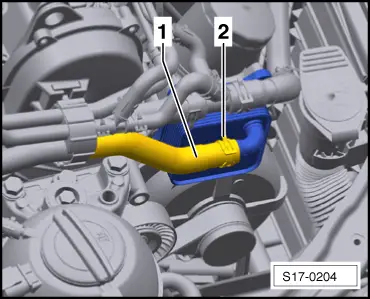
For the vehicles Fabia II, Roomster
–
Open the spring strap clamp with the hose binding claw and detach the coolant hose
-1-
.
For the vehicles Octavia II, Yeti
–
Open the spring strap clamp with the hose binding claw and detach the coolant hose
-1-
.
Continued for all vehicles
–
Release the four fixing screws from the engine oil cooler and remove the engine oil cooler.
Install
Note
Replace gasket if damaged.
For the vehicles Fabia II, Roomster
–
Position the engine oil cooler
-2-
at the bracket and tighten the fixing screws crosswise to 8 Nm + torque a further 90° (
1
/
4
turn).
–
Place the coolant hose
-1-
onto the oil cooler fitting and attach it with the spring strap clip.
For the vehicles Octavia II, Yeti
–
Position the engine oil cooler
-2-
at the bracket and tighten the fixing screws crosswise to 8 Nm + torque a further 90° (
1
/
4
turn).
–
Place the coolant hose
-1-
onto the oil cooler fitting and attach it with the spring strap clip.
Continued for all vehicles
–
Top up and bleed cooling system
→ Chapter
.
–
Inspect coolant level in the expansion reservoir, top up with coolant if necessary.
Note
If the engine oil cooler was replaced, the coolant must be changed.
Power unit
1,2/63; 77 kW TSI engine
Engine lubrication / Lubrication system
Removing and installing engine oil cooler
Testing oil pressure and oil pressure switchF1 >
< Removing and installing oil pump
 Note
Note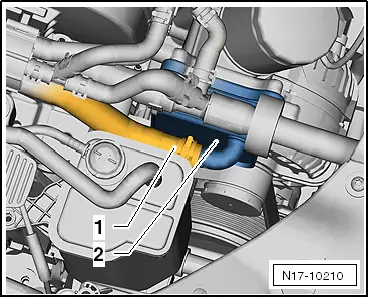 Note
Note
 Note
Note
Note
Note