skoda Workshop Repair Guides

Skoda Workshop Service and Repair Manuals

Setting the hand-brake > < Removing and installing rear wheel brake
Removing and installing brake pads
Special tools and workshop equipment required
t  Resetting tool -T10165-
t  Assembly device -T10165/1-
t  Brake filling and bleeding device, e.g. -VAS 5234-
t  Brake fluid → Chapter
  Note
t  When removing mark the brake pads you intend to keep using. Install in the same location, as otherwise this may cause uneven braking.
t  Do not unscrew the brake hose when replacing the brake pad.
Removing
–  Remove rear centre console → Body Work; Rep. gr.68.
–  Release the hand-brake.
   
–  Release the adjusting nut -1- so far until the hand-brake cable can be unhooked from the compensating clamp -2-.
–  Raise vehicle.
–  Remove wheels.
  S46-0212
–  Lift off the clip -1- with a screwdriver and pull down to remove.
–  Press the hand-brake lever -2- in the -direction of the arrow- and while doing so unhook the hand-brake cable -3-.
  N46-0232
–  Unscrew the fixing screws of the brake carrier while counterholding the guide bolts.
  Note
The brake line and the surrounding components are not shown to simplify the illustration.
–  Remove the brake caliper housing and secure with wire in such a way that the weight of the brake caliper does not burden or damage the brake hose.
  N46-0184
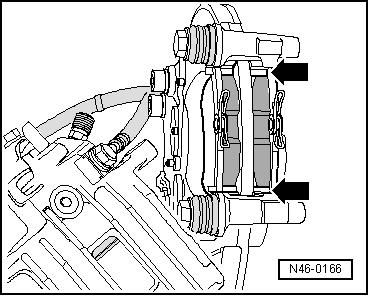
–  Remove the brake pads and pad retaining springs -arrows-.
  Note
Only use alcohol to clean the brake caliper housing.
–  Clean the brake caliper housing, in particular the adhesive surface for the brake pad must be free from glue residues and grease.
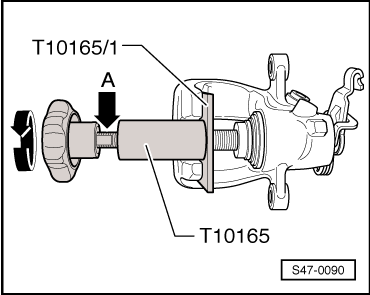
Install
  Note
Before inserting new brake pads, press the piston with a resetting and turning out tool -T10165- into the cylinder. Drain the brake fluid from the brake fluid reservoir using a ventilation bottle before pushing back. Otherwise brake fluid can flow out and lead to damage if brake fluid was added in the meantime.
  WARNING
Brake fluid is toxic and must never be sucked into your mouth through a hose.
  N46-0166
t  Insert the resetting and turning out tool -T10165- in such a way that the collar of the tool -T10165/1- is resting on the brake caliper.
t  Use open-jawed spanner on a provided spanner surface -arrow A- if the piston is difficult to move.
t  When adjusting the piston with a piston resetting device the automatic adjustment in the brake caliper is destroyed.
–  Screw the piston by turning the knurled wheel of the resetting tool -T10165- to the right into the brake caliper.
  S47-0090
–  Insert the new pad retaining springs -arrows- and brake pads in the brake carrier.
–  Remove the protective foil from the supporting plate of the brake pad.
  Note
There are four self-locking screws in the repair set, which must be fitted.
  N46-0166
–  Secure the brake caliper housing using new self-locking screws.
Counterhold at the guide bolt when tightening.
Tightening torque: 35 Nm.
  N46-0184
–  Press the hand-brake lever -2- in the -direction of the arrow- and hook on the hand-brake cable -3-.
–  Fit clip -1-.
–  Setting the hand-brake → Chapter.
–  Attach the wheels.
–  Lower the vehicle.
  Note
t  After each brake pad replacement, forcefully apply the brake pedal repeatedly to ensure the brake pads go into their normal operating position.
t  Check brake fluid level after replacing the brake pads.
  N46-0232

Setting the hand-brake > < Removing and installing rear wheel brake