skoda Workshop Repair Guides

Skoda Workshop Service and Repair Manuals

Rear suspension, drive shaft > < Repairing drive shaft with inner tripod joint AAR 2000 and outer CV joint
Disassembling and assembling the tripod joint AAR 2000
Special tools and workshop equipment required
t  → Chapter
Grease quality and grease quantity
→ Anchor
Dismantling
–  Open warm-type clamp on joint part.
–  Push back the joint boot.
   
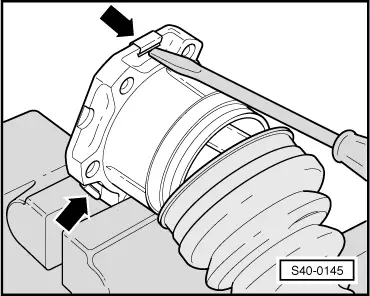
–  Straighten the metal tabs -arrows- with a screwdriver and lever off cover.
  S40-0145
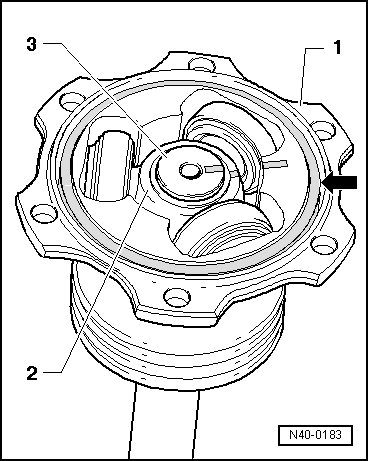
–  Remove O-ring seal -arrow- from slot.
–  Mark fitting position of parts -1- ... -3- with the help of lines.
-1- Joint part
-2- Tripod spider
-3- Drive shaft
  Note
t  If the parts -1- ... -3- are not marked and if they are not fitted in their original position again when assembling, at a later stage this could cause noises during driving.
t  Use a waterproof marker for marking.
–  Hold the joint part and remove drive shaft from the vice.
  N40-0183
–  Clamp the drive shaft in a vice with protective jaws.
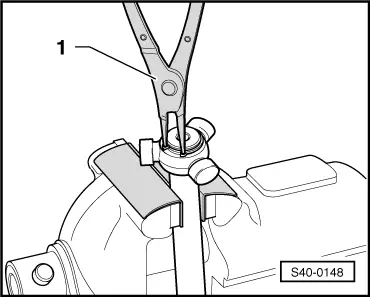
–  Remove circlip.
-1- Circlip pliers (commercially available)
–  Insert the drive shaft in the press.
  S40-0148
–  Hold the drive shaft and push tripod spider off the drive shaft.
–  Remove the tripod spider with rollers and lay aside on a clean surface.
–  Remove the joint part from the drive shaft.
–  Remove the joint boot from the drive shaft.
–  Clean the drive shaft and the joint part.
Assembling together
–  Insert the joint boot on the drive shaft.
–  Insert the joint part on the drive shaft.
Install tripod joint
  Note
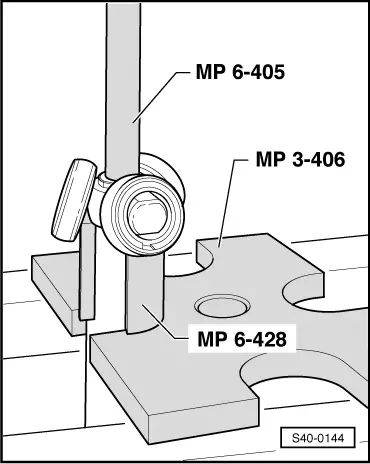
Chamfer on the tripod spider must point towards the drive shaft. Chamfer serves as an assembly aid.
  S40-0144
–  Position the tripod spider on the drive shaft according to the marking and drive in up to the stop.
–  Insert new circlip and pay attention to correct position.
–  Slide the joint part over the rollers and hold down.
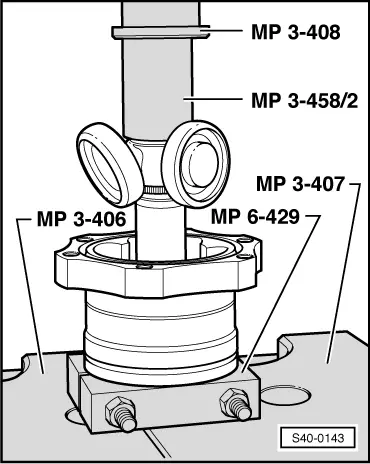
–  Remove the drive shaft from the special tool and clamp in the vice.
  S40-0143
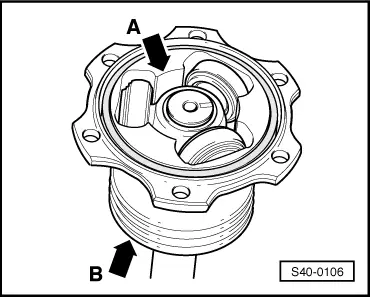
–  Press the high temperature grease from the repair set evenly into the tripod joint (on the tripod spider side) -arrow A- and into the rear side of the tripod joint -arrow B-.
Grease quality and grease quantity
→ Anchor
–  Installing the joint boot.
  Note
The bead in the joint boot must fit into the groove of the joint part.
–  Remove drive shaft from the vice and clamp the joint part.
  S40-0106
–  Insert new gasket ring -arrow- from the repair kit in the groove.
–  Fit the new cover on the joint part.
  Note
The bores of the cover and joint part must be flush.
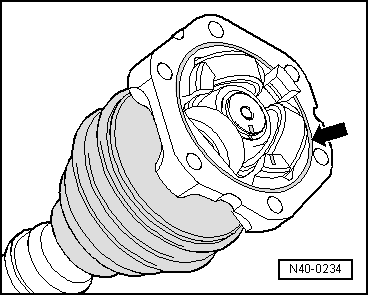
–  Tighten open warm-type clamp using pliers.
Grease quantity
  N40-0234
Outer joint Ø mmTotal quantity of grease (g)Inner joint Ø mmTotal quantity of grease (g)of which in
 Spread evenly in the joint  Joint (g)Joint boot (g)
819094 (synchronous running) 1)904545
90110100 (synchronous running) 1)1206060
90110108 (tripod) 1)110110_
90110124 (tripod) 1)140140_
98130100 (synchronous running) 2)190190_

1) Valid for all vehicles, except 1.9 ltr./74 kW PD and 1.9 ltr./96 kW PD engines.
2) Valid for vehicles with 1.9 ltr./74 kW PD and 1.9 ltr./96 kW PD engines.
Grease quality - outer CV joint
The outer CV joints can be filled with the following grease qualities:
t  Grease for operating at normal temperatures, part no.: -G 052 738 A2-
t  Grease from the relevant repair kit
t  High temperature grease, part no.: -G 052 133 A2-, or part no.: -G 052 133 A3-
Grease quality - inner CV joint
The inner CV joints can be filled with the following grease qualities:
t  Grease from the relevant repair kit
t  High temperature grease, part no.: -G 052 133 A2-, or part no.: -G 052 133 A3-
  Note
t  -G 052 133 A2- Can with a grease quantity of 90 g
t  -G 052 133 A3- Can with a grease quantity of 120 g
t  Grease joint if necessary, when replacing the joint boot.
t  Spread the quantity of grease for the joint evenly in the joint on the left and right.
t  Spread the quantity of grease for the joint boot evenly in the joint boot - only on the side of the joint.
   

Rear suspension, drive shaft > < Repairing drive shaft with inner tripod joint AAR 2000 and outer CV joint