skoda Workshop Repair Guides

Skoda Workshop Service and Repair Manuals

Aligning unit mounting for engine - gearbox > < Installing - engines with identification characters AEH, AKL
Installing - engines with identification characters AVU, BFQ
  Note
t  Always replace the seals and gaskets during assembly work.
t  Replace the self-locking screws and nuts.
t  Clean all threaded holes into which self-locking bolts are inserted, with a thread tap to remove residues of the locking fluid.
t  Coat stud bolts of exhaust manifold with hot bolt paste -G 052 112 A3- before installing.
t  Tightening torques → Chapter.
t  Assembly bracket → Chapter.
t  If the battery is disconnected and reconnected, carry out certain additional operations → Electrical System; Rep. gr.27.
Work procedure
Installation is performed in the reverse order, pay attention to the following points:
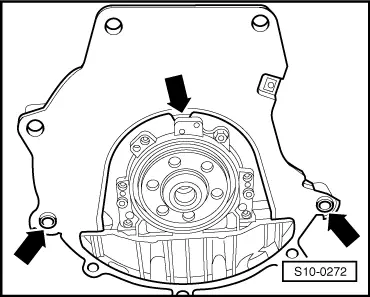
–  Check whether the dowel sleeves for centering the gearbox are present in the cylinder block, insert if necessary.
   
–  Insert intermediate plate on sealing flange and push onto the dowel sleeves -arrows-.
For vehicles with manual gearbox
–  Grease the drive shaft serration with grease -G 000 100-.
–  If necessary check the centering of the clutch disc.
–  Install slave cylinder of hydraulic clutch → 5-Speed Manual Gearbox 02K; Rep. gr.30.
–  Install shift mechanism → 5-Speed Manual Gearbox 02K; Rep. gr.34.
–  Set shift mechanism → 5-Speed Manual Gearbox 02K; Rep. gr.34.
For models with automatic gearbox
  S10-0272
–  Only use approved nuts -arrow- for attaching the drive plate to the torque converter → Electronic catalogue of original parts.
–  Replace lock washer at support bracket of selector lever cable.
–  Install selector lever cable at gearbox or adjust → Automatic Gearbox 01M; Rep. gr.37.
Continued for all vehicles
–  When installing the engine/gearbox assembly, ensure clearance to the assembly carrier as well as to the radiator.
–  Run pressure line of power-assisted steering past the gearbox.
–  Align unit mounting for engine - gearbox → Chapter.
For vehicles with air conditioning
–  Install AC compressor → Heating, Air Conditioning; Rep. gr.87.
  S10-0308
–  To facilitate the positioning of the AC compressor drive the threaded bushings -B- for fixing screws -A- slightly backwards in the direction of the arrow.
Continued for all vehicles
–  Install power-assisted steering hydraulic pump → Chassis; Rep. gr.48.
–  Install the V-ribbed belt → Chapter.
–  Install the right drive shaft and screw the left drive shaft onto the gearbox → Chassis; Rep. gr.40.
–  Install pre-exhaust pipe → Chapter.
–  Install coolant hose → Chapter.
  Note
The drained off coolant must only be then re-used if the cylinder head, cylinder block, radiator or heat exchanger were not replaced.
–  Top up coolant → Chapter.
–  Electrical connections and proper routing → Current flow diagrams, Electrical fault finding and Fitting locations.
–  Install top part of intake manifold → Chapter.
–  Install secondary air pump → Chapter.
  S10-0309
–  Install noise insulation panel in middle as well as on left and right -arrows-. Install air guide parts on outside.
–  Check oil level before starting the engine → BookletOctavia.
–  Adapt the engine control unit to the throttle valve control unit -J338- and to the EGR valve → Vehicle diagnostic tester.
–  Check readiness code, if necessary re-generate → Vehicle diagnostic tester.
–  The basic setting must always be additionally initiated on vehicles with an automatic gearbox → Automatic Gearbox 01M; Rep. gr.01.
–  Perform a test drive and interrogate fault memory and erase → Vehicle diagnostic tester.
  S10-0310

Aligning unit mounting for engine - gearbox > < Installing - engines with identification characters AEH, AKL