skoda Workshop Repair Guides

Skoda Workshop Service and Repair Manuals

Repairing steel assembly carrier > < Removing front or rear rubber-metal bearing
Installing front or rear rubber-metal bearing
Installation is carried out in the reverse order. Pay attention to the following:
The front and rear rubber-metal bearing differ only slightly in the overall height. When installing, pay attention to correct assignment → Electronic catalogue of original parts.
   
The rubber-metal bearing must be installed in direction of orientation.
The tabs of the outer sleeve -arrows A- must point transversely to the direction of travel -arrow C-.
  S42-0245
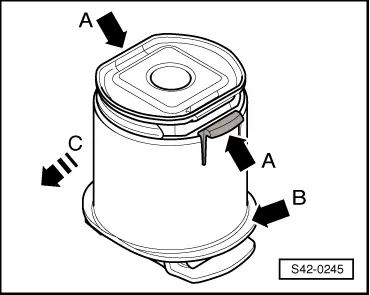
–  Insert special tool together with rubber-metal bearing as shown in the assembly carrier.
  Caution
The pressure plate -T10263/3- must be laid in such a way that the tabs align the outer sleeve of the rubber-metal bearing -arrow A- with the window at the pressure plate -T10263/3--arrow B-.
This positioning is absolutely necessary, as the tabs interlock in the area of the window with the bearing seat after removing the rubber-metal bearing.
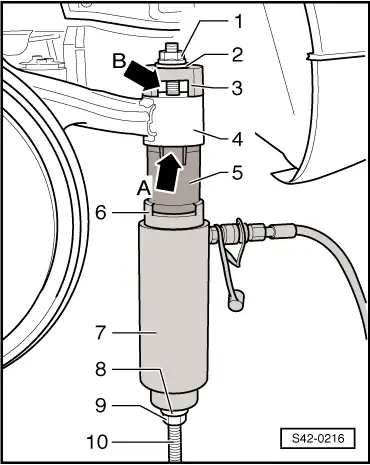
1 - Nut -T10263/1-
2 - Washer, commercially available
3 - Thrust piece -T10263/3-
4 - Assembly carrier
5 - Rubber-metal bearing
6 - Thrust piece -T10263/2-
7 - Hydraulic cylinder e.g. -VAS 6178-
8 - Washer, commercially available
9 - Nut -T10263/1-
10 - Screw -T10263/4-
–  Pretension special tool with rubber-metal bearing.
  S42-0216
–  Carefully install the rubber-metal bearing by actuating the pump, until the collar -arrow B- rests „free of gap“ against the assembly carrier.
–  Perform chassis alignment → Chapter.
  S42-0245
Tightening torques:
Assembly carrier to body
t  Use new screws!
90 Nm + 90°
Wheel bolts120 Nm


Repairing steel assembly carrier > < Removing front or rear rubber-metal bearing