skoda Workshop Repair Guides

Skoda Workshop Service and Repair Manuals

Removing and installing shock absorber > < Summary of components: shock absorber, helical spring (vehicles with four-wheel drive)
Removing and installing coil spring
Special tools and workshop equipment required
t  Spring tensioning device, e.g. -V.A.G 1752/1 -
t  Spring holder, e.g. -V.A.G 1752/3A-
t  Adapter e.g. -V.A.G 1752/9 -
Removing:
–  Remove wheel.
   
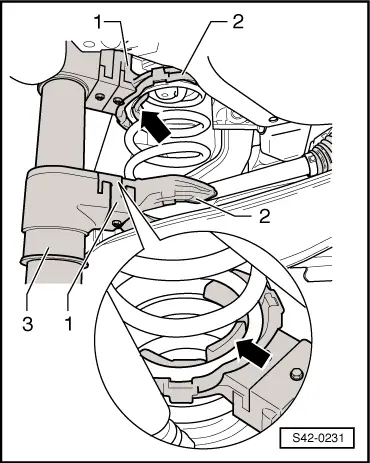
–  Insert spring tensioning device -3-.
  WARNING
Pay attention to the correct seating of the helical spring in the spring tensioner, e.g. -V.A.G 1752/3A- (risk of accident).
–  Tension helical spring sufficiently until it can be taken out.
–  Remove coil spring.
1 - Adapter e.g. -V.A.G 1752/9-
2 - Spring holder, e.g. -V.A.G 1752/3A -
3 - Spring tensioning device, e.g. -V.A.G 1752/1-
Installing:
Installation is carried out in the reverse order. Pay attention to the following:
  Note
  S42-0231
The beginning of the spring -arrow- must be positioned at the stop of the bottom spring seat.
–  Install the helical spring along with the spring seat.
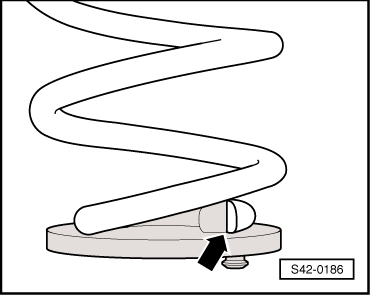
  S42-0186
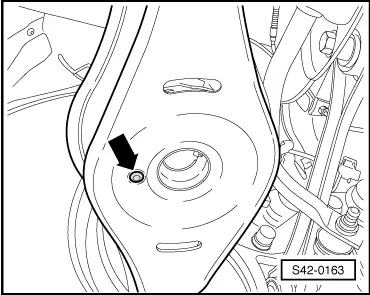
–  Insert the stud of the spring seat into the hole of the bottom suspension arm -arrow-.
  Note
In the fig. the bottom suspension arm is illustrated without protection against stones.
–  Insert top spring seat into the upper spring coil end.
–  Slacken spring. While doing so, the top spring seat must be positioned onto the lug of the body.
–  Remove spring tensioning device.
–  Installing and tightening the wheel.
  S42-0163
Tightening torque:
Wheel bolts120 Nm


Removing and installing shock absorber > < Summary of components: shock absorber, helical spring (vehicles with four-wheel drive)