
Octavia Mk2
| Summary of components of centre console |
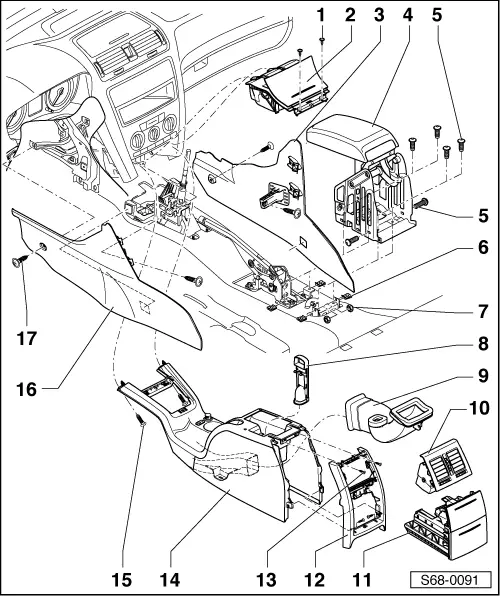
| 1 - | 1.4 Nm |
| 2 - | Ashtray |
| 3 - | Right side cover |
| 4 - | Armrest |
| Removing: |
| – | Remove centre console (Pos. 14). |
| – | Remove air guide (Pos. 9). |
| – | Remove screws (Pos. 5) and take out armrest. |
| Installing: |
| – | Installation is carried out in the reverse order. |
| 5 - | 5 Nm |
| 6 - | Plate nut |
| 7 - | Nut |
| 8 - | Air valve |
| 9 - | Air deflector |
| 10 - | Rear flow vent |
| 11 - | Rear ashtray |
| 12 - | Rear support |
| 13 - | 1.4 Nm |
| 14 - | Centre console |
| Removing: |
| – | Switch off the ignition and all electrical components. |
| – | Remove cover for gearshift lever → Transmission System → Rep. gr.34. |
| – | Remove screws (Pos. 1) and take out ashtray (Pos. 2). |
| – | Release plug for ashtray illumination. |
| – | Remove screws (Pos. 17) and take off both side covers (Pos. 3 and Pos. 16) to the front. |
| – | Remove screws (Pos. 15). |
| – | Take out rear ashtray (Pos. 11) and disconnect plug for rear ashtray illumination or plug from the rear seat heating control (if present). |
| – | Remove rear vent (Pos. 10). |
| – | Remove screws (Pos. 13) and take off rear support (Pos. 12). |
| – | Pull on the handbrake and push the centre console upwards. |
| – | Disconnect plug from cigarette lighter and from central locking switch. |
| Installing: |
| – | Installation is carried out in the reverse order. |
| 15 - | 1.4 Nm |
| 16 - | Left side cover |
| 17 - | 1.4 Nm |