skoda Workshop Repair Guides

Skoda Workshop Service and Repair Manuals

Bleeding the brake system of air without using the brake filling and bleeding device > < Bleeding brake system
Bleeding the brake system of air with the brake filling and bleeding device
Special tools and workshop equipment required
t  
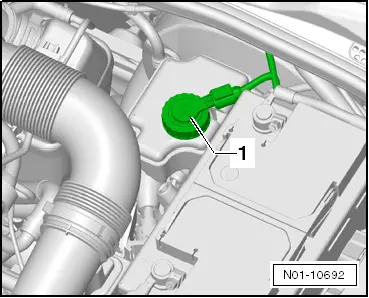
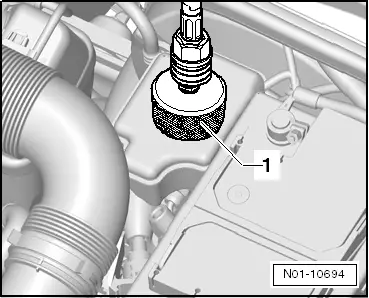
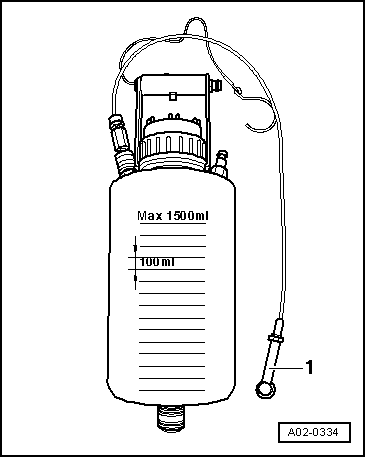
Brake filling and bleeding device, e. g. -VAS 5234-
t  Brake fluid → Chapter
  WARNING
t  Brake fluid is hygroscopic, i.e. it retains humidity from the ambient air, and must therefore always be stored in airtight containers.
t  Brake fluid must never come into contact with fluids containing mineral oils (oil, petrol, cleaning agent). Mineral oils damage the plugs and boots of the brake system.
t  Drained (used) brake fluid must never be used again.
t  Brake fluid is toxic, avoid skin contact.
t  Because of its caustic effect brake fluid must not come into contact with paint.
t  Rinse any brake fluid spills with a lot of water.
t  Dispose of brake fluid in compliance with the applicable waste disposal and environmental regulations.
t  Bleeding brake system on vehicles with ABS or TCS/ESP, as for vehicles without ABS.
t  Only use new brake fluid in accordance with the specification → Chapter.
A pre-pressure of 0.2 MPa (2 bar) is required to bleed the brake system.
   
–  Unscrew cap -1- from the brake fluid reservoir
  N01-10692
–  Connect the thread plug -1- of the brake filling and bleeding device e.g. -VAS 5234- to the brake fluid reservoir.
–  Provide a suitable catch pan for used brake fluid.
–  Remove the dust caps of the bleeder screws at the brake calipers.
–  Switch on the brake filling and bleeding device e.g. -VAS 5234- and activate the system with a brake fluid pressure of 0.2 MPa → Operating instruction of the brake filling and bleeding device.
  N01-10694
–  Fit the hose of the bleeding bottle-1- onto the corresponding bleeder screw.
–  Slacken bleeder screw.
–  Extract as much brake fluid as possible until even the smallest air bubbles have escaped.
–  Close bleeder screw.
–  Repeat this procedure for all brake calipers in the prescribed sequence until the brake system is fully bled.
Bleeding sequence
1.  Rear right brake caliper
2.  Rear left brake caliper
3.  Front right brake caliper
4.  Front left brake caliper
–  Inspect pedal position and idle travel at brake pedal. Idle travel: max. 1/3 of pedal travel.
–  Repeat the whole procedure if necessary (several times), until perfect bleeding is achieved.
Vehicles with ABS
–  Perform basic setting of the ABS control unit using the diagnostic unit -VAS- → Vehicle diagnostic tester.
–  Proceed by referring to the read-out on the display of the diagnostic unit.
  Caution
Before the basic setting of the ABS control unit is performed, first of all the brake system must be fully bled until even the smallest air bubbles have escaped from the system.
The air bubbles would penetrate into the ABS hydraulic unit when performing the basic setting of the ABS control unit.
It is very difficult to remove these air bubbles from the ABS hydraulic unit.
Continued for all vehicles
–  After bleeding close the relevant bleeder screw and fit dust cap.
–  If necessary, correct the brake fluid level in the brake fluid reservoir.
–  Disconnect the brake filling and bleeding device.
–  Disconnect the brake filling and bleeding device from the brake fluid reservoir.
–  Perform a test drive. While doing so, at least one ABS adjustment must be carried out on vehicles with ABS!
  A02-0334

Bleeding the brake system of air without using the brake filling and bleeding device > < Bleeding brake system