skoda Workshop Repair Guides

Skoda Workshop Service and Repair Manuals

Tightening torques > < Remove angle gearbox
Install angle gearbox
–  The installation occurs in reverse order, while paying attention to the following.
  Note
t  On installed manual gearbox, lightly grease the rigid serration at differential gear with grease for the plug serration of the clutch disc -G 000 100-.
t  If applicable, install the heat shield → Anchor when replacing the angle gearbox.
t  When attaching the angle gearbox to the manual gearbox slowly turn the flange shaft (carefully push angle gearbox to gearbox up to stop).
t  Do not pull angle gearbox with the fixing screws against the manual gearbox, otherwise the angle gearbox can tilt and the fixing eyes can break off.
t  Tighten gearbox/angle gearbox connecting screws crosswise (always replace screws → Electronic Catalogue of Original Parts).
–  Attach angle gearbox to gearbox and tighten connecting screws crosswise.
   
For vehicles without particle filter
–  Install gearbox carrier at engine and angle gearbox -arrows-, to do so pay attention to the tightening sequence of the screws → Chapter.
–  If present, install oil line for exhaust turbocharger -A- at engine.
  S34-1049
For vehicles with particle filter
–  Install gearbox carrier at engine and angle gearbox, to do so pay attention to the tightening sequence of the screws -arrows 1, 2- and -3- → Chapter.
–  Install the support -A- for exhaust gas turbocharger, to do so attach the support on the exhaust gas turbocharger and screw in the hollow screw -B- with new O-rings → Engine; Rep. gr.21.
  S34-10006
–  Remove plugs -T10460- from angle gearbox.
–  Carefully right drive in flange shaft, to do so turn.
–  Install particle filter with bracket for particle filter → Engine; Rep. gr.26.
For all vehicles
  N34-11716
–  Tighten the screw of the flange shaft -arrow 1- with socket insert -T10107A-.
–  After installing the right flange shaft, check the oil level in the angle gearbox → Chapter, to do so unscrew the oil filler plug -B-.
–  Screw the right drive shaft onto the flange shaft of the gearbox → Chassis; Rep. gr.40.
  S34-1047
Vehicles with auxiliary heating.
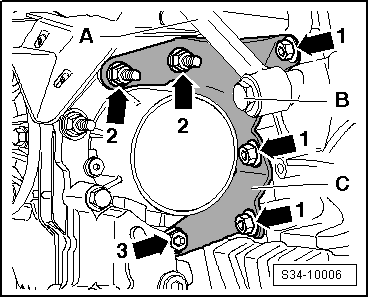
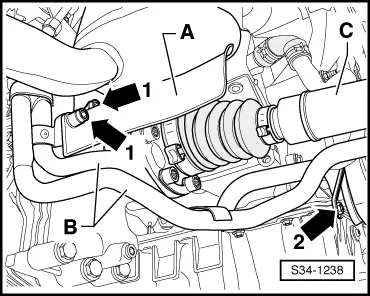
–  On these vehicles, fit the coolant pipes -B- onto the double screws at the angle gearbox and install on the engine -arrow 2-.
For all vehicles
–  Install heat shield -A- for drive shaft, if present -arrows 1-.
–  Install assembly carrier with pendulum support, anti-roll bar, consoles, steering gear and track control arms → Chassis; Rep. gr.40.
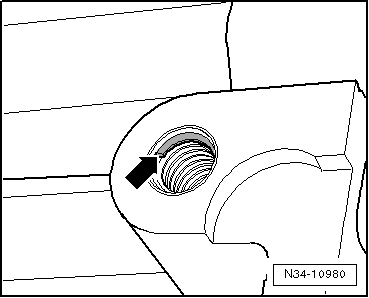
  Note
t  As of gearbox manufacturing date 28.05. 07, the threaded inserts are located in the bolt-holes for the pendulum support (e.g. „Heli-Coil“).
  S34-1238
t  Distinguishing feature: Shoulder at first thread turn -arrow-.
t  Pay attention to the corresponding fixing screws and the tightening torque for the pendulum support → Engine; Rep. gr.10.
If the shift mechanism was removed from the gearbox:
–  Attach shift mechanism to the gearbox and adjust shift mechanism.
t  Remove and install shift mechanism (Octavia II) → Chapter , adjust shift mechanism → Chapter.
t  Remove and install shift mechanism (Superb II) → Chapter , adjust shift mechanism → Chapter.
t  Remove and install shift mechanism (Yeti) → Chapter , adjust shift mechanism → Chapter.
–  Screw propshaft onto the flange of the angle gearbox → Chapter.
–  Install all supports for exhaust system at gearbox and front exhaust pipe → Engine; Rep. gr.26.
–  Assemble exhaust system free of stress and install bracket for the exhaust system at the assembly carrier → Engine; Rep. gr.26.
–  Install the front right wheelhouse liner → Body Work; Rep. gr.66.
–  Install the noise insulation → Body Work; Rep. gr.50.
–  Install front wheel → Chassis; Rep. gr.44.
–  If the front left vehicle level sensor -G78- was removed, then the headlight beam setting must be checked → Electrical System; Rep. gr.94.
  N34-10980

Tightening torques > < Remove angle gearbox