Octavia Mk2
|

| 1 - | 15 Nm |
| 2 - | Drive chain sprocket |
| q | at the crankshaft |
| q | removing and installing → Chapter |
| 3 - | Dipstick |
| q | Oil level must not exceed the max. marking |
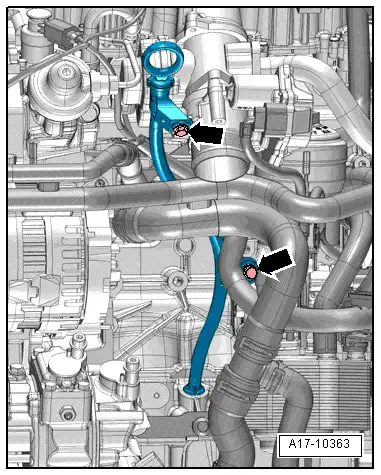
| 4 - | Filler funnel |
| q | The filler funnel and the guide pipe are one component part |
| q | Tightening torque → Fig. |
| 5 - | Guide tube |
| q | The filler funnel and the guide pipe are one component part |
| q | Tightening torque → Fig. |
| 6 - | Oil injection nozzle |
| q | for piston cooling |
| q | removing and installing → Fig. |
| 7 - | Pressure valve, 27 Nm |
| q | opens at a pressure of 0.25 ... 0.32 MPa (2.5 ... 3.2 bar) |
| q | replace without sealant |
| q | removing and installing → Fig. |
| 8 - | O-ring |
| q | replace |
| 9 - | Intake manifold |
| q | Clean strainer if dirty |
| 10 - | Baffle |
| 11 - | Right charge air pipe |
| q | on the inlet side → Chapter |
| 12 - | 8 Nm |
| 13 - | Oil pan |
| q | removing and installing → Chapter |
| q | install with silicone sealant -D 176 404 A2- |
| 14 - | Drain plug, 30 Nm |
| q | with integrated gasket ring |
| q | replace |
| 15 - | 10 Nm |
| q | replace |
| 16 - | Oil level and oil temperature sender -G266- |
| q | check → Vehicle diagnostic tester |
| q | removing and installing → Chapter |
| 17 - | O-ring |
| q | replace |
| 18 - | Oil pump |
| q | with safety valve 1,2 MPa (12 bar) |
| q | removing and installing → Chapter |
| q | before installing, check whether both dowel sleeves are present |
| q | if there is any scoring on the contact surfaces of the gears, replace |
| q | Tighening torque of oil pump cover at oil pump housing: 10 Nm |
| 19 - | Oil pump sprocket |
| q | Fits onto oil pump shaft in one position only |
| 20 - | Right charge air pipe |
| q | on the outlet side → Chapter |
| 21 - | 25 Nm |
| 22 - | Oil pump chain |
| q | before removing mark running direction |
| q | check for wear |
| 23 - | Chain tensioner |
| q | do not disassemble |
| q | Replace chain tensioner if spring is broken |
| q | Check fitting position |
| q | When installing, hook on the spring and pretension |
| q | tighten to 16 Nm |
| 24 - | Sealing flange on the belt pulley side |
| q | must be positioned on dowel sleeves |
| q | removing and installing → Chapter |
| q | Replace crankshaft seal on belt pulley side → Chapter |
|

|
