skoda Workshop Repair Guides

Skoda Workshop Service and Repair Manuals

Relacing shield with transparent washer > < Adjust/replace dash panel insert
Removing and installing the dash panel insert
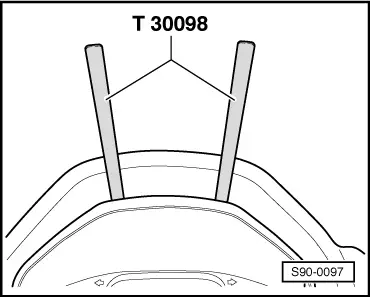
Special tools and workshop equipment required
t  Release tool -T 30098-
  Note
t  After reading in the information stored in the control unit, the work sequence „adjust/replace dash panel insert“ must be carried out before replacing the dash panel insert → Chapter.
t  The dash panel insert must not be disassembled, only the shield with transparent washer attached with clips is replaceable → Chapter.
Removing
–  Switch off the ignition and all electrical components.
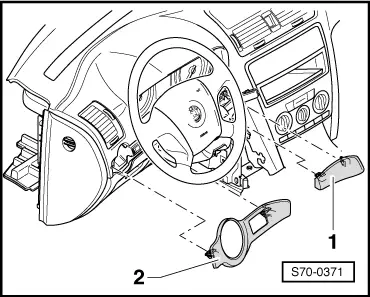
–  Pull steering wheel out fully and lock it in its lowest position.
–  Remove light switch → Chapter.
   
–  Release catches and remove the left -2- and right -1- cover.
–  Push out the gap cover between dash panel insert and top steering column trim panel towards you and remove together with the top steering column trim panel.
  S70-0371
–  Release screws -arrows- (1,5 Nm).
  S90-0096
–  Insert release tool -T 30098- as shown in the figure and release the upper clips of the dash panel insert (they must click audibly).
–  Pull out the dash panel insert slightly and unplug the plug connection.
–  Take out the dash panel insert.
Install
–  Installation is carried out in the reverse order.
  S90-0097
Dash panel insert up to MY 2008 - rear view
  S90-0094
Dash panel insert as of MY 2009 - rear view
  Note
t  For fault finding perform self-diagnosis → Chapter.
t  Contact assignment of plug connection → Current flow diagrams, Electrical fault finding and Fitting locations.
  S90-0113

Relacing shield with transparent washer > < Adjust/replace dash panel insert