Skoda Workshop Service and Repair Manuals
HOME
FEATURES
MENU
INDEX
ABOUT US
Removing and installing parts of the heater unit - Part 1 >
< Repairing the heating
Roomster
Heating, ventilation, air conditioning system
Heating, Air conditioning / Heating
Removing and installing parts of the heater unit - Part 2
Removing and installing the control unit for temperature flap
Removing and installing the control unit for temperature flap
Removing
–
Remove the centre console
→ Body Work; Rep. gr.68
.
–
Removing the dash panel
→ Body Work; Rep. gr.70
.
–
Remove left footwell vent.
–
Remove flex shaft
-1-
from the control unit
-3-
→ Chapter
.
–
Release catch
-2-
by pressing in the
-direction of the arrow A-
.
–
Swivel out control unit
-3-
in the
-direction of the arrow B-
and remove from brackets
-4-
.
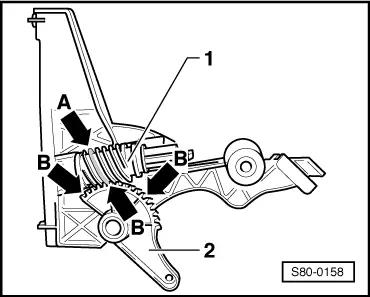
Install
Note
t
Before installing, check whether the position of the worm wheel
-1-
and the gear segment
-2-
correspond.
t
The higher turn (darker)
-arrow A-
must engage in the deeper gear openings
-arrow B-
.
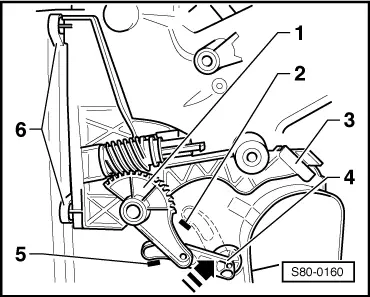
–
Mark the positions
-2-
and
-4-
of the lever for the temperature flap
-3-
in the end positions (flap fully open/flap fully closed) on the housing.
–
Switch control unit
-1-
to position „flap closed“.
–
Close temperature flap.
Position lever
-4-
down to stop.
–
Insert the control unit
-1-
in the brackets
-6-
and guide into the housing in the
-direction of the arrow-
.
Control unit bolt
-1-
must engage in the slide
-4-
.
–
press the control unit into the catch
-3-
.
–
Insert flex shaft into the control unit
-1-
→ Chapter
.
–
Check operation of the control unit.
It must be possible to adjust the temperature flap to its end position in a smooth and easy way (markings
-2-
and
-5-
).
If the temperature flap adjustment is N.O.K.:
–
Remove control unit again and install - as described above.
If the temperature flap adjustment is O.K.:
–
Install flex shaft of the positioning unit.
–
Install left footwell vent.
–
Install the dash panel
→ Body Work; Rep. gr.70
.
–
Install the centre console
→ Body Work; Rep. gr.68
.
Heating, ventilation, air conditioning system
Heating, Air conditioning / Heating
Removing and installing parts of the heater unit - Part 2
Removing and installing parts of the heater unit - Part 1 >
< Repairing the heating
 Note
Note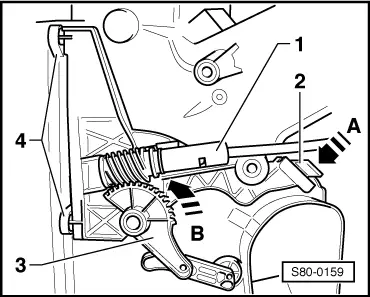
 Note
Note