skoda Workshop Repair Guides

Skoda Workshop Service and Repair Manuals

Testing the compression > < For engines with identification characters BZG, CGPA, CGPB, CEVA, CJLA, BME
Removing and installing the cylinder head
Special tools and workshop equipment required
t  Camshaft fixer/locator -T10123-
t  Support -T10358-
t  Fixing bolts -T10121-
t  Extractor -T10094A-
t  Sealant remover gasket stripper (bearing code GST, bearing article no. R 34402), manufacturer Retech s.r.o.
t  Cleaning and degreasing agent, e.g. -D 009 401 04-
t  Protective goggles and gloves
Removing
Requirements
l  Engine temperature should not exceed 35 °C, because the cylinder head could be twisted when slackening the screws.
l  No piston must be standing at TDC.
–  Remove timing case → Chapter.
–  Remove the camshaft sprocket, if necessary the camshaft sprockets → Chapter.
–  Removing the intake manifold → Chapter.
–  Remove fuel strip together with injectors → Chapter.
–  Remove all other connecting hoses, coolant regulator and intake hoses from the cylinder head.
–  Unscrew the exhaust manifold → Chapter.
–  Release fixing screw for gearbox and screw in the bracket -T10358- as shown.
   
–  Hang the hook of the supporting device -MP9-200 (10-222A)- at the bracket -T10358- as shown.
  N15-10347
–  Unhook the hook -1- from the left lifting eye and push the spindle onto the supporting device -MP9-200 (10-222A)- on the left.
–  Remove cylinder head cover → Chapter.
–  Loosen the cylinder head screws in two stages and remove in the specified order.
  N15-10348
For engines with identification characters BBM, CHFA
  S15-0214
For engines with identification characters BZG, CGPA, CGPB, CEVA, CJLA, BME
Continued for all engines
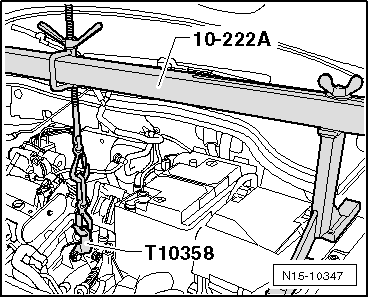
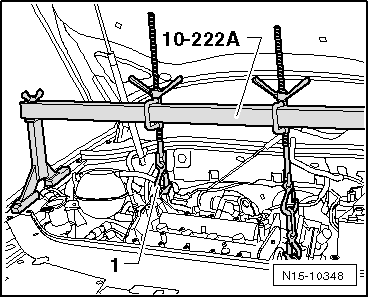
–  Carefully remove the cylinder head.
  Note
Do not lay the cylinder head on the surface with the head combustion chamber - danger of damaging the spark plugs.
Install
l  The pistons must not be positioned at top dead centre.
  WARNING
Wear protective gloves and goggles when working with gasket remover and degreasing agent!
Remove gasket residues on cyliner head with sealant remover.
  Note
t  Always replace the cylinder head bolts.
t  There must not be any oil or coolant present in the threaded holes for the cylinder head bolts.
t  Remove the new cylinder head gasket from its wrapping immediately before fitting.
t  Treat the new seal with the utmost care. Any damage will result in leaks.
–  Check whether both sleeves which are intended for the guide of the cylinder head, are inserted into the cylinder block above; insert if necessary.
–  Position the new cylinder heads. The legend (part number) must be legible.
–  Insert the cylinder head.
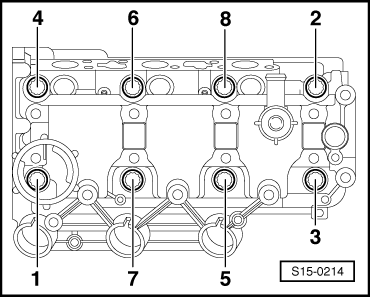
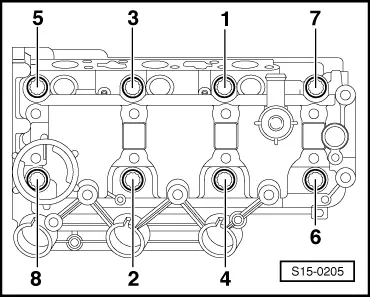
–  Insert new cylinder head screws into the screw contact surface lightly oiled and tighten by hand.
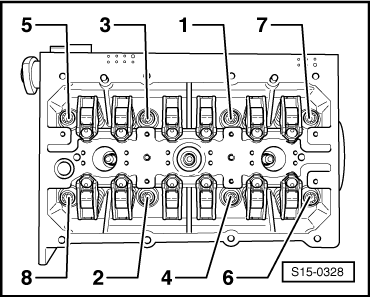
–  Tighten cylinder head in three stages in the following order:
  S15-0327
For engines with identification characters BBM, CHFA
  S15-0205
For engines with identification characters BZG, CGPA, CGPB, CEVA, CJLA, BME
Continued for all engines
1.  Pre-tighten with torque wrench:
   Stage I = 30 Nm
2.  Tighten further with a rigid wrench:
   Stage II = torque a further 90° (1/4 turn)
Stage III = once again torque a further 90° (1/4)
Further installation occurs in reverse order. Pay attention to the following:
t  Carefully crank engine at least 2 revolutions to ensure that no valve touches the piston when the engine is started.
  S15-0328

Testing the compression > < For engines with identification characters BZG, CGPA, CGPB, CEVA, CJLA, BME